The bathroom is a room that most people use twice a day, every day — and yet it’s often the last room to receive design attention. A bathroom that works well and feels good to be in changes the quality of daily life in a small but genuine way: the morning feels different when the room is calm and considered rather than cluttered and poorly lit. The upgrade doesn’t require a full renovation. Many of the most impactful changes are improvements to lighting, storage, linens, and detail — things that cost relatively little but change how the bathroom feels every time you use it. These 20 ideas cover everything from structural decisions (tile, vanity, layout) to the smaller additions that complete the experience.
1. Choose a Calming Color Palette
Best for: Any bathroom — color is the foundation that determines whether the space feels restful or stimulating
The most successful bathroom color palettes share a quality: they’re muted, slightly desaturated versions of their base color rather than fully saturated ones. Warm white, soft sage green, warm taupe, dusty blue, and greige consistently produce bathrooms that feel calm and welcoming rather than demanding attention.
The specific shade of white or neutral matters considerably in a bathroom. Pure bright white can look clinical and harsh under artificial light. Off-white, warm cream, or a very pale warm grey creates a softer, more spa-like atmosphere that ages better and photographs better.
Smart tip: Test paint colors on the actual bathroom wall and observe them under the specific light conditions of your bathroom — morning natural light, evening artificial light, and with the door closed. Bathroom lighting is often very different from the rest of the house and colors behave differently in it.
Mistake to avoid: Choosing a cool grey or blue-toned white and expecting it to feel warm. Cool tones in a bathroom with cool artificial lighting create a genuinely cold, unwelcoming atmosphere. If your bathroom has limited natural light or cool-toned fixtures, choose warm-undertoned colors to compensate.
2. Upgrade to a Floating Vanity
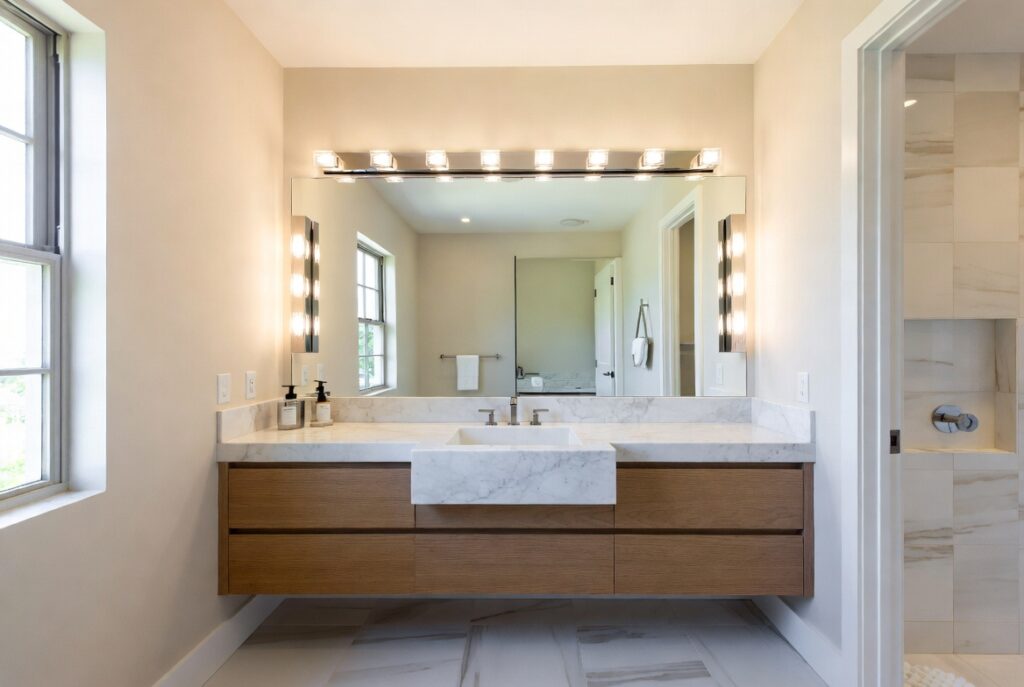
Best for: Any bathroom — floating vanities visually expand the space and modernize the room immediately
A floating (wall-mounted) vanity — a vanity cabinet with no floor-touching legs or base — makes a bathroom feel larger because you can see the floor beneath it. The visual of continuous floor extending under the vanity gives the eye more floor plane to read, which the brain registers as more space.
Floating vanities also make cleaning easier (no base to work around), look more contemporary than floor-standing vanities, and can be mounted at any height — which is particularly valuable for people who are taller or shorter than average.
Smart tip: Mount the vanity at a height that suits the primary users rather than at standard height. Standard vanity height is 32 to 34 inches — but many people find 36 inches significantly more comfortable for daily use because it reduces the forward lean required. Floating vanities make custom height effortless.
Mistake to avoid: Choosing a floating vanity with inadequate storage for the bathroom’s actual needs. Floating vanities often have less storage than comparable floor-standing units. Assess your storage requirements honestly — toiletries, towels, cleaning supplies, medications — and choose a vanity that accommodates them, supplemented by additional storage elsewhere in the room if necessary.
3. Install Large Format Tiles
Best for: Any bathroom — large tiles reduce grout lines and create a more expansive, luxurious appearance
Large format tiles (24×24 inches, 24×48 inches, or larger) make bathrooms feel bigger because fewer grout lines means fewer visual interruptions across the floor and wall surfaces. The eye reads the tile surface as more continuous — closer to the appearance of stone slab — which creates a more refined, spa-like quality.
Large tiles also mean fewer grout lines to clean — a practical benefit that compounds over years of bathroom maintenance. A bathroom with 4×4-inch tiles has approximately 10 times more grout than the same bathroom tiled in 24×24 format.
Smart tip: Use the same tile on the floor and shower walls for a cohesive, high-end look. A continuous material from floor to shower walls to shower ceiling (in a wet room application) creates the seamless, hotel-quality appearance that most bathroom aspirations reference.
Mistake to avoid: Using very large tiles (over 24 inches) in a very small bathroom without considering the visual result. In a tiny bathroom, one or two tiles fill the entire floor, which can look odd rather than expansive. Consult with a tile specialist about appropriate sizes for specific room dimensions.
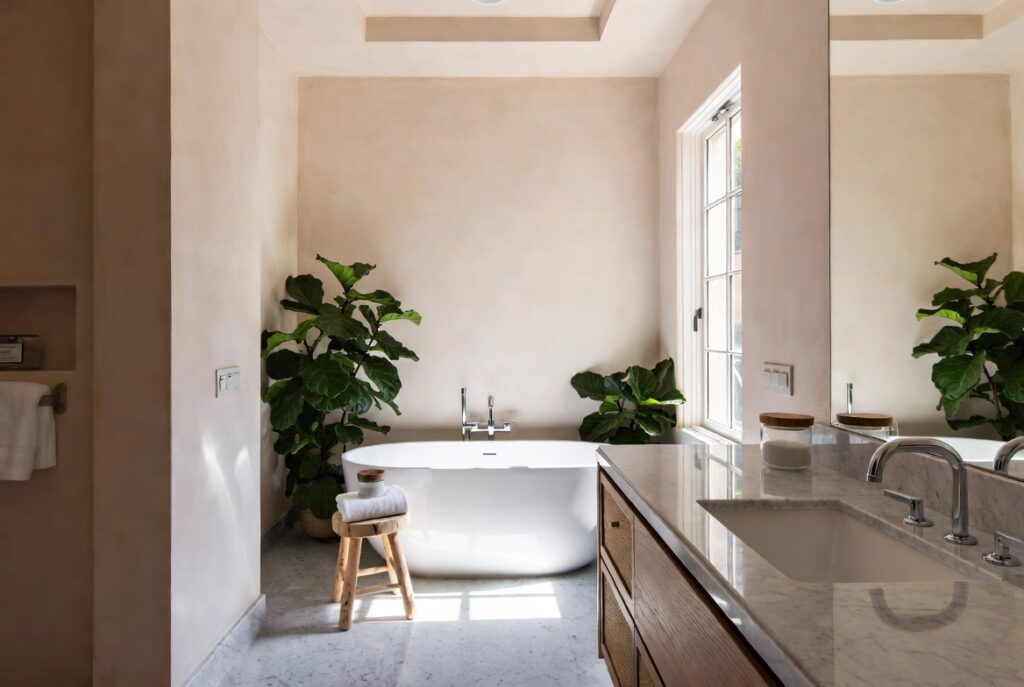
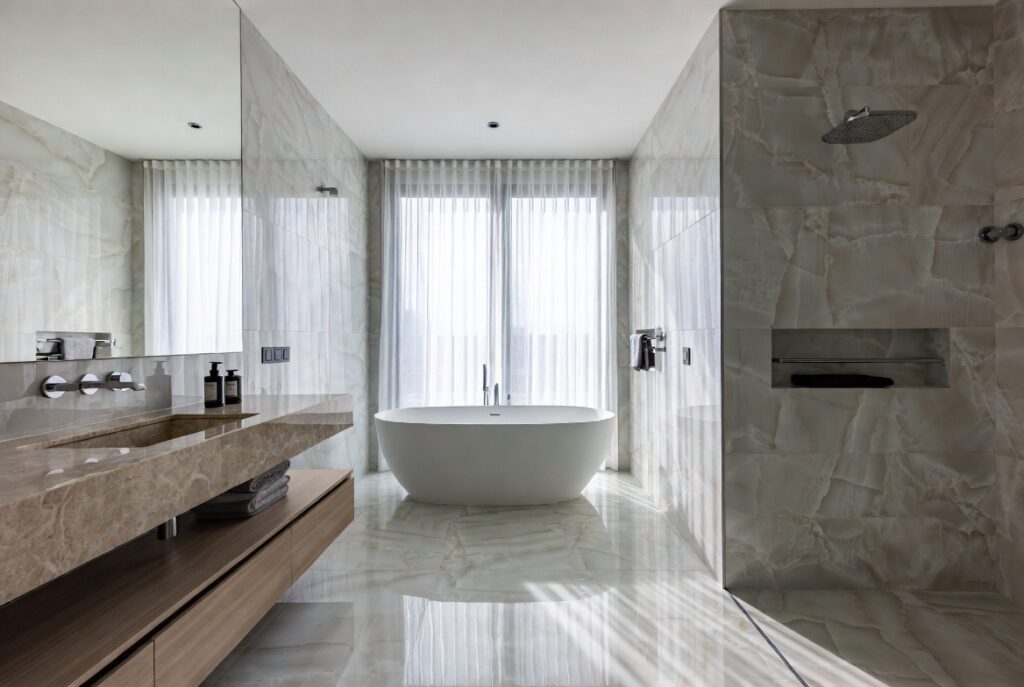
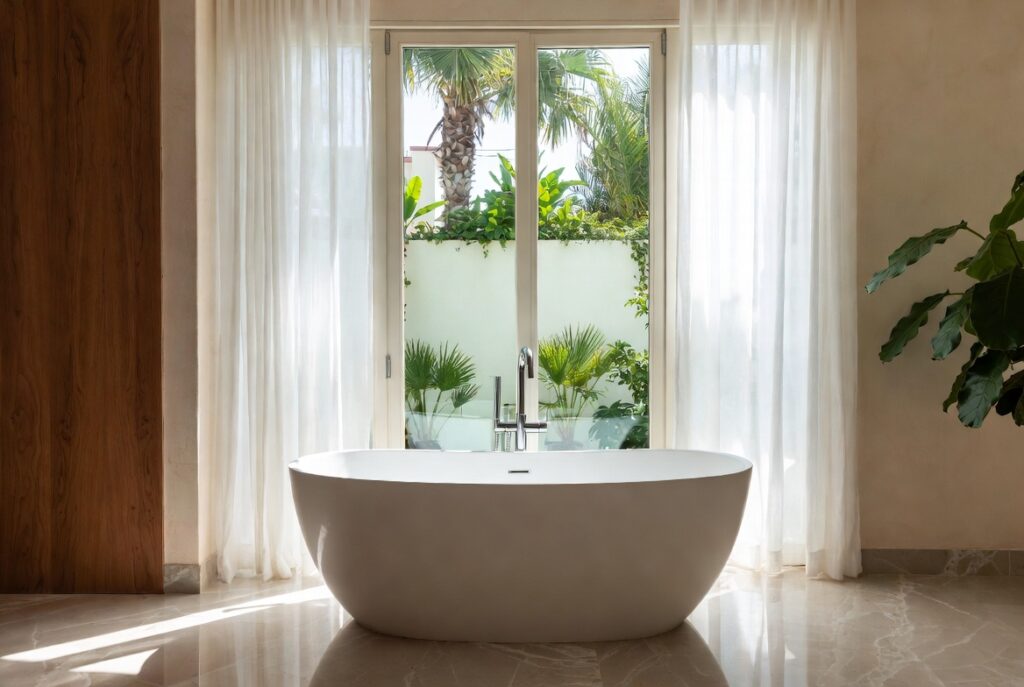
4. Add a Freestanding Bathtub
Best for: Master bathrooms with adequate space — typically at least 8×10 feet to accommodate a freestanding tub comfortably
A freestanding bathtub is the single most dramatic change available in bathroom design. It instantly signals that the bathroom is a destination rather than purely a utility space. The sculptural quality of a freestanding tub — visible on all sides, treated as a piece of furniture rather than a built-in element — gives the bathroom an entirely different character.
Freestanding tub materials: acrylic (most affordable, lightweight, easy to install, wide style range); stone resin (heavy, excellent heat retention, premium feel); cast iron (extremely durable, very heavy, requires floor reinforcement); copper or stone (statement materials for high-end installations).
Smart tip: Position the freestanding tub where it can be seen from the door — it should be the first thing visible when entering the bathroom. A freestanding tub tucked in a corner or hidden from the entrance loses much of its design impact. Think of it like positioning a statement piece of furniture.
Mistake to avoid: Installing a freestanding tub without considering practical access to the taps. Freestanding tubs require floor-mounted or wall-mounted taps positioned close enough to the tub to be comfortable when bathing. Taps mounted too far from the entry point create awkward reaching while filling or bathing.
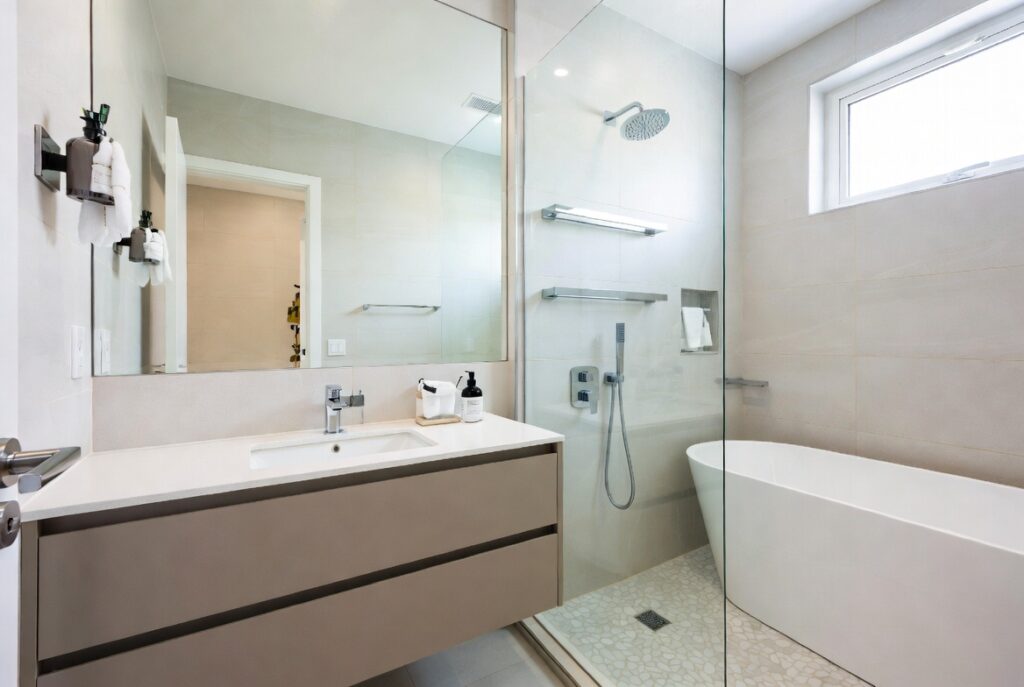
5. Upgrade the Shower Experience
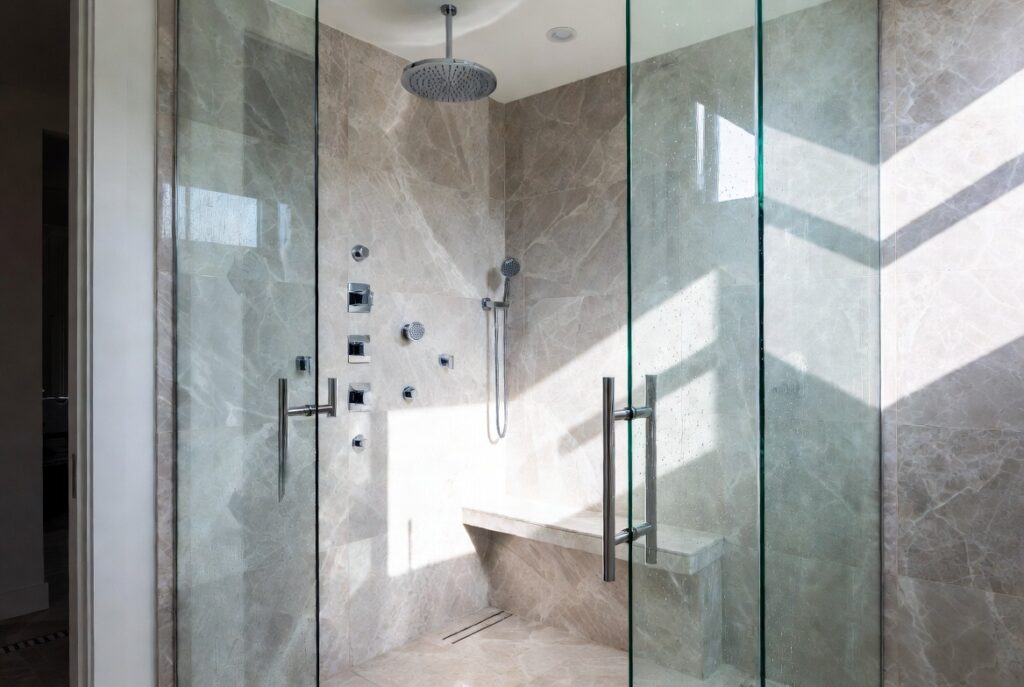
Best for: Any bathroom — shower upgrades provide daily benefit to everyone who uses the bathroom
Most shower experiences are limited by one element — the showerhead. A standard low-flow showerhead replaced with a high-pressure rainfall showerhead, a body spray system, or a multi-function handset changes the shower from a functional activity to a genuinely enjoyable one. This is one of the highest return-per-dollar improvements available in any bathroom.
The options: a rainfall showerhead (mounted overhead, provides full coverage — the single most impactful upgrade); a thermostatic shower system (maintains exact temperature without adjustment — eliminates temperature fluctuation); a steam shower generator (converts an enclosed shower into a steam room); or a combination of head types in a custom shower.
Smart tip: If replacing just one element, replace the showerhead with a quality rainfall model. The installation is a simple DIY project for most shower types — remove the old head, apply thread tape to the new one, and screw it in. The improvement in daily shower experience is immediate and consistent.
Mistake to avoid: Installing a large rainfall showerhead without checking the home’s water pressure. Rainfall heads require adequate water pressure to perform properly — in homes with low water pressure, a large overhead showerhead produces a disappointing trickle rather than the satisfying rainfall effect. Check pressure or install a pump before upgrading.
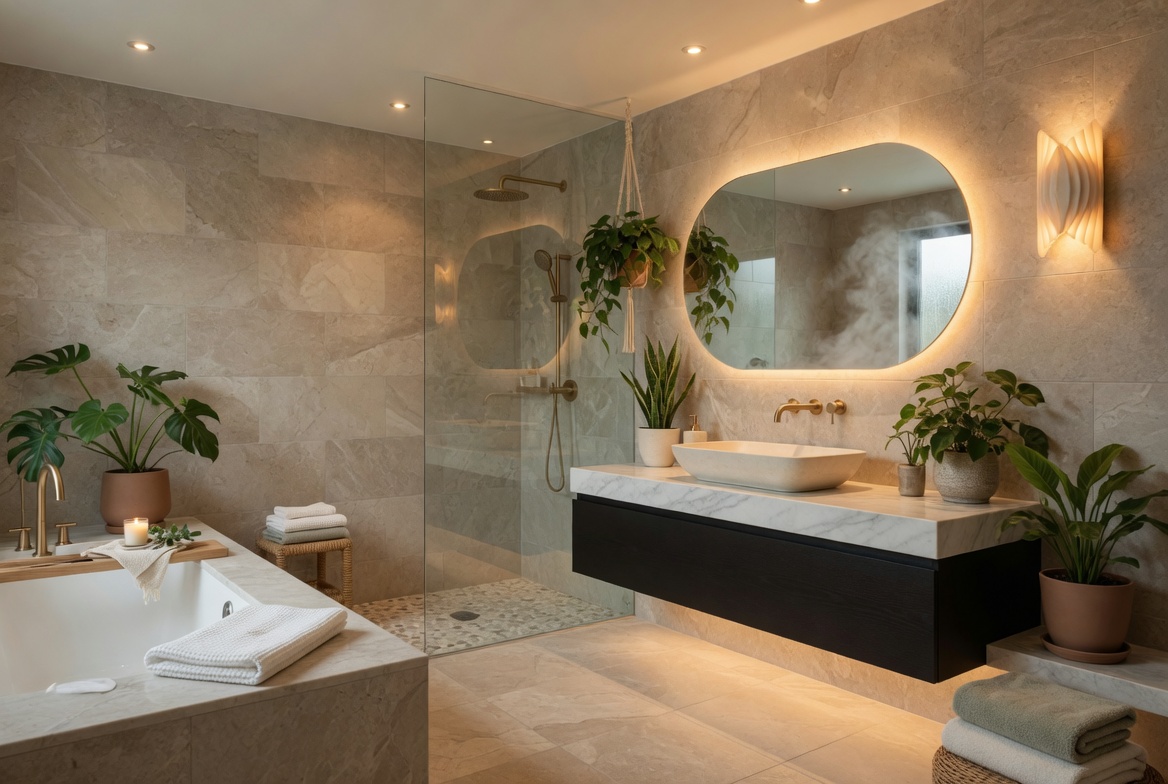
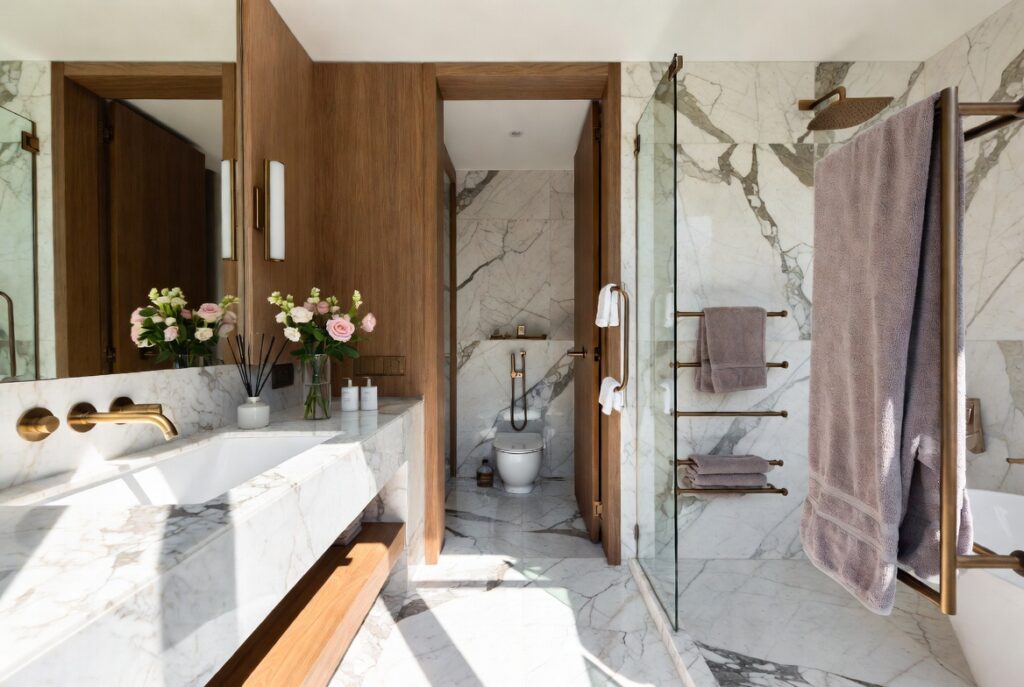
6. Use Natural Stone and Marble
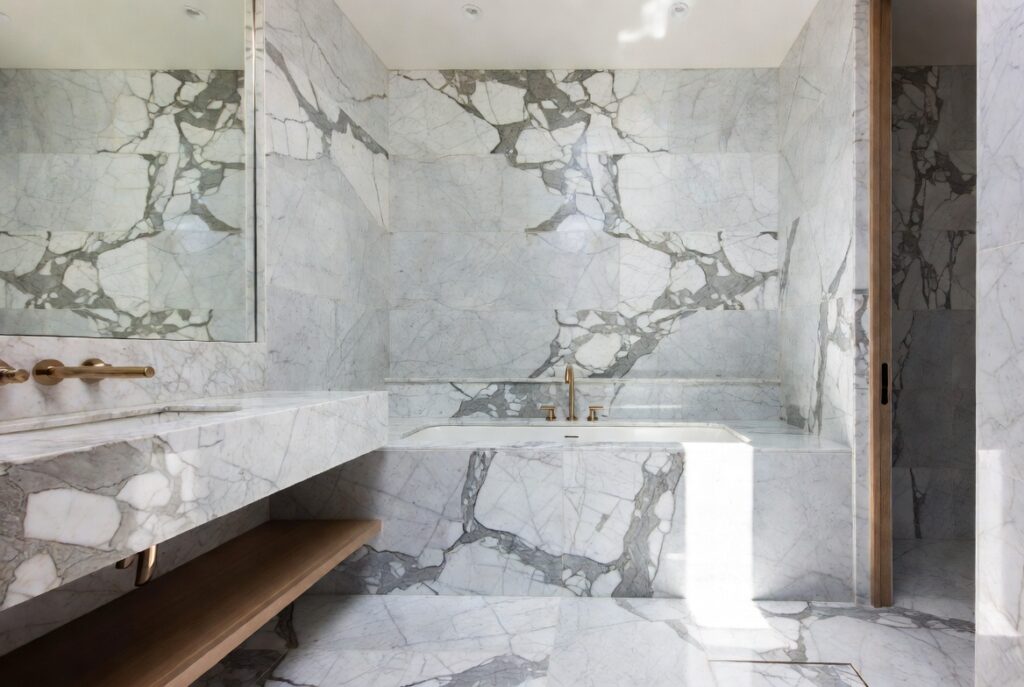
Best for: Bathrooms where a luxury, tactile quality is the goal
Natural stone — marble, limestone, travertine, slate — gives a bathroom a quality that no ceramic or porcelain tile fully replicates. The variation in natural stone (each piece is genuinely unique), the coolness underfoot, and the way it responds to light creates an atmosphere of material honesty and quality that defines the best hotel bathrooms worldwide.
The most versatile bathroom stones: Carrara marble (white with soft grey veining, the classic choice); limestone (warm buff tones, matte surface, softly aged quality); travertine (honeyed tones, slightly irregular surface, Mediterranean character); slate (dark, dramatic, excellent grip when textured).
Smart tip: Use marble in one location — a vanity countertop, a shower niche, a feature wall — rather than throughout the entire bathroom. Marble used selectively reads as considered luxury. Marble used everywhere can look overwhelming and makes maintenance more demanding.
Mistake to avoid: Installing marble without sealing it properly before use and without understanding its maintenance requirements. Marble is porous and stains from acidic substances (soap, shampoo, cleaning products) permanently if not sealed. Seal before installation and re-seal annually; use only pH-neutral cleaning products.
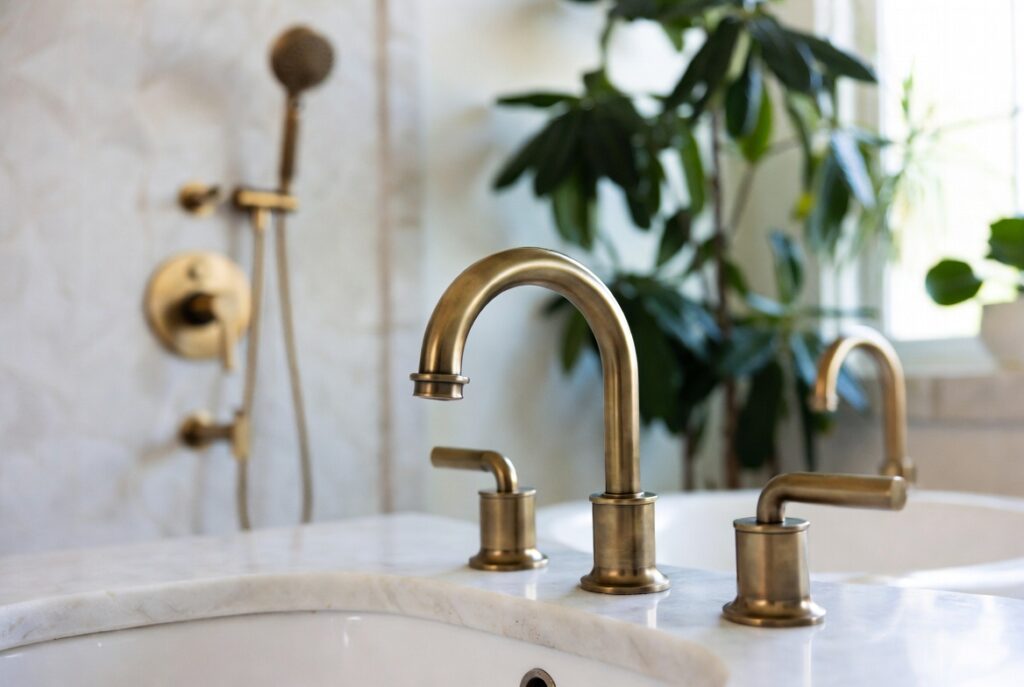
7. Add Warm Brass Fixtures
Best for: Any bathroom — warm metal finishes add sophistication and warmth that chrome and stainless cannot
Warm brass — whether antique brass, brushed gold, or unlacquered brass that develops its own patina — has become the dominant premium bathroom fixture finish because it adds warmth and sophistication that cool metals (chrome, stainless) don’t provide. Against white or neutral bathroom surfaces, warm brass creates a richness that makes a bathroom feel genuinely elevated.
The key is consistency: mixing multiple metal finishes in the same bathroom — brass taps, chrome towel rail, stainless accessories — creates a collected, accidental quality rather than a designed one. Choose one warm metal finish and apply it across all hardware: taps, towel rail, toilet roll holder, handles, light fixtures.
Smart tip: Brushed brass is more forgiving to maintain than polished brass — it shows water spots and fingerprints less, and minor scratches are less visible. For bathroom fittings that see daily use and water contact, brushed finishes are more practical than polished.
Mistake to avoid: Using brass finishes in a bathroom with a very cool, minimalist aesthetic. Warm brass is a warm-toned material that suits warm palettes (cream, stone, sage, warm white). Against cool greys and blue-whites, it creates a color temperature conflict rather than a harmonious composition. Match the metal’s warmth to the palette’s warmth.
8. Install a Statement Mirror
Best for: Any bathroom — the mirror is the most visible single element and the easiest to upgrade
The bathroom mirror is seen at close range, at eye level, every day. Its size, shape, and frame determine the bathroom’s visual character more than any other single accessory. A mirror that’s the same width as the vanity (or slightly wider), with a frame that complements the bathroom’s metal finishes and style, completes the vanity composition in a way that a smaller or mismatched mirror can’t.
Mirror options: frameless (clean, contemporary, suits minimal aesthetics); framed (adds character — match the frame material to the bathroom’s other materials); arched (adds softness and a current aesthetic that flat rectangles lack); round (strong design statement, suits certain positions); backlit (provides practical ambient light as well as visual interest).
Smart tip: An arched or oval mirror over a rectangular vanity creates a pleasing contrast of forms — the soft curve against the straight edges of the vanity below. This combination has become one of the most widely used bathroom design pairings because it works with most bathroom styles from traditional to contemporary.
Mistake to avoid: Installing a mirror that’s too small for the vanity. A small mirror floating above a wide vanity looks like an afterthought. The mirror should be at least as wide as the sink or the countertop section of the vanity — the full width reads as properly considered.
9. Get Bathroom Lighting Right

Best for: Every bathroom — most bathrooms have inadequate or poorly positioned lighting
Most bathrooms have one ceiling light that illuminates from directly above — casting downward shadows on the face that make mirror tasks (makeup, shaving, skincare) difficult and the bathroom feel institutional. The solution is lighting positioned at face level, on either side of the mirror, rather than above it.
Wall-mounted sconces on either side of the bathroom mirror — at approximately face height (60 to 65 inches from the floor to the center of the fixture) — provide the most flattering and functional illumination for mirror tasks. This is standard practice in professional makeup and hairdressing environments for good reason.
Smart tip: Use warm white bulbs (2700K to 3000K) throughout the bathroom. Cool white light (4000K and above) in a bathroom creates unflattering shadows and a clinical atmosphere. Warm white light is more flattering on skin tones and creates the spa-like warmth that bathroom aspirations typically reference.
Mistake to avoid: Using only one light source above the vanity mirror. Overhead-only bathroom lighting creates heavy shadows under the chin, nose, and eyes — making mirror tasks harder and the user look worse than they do in natural light. This is the most common and most impactful bathroom lighting mistake.
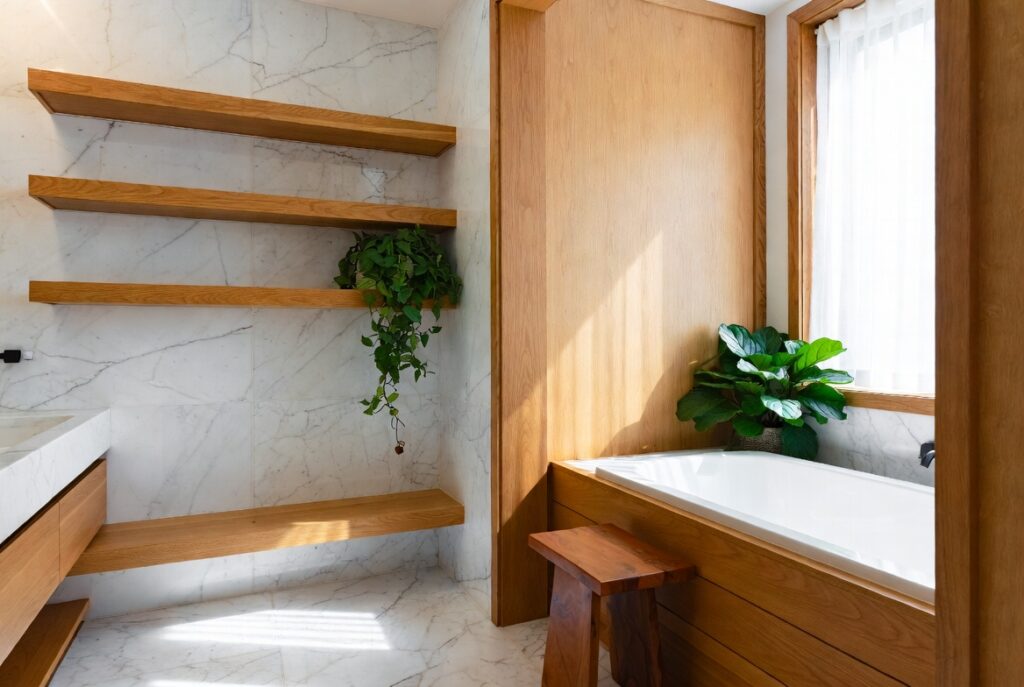
10. Add Wood Accents for Warmth
Best for: Any bathroom that feels cold, clinical, or lacking warmth
Natural wood in a bathroom — a wood vanity cabinet, teak shower mat, wooden shelving, a wooden stool or ladder — adds organic warmth that tile, glass, and chrome cannot provide. The contrast between warm wood tones and the cool hard surfaces typical of bathrooms creates the layered, spa-quality atmosphere that the best bathroom designs achieve.
Wood in a bathroom requires proper sealing to resist moisture — particularly in areas near the shower or bath. Teak is naturally resistant to moisture and is the traditional choice for wet environments. Other woods need thorough sealing and periodic maintenance in bathroom applications.
Smart tip: A teak shower mat — a slatted wooden platform that sits outside the shower — is the single most accessible and impactful wood addition available for any bathroom. It costs $30 to $80, requires no installation, looks immediately sophisticated, and is genuinely more comfortable underfoot than a standard bath mat.
Mistake to avoid: Using reclaimed or untreated wood in a bathroom without sealing it thoroughly first. Untreated wood in a humid bathroom environment absorbs moisture, warps, darkens, and eventually develops mold. Any wood used in a bathroom must be properly sealed with a waterproof finish or be a naturally water-resistant species like teak.
11. Maximize Storage Without Clutter
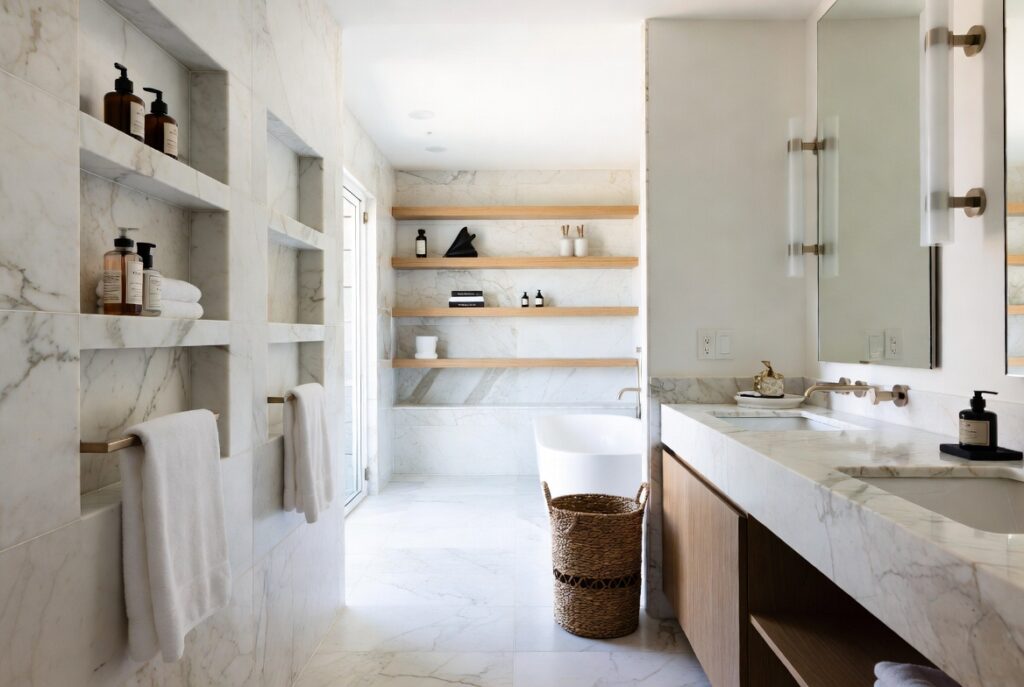
Best for: Any bathroom — inadequate or poorly organized storage is the primary cause of bathroom clutter
A bathroom that looks calm requires storage that makes putting things away easier than leaving them out. The friction of storage — the effort required to access and replace items — determines whether surfaces stay clear or accumulate clutter. Storage that requires two hands, bending, or searching discourages consistent use and results in items left out permanently.
Effective bathroom storage: a vanity with pull-out drawers rather than a single under-sink cabinet (drawers provide better access to the back of the storage space); a recessed medicine cabinet (provides mirror and storage without projecting into the room); floating shelves at accessible heights; and drawer dividers that keep small items organized rather than tumbling.
Smart tip: Group bathroom storage by activity rather than by item type. A “getting ready” drawer with all makeup and skincare tools together; a “shower” drawer with shower products organized by person; a “medical” cabinet section with medications and first aid. Activity-based organization matches how the bathroom is actually used.
Mistake to avoid: Storing rarely used items in prime bathroom storage space. Items used daily (toothbrush, face wash, moisturizer) should occupy the most accessible positions. Items used weekly or monthly (backup supplies, special treatments) can go in less accessible positions. Items used rarely should be stored elsewhere.
12. Add Bathroom Plants
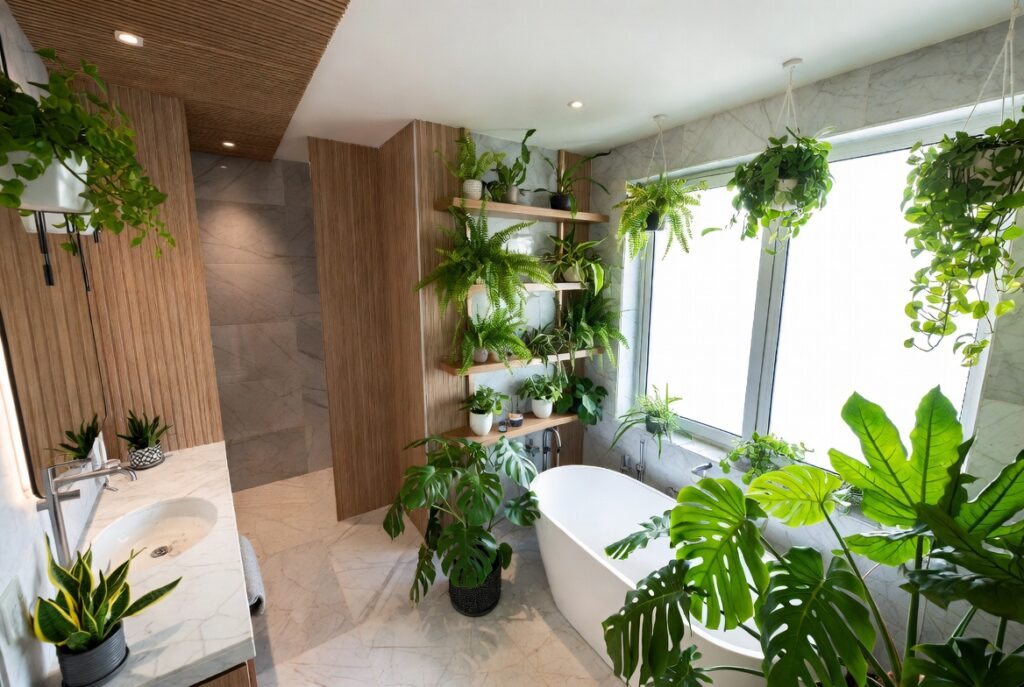
Best for: Bathrooms with natural light and adequate humidity — plants add life and organic warmth
Plants in a bathroom change the atmosphere from a purely functional room to one that feels cared for and alive. The organic quality of living plants against tile, glass, and chrome creates a contrast that no other decorative element achieves — and many plants actively thrive in the bathroom’s humid environment.
Best bathroom plants: peace lily (tolerates low light, removes airborne pollutants); snake plant (releases oxygen at night, very tolerant of neglect and low light); aloe vera (thrives in bright light, useful medicinally); pothos (tolerates low to medium light, trails beautifully from a high shelf); ferns (thrive in humidity, suit larger bathrooms with adequate light).
Smart tip: A trailing pothos on a high shelf above the toilet or in a corner near the window is the single most impactful plant addition for most bathrooms. The trailing vines add vertical and visual interest in a position that otherwise typically has nothing, and pothos is virtually indestructible in bathroom conditions.
Mistake to avoid: Placing plants that need bright light in a windowless bathroom. Many bathrooms have limited or no natural light — this rules out most flowering plants and sun-loving species. Stick to genuinely low-light tolerant species (snake plant, peace lily, ZZ plant) for bathrooms without natural light.
13. Use Wallpaper as a Feature Wall
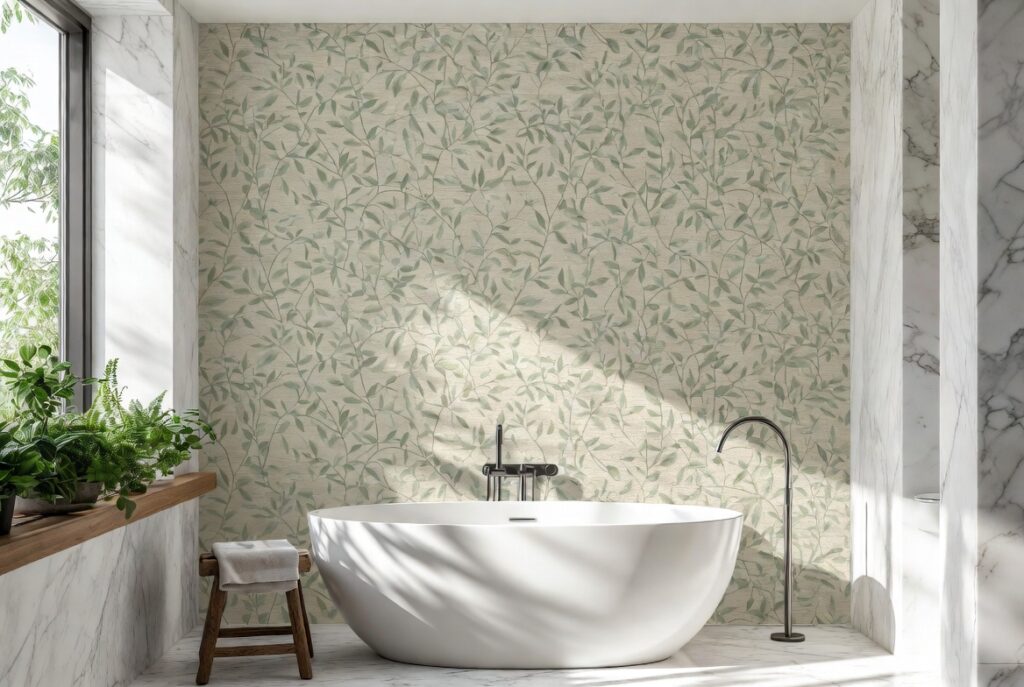
Best for: Bathrooms that feel plain or lacking personality, powder rooms where a bold statement is appropriate
Bathroom wallpaper — once considered impractical in humid environments — is now a standard design tool. Vinyl-coated or moisture-resistant wallpapers specifically designed for bathroom use are widely available and perform well in bathroom conditions with adequate ventilation.
A feature wall of wallpaper in a bathroom — typically the wall behind the toilet, the wall facing the door, or the vanity wall — adds pattern, color, and character that paint alone can’t achieve. The contained application of wallpaper (one wall only) creates a design statement without the commitment of papering the entire room.
Smart tip: Powder rooms (half bathrooms without a shower) are the ideal space for bold, dramatic wallpaper. The small size means the wallpaper budget is modest, the humidity is lower than a full bathroom, and the smaller space benefits from the close-up impact that a bold pattern provides.
Mistake to avoid: Using standard interior wallpaper in a bathroom without moisture resistance. Standard wallpaper delaminates, bubbles, and grows mold in humid bathroom conditions. Always specify wallpaper rated for bathroom or kitchen use, and ensure the bathroom has adequate ventilation to reduce moisture buildup.
14. Upgrade Towels and Bath Linens
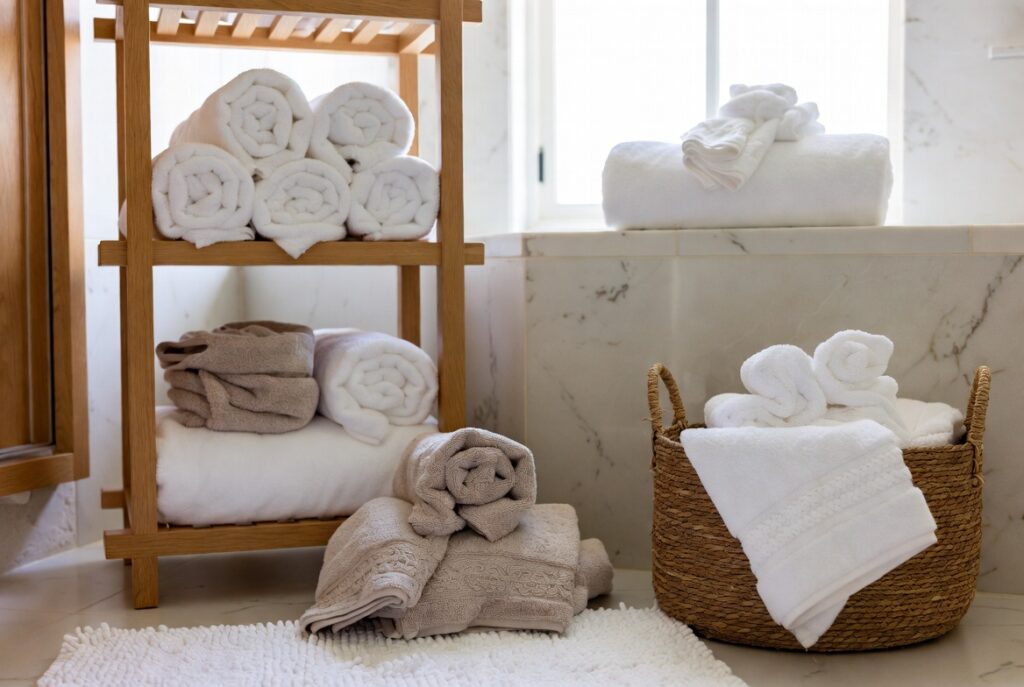
Best for: Any bathroom — high-quality towels are the fastest and most affordable daily improvement available
The towel you reach for after a shower or bath is one of the most tactile daily experiences in a home. A thin, scratchy, faded towel makes that experience slightly unpleasant every day. A thick, soft, properly dried towel from a heated rail makes it genuinely pleasurable. This distinction requires no renovation — only a better towel purchase.
What makes a good bathroom towel: GSM (grams per square meter) of at least 600 for an absorbent, hotel-quality feel; Egyptian cotton or Turkish cotton for the softest, most durable fiber; a weight that feels substantial in the hand without being excessively heavy when wet.
Smart tip: Wash new towels before first use — and wash them without fabric softener for the first three washes. Fabric softener coats cotton fibers and reduces absorbency. New towels are more absorbent after the first few plain washes than they are straight from the packaging.
Mistake to avoid: Keeping too many towels in bathroom rotation. More towels than the household needs means some are always in use, some are waiting to be washed, and the bathroom storage is perpetually cluttered. Two to three towels per person — one in use, one fresh, one in the wash — is adequate and keeps the storage system manageable.
15. Add a Heated Towel Rail
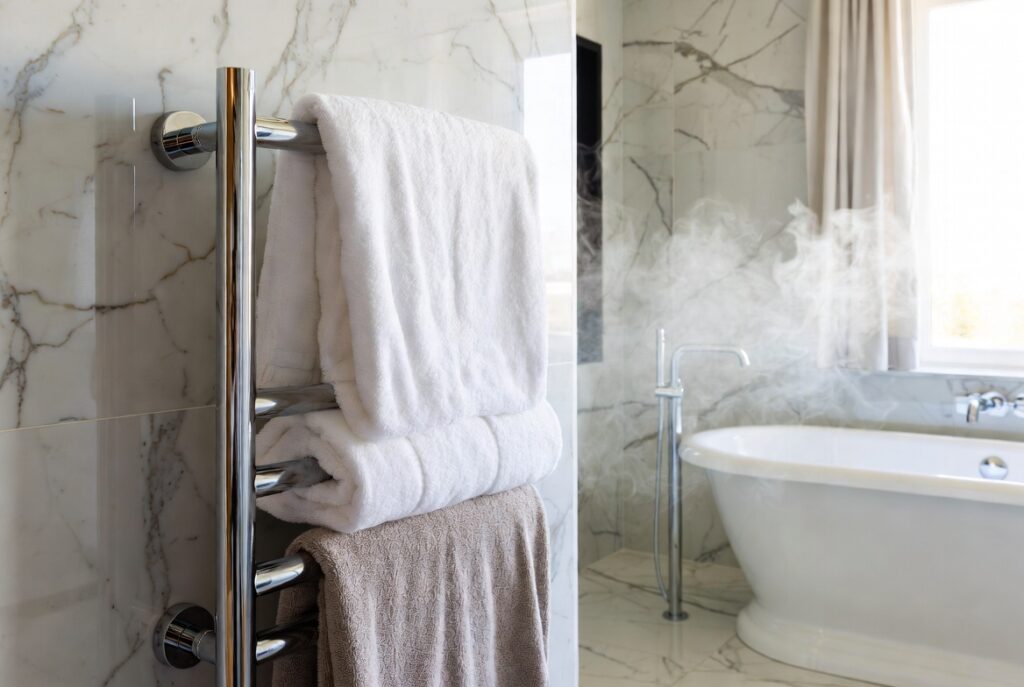
Best for: Any bathroom in a climate where cold towels are a daily inconvenience
A heated towel rail — an electrically heated rail that warms towels and reduces bathroom ambient humidity — is one of the improvements most consistently cited as a quality-of-life upgrade by people who have them. A warm towel after a shower or bath is a small luxury that becomes a daily pleasure quickly enough to feel necessary within weeks.
Electrically heated rails (plug-in or hardwired) are independent of the home’s heating system and can be run year-round. Hydronic rails (connected to the central heating) warm up when the heating is on and suit homes where bathroom warmth is needed primarily in winter.
Smart tip: Mount the heated towel rail at a height where the bottom rail is at least 24 inches from the floor — high enough that towels hanging from it don’t touch the floor. Rails mounted too low result in the bottoms of hanging towels collecting floor moisture and preventing proper drying.
Mistake to avoid: Using a heated towel rail as the bathroom’s primary heat source in a cold climate. Towel rails are designed to warm towels and maintain background bathroom warmth — not to heat a cold bathroom rapidly. In cold climates, a dedicated bathroom heater or underfloor heating provides more effective room heating, with the towel rail supplementing rather than replacing it.
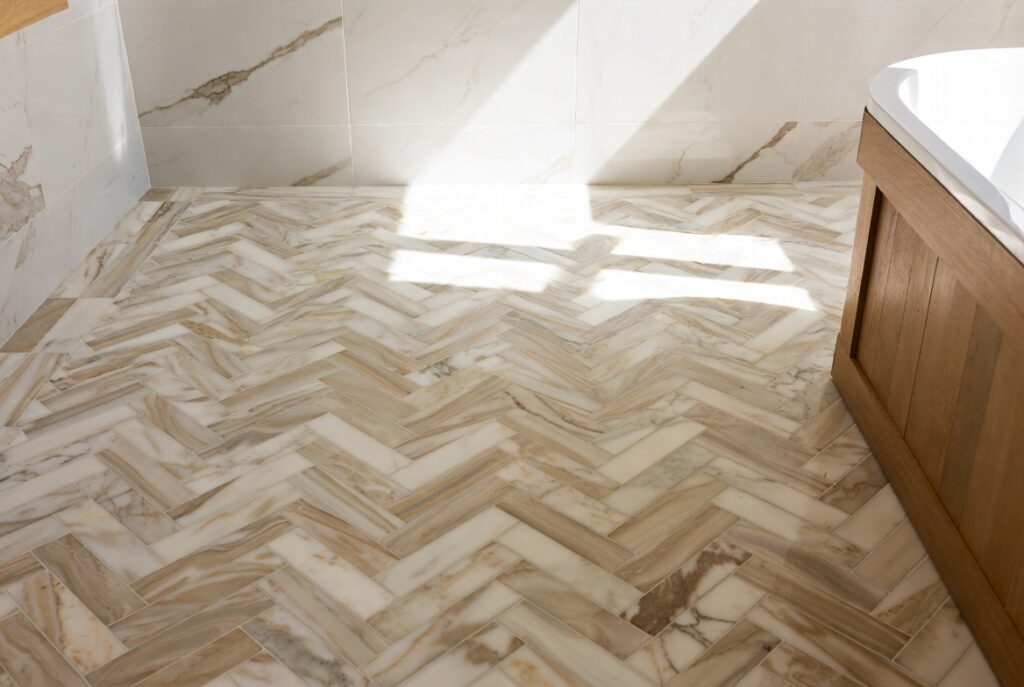
16. Choose the Right Tile Pattern
Best for: Anyone planning a bathroom tile installation or renovation
The pattern in which tiles are laid determines the bathroom’s visual character as much as the tile color or material itself. The same tile in a standard grid pattern looks different from the same tile in a herringbone, chevron, or offset brick pattern — and the choice of pattern is a design decision that deserves as much consideration as the tile selection.
Patterns and their visual effects: standard grid (clean, contemporary, neutral); brick offset (classic, adds subtle horizontal movement); herringbone (dynamic, adds energy, suits feature areas); chevron (more formal version of herringbone); large format with minimal grout (expansive, spa-like); mosaic (decorative, suits small accent areas).
Smart tip: Use a more complex tile pattern (herringbone, chevron) in one area — typically the shower floor or a feature wall — and a simpler pattern (standard grid or brick offset) elsewhere. Complex patterns used throughout the entire bathroom create visual noise; used selectively, they create a focal point.
Mistake to avoid: Choosing a tile pattern based on how it looks in a tile showroom rather than how it will look scaled to your specific bathroom dimensions. Some patterns — particularly diagonal and herringbone — create significantly more tile waste due to cuts at the room’s edges. Discuss waste percentages with your tiler before finalizing the pattern choice.
17. Small Bathroom Layout Solutions
Best for: Bathrooms under about 50 square feet where every inch of space matters
Small bathrooms benefit more from good layout decisions than large ones — the wrong fixture placement or furniture choice in a small bathroom makes it genuinely uncomfortable to use. The right choices make the same space feel workable and even elegant.
Key small bathroom strategies: a wall-mounted toilet (the cistern is hidden in the wall, freeing up floor space and making the room feel cleaner); a corner shower rather than a full tub (frees significant floor space); a sliding or folding door rather than a standard hinged door (eliminates the swing clearance that a hinged door requires); and a pedestal or wall-mounted sink rather than a vanity cabinet (frees floor visual space, though at the cost of storage).
Smart tip: Use the same tile on the floor and walls in a small bathroom. Continuous material from floor to ceiling reduces the number of visual interruptions and makes the boundaries between surfaces less defined — which makes a small space feel larger and more cohesive.
Mistake to avoid: Putting too many fixtures in a small bathroom in pursuit of full functionality. A small bathroom with a shower, a bathtub, a double vanity, and a toilet has everything — but if they’re all crowded into an inadequate space, none of them is pleasant to use. Choose the most important fixtures for the household’s actual use patterns and let the others go.
18. Add Scent for a Spa Experience
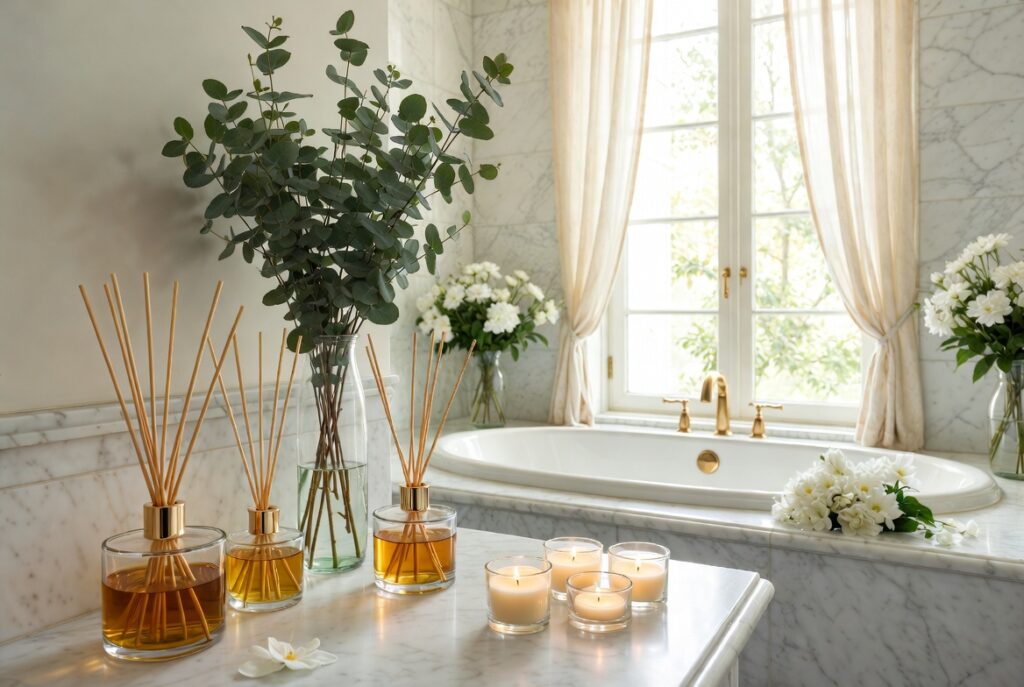
Best for: Any bathroom — scent is the most underused dimension of bathroom design
The olfactory experience of a bathroom is as important as its visual appearance — and it’s the dimension most people ignore until something goes wrong. A bathroom that smells fresh and subtly pleasant the moment the door opens is a genuinely different experience from one that smells of nothing or of inadequate ventilation.
Options for bathroom scent: a reed diffuser with essential oils (continuous, low-maintenance, available in endless scent options); a scented candle used during bathing and showering (the most atmospheric option but requires attention); eucalyptus bundles hung from the shower head (release fragrance when wet, look beautiful, last several weeks); or high-quality hand soap at the sink (the most touched surface in the bathroom, scented hand soap provides the most consistent sensory contact).
Smart tip: Eucalyptus bundles hung from the shower head release their natural essential oils in the steam, creating an immediate spa-like fragrance experience during every shower. Fresh eucalyptus costs very little from a florist or farmers market, lasts 2 to 4 weeks, and looks attractive throughout.
Mistake to avoid: Using synthetic air freshener sprays as the primary bathroom scent. Chemical air fresheners mask odors rather than eliminating them, contain compounds that some people find irritating, and smell obviously artificial. Natural scent options — essential oil diffusers, natural candles, fresh plant material — provide a genuinely pleasant sensory experience rather than a covered-up one.
19. Use Dark and Moody Tones
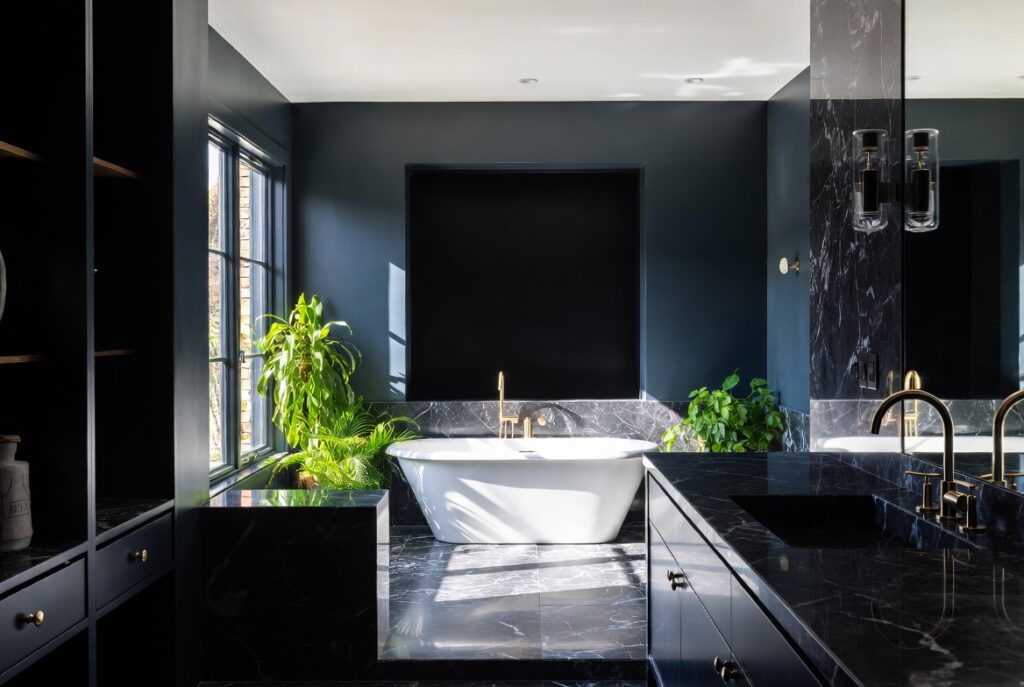
Best for: Master bathrooms, powder rooms, and any bathroom where drama and sophistication are preferred over brightness
A dark bathroom — deep navy walls, charcoal tiles, forest green cabinetry, black fixtures — creates an atmosphere of dramatic luxury that light bathrooms can’t achieve. The enveloping quality of a dark, well-lit bathroom makes it feel intimate and considered in a way that more conventional light-toned approaches don’t.
The key to making dark bathrooms work: lighting. Dark surfaces absorb light rather than reflecting it, which means a dark bathroom needs more deliberate and higher-quality lighting than a light-toned bathroom. Wall sconces at face level, under-vanity LED strips, and recessed ceiling lights with warm-toned bulbs ensure the dark surfaces read as dramatic rather than dingy.
Smart tip: Dark bathroom walls look most effective with warm-toned lighting (2700K) that brings out the depth of the color. Cool white lighting on dark surfaces flattens the color and creates a cold, unwelcoming atmosphere. The combination of dark walls and warm lighting produces the rich, atmospheric quality that makes dark bathrooms exceptional.
Mistake to avoid: Using dark tones in a bathroom with very limited natural light without investing in excellent artificial lighting. A bathroom that’s dark by nature and dark by design without compensating artificial light is genuinely oppressive rather than atmospheric. Dark bathroom design requires the lighting investment to be made simultaneously with the color decision.
20. Make Every Detail Count
Best for: Any bathroom nearing completion — the details distinguish a considered bathroom from a merely functional one
The quality of a bathroom is ultimately determined by the accumulation of small decisions: the weight of the door handle, the quality of the toilet seat, the thickness of the bath mat, the condition of the grout, the alignment of the towel rail, the quality of the soap dispenser. None of these individually determines the bathroom’s success, but together they determine whether it feels finished or perpetually almost-there.
A toilet seat that wobbles, grout that’s discolored, a misaligned towel rail, a soap dish that doesn’t drain properly — each of these small flaws contributes to a low-grade frustration that accumulates with every use. Addressing them individually takes minutes and costs little.
Smart tip: Do a methodical walk-through of the bathroom with fresh eyes — ideally after being away for a few days — and note everything that’s not quite right. Compile a list and address it systematically rather than hoping to notice individual issues when you’re distracted by the morning routine.
Mistake to avoid: Finishing the big elements (tile, vanity, fixtures) and leaving the details to “later.” Later rarely comes, and the accumulation of unfinished details — missing switch plates, temporary hooks, placeholder accessories — is what gives a recently renovated bathroom the feeling that it’s not quite done. Budget time and money for the details from the beginning, not as an afterthought.
Before You Start
- Establish your budget before choosing anything. Bathroom costs escalate quickly — tiling, plumbing, and fitting labor add up faster than materials costs suggest. Set a firm budget and work backward from it to determine what’s feasible.
- Fix ventilation before aesthetics. A beautiful bathroom that develops mold because of inadequate ventilation becomes a maintenance problem quickly. Ensure the fan or window provides adequate air changes before investing in finishes.
- Consider the plumbing position before changing the layout. Moving plumbing is expensive. A layout that works with existing plumbing positions costs significantly less than one that requires moving pipes.
- Choose tiles before fixtures before paint. Tile selection is the most constrained choice (limited to what’s available in the right size and at the right price); fixtures are the second most constrained; paint is the least constrained because it can be adjusted after everything else is in place.
Conclusion
The best bathrooms are the result of considered decisions about a small number of things — color, lighting, storage, and the quality of a few key materials — rather than the accumulation of many features. A bathroom with excellent lighting, good storage, quality towels, and a calm color palette is more pleasant to use every day than one with a freestanding tub, poor lighting, no storage, and inadequate ventilation. Start with function, then add beauty, then refine the details. The order matters.