White rocks do something in a landscape that almost no other material achieves: they reflect light. Spread across a garden bed, laid as a path, or used to ring a tree, white rocks brighten every space they occupy — making small yards feel larger, dark corners feel lighter, and the plants growing above them look more vivid by contrast. They also don’t decompose, don’t attract insects, don’t need annual replacing like bark mulch, and suppress weeds effectively when installed over landscape fabric. The result is a landscape that looks consistently clean with minimal ongoing maintenance. These 20 ideas cover every application of white rock in residential landscaping — from a simple flower bed mulch replacement to a complete front yard transformation.
1. Replace Mulch with White Gravel
Best for: Any garden bed currently mulched with bark or wood chips — the most impactful single white rock application
Replacing bark mulch with white gravel in existing garden beds transforms their appearance immediately. Where bark mulch fades from its initial dark brown to a washed-out grey within one season and requires annual replacement, white gravel stays bright indefinitely — reflecting light rather than absorbing it and maintaining its appearance through years without any replacement cost.
White gravel as mulch also warms soil faster in spring (reflecting heat downward), drains freely rather than holding moisture at the surface, and doesn’t break down into the soil — meaning no nitrogen depletion of the kind that fresh wood chip mulch causes.
Smart tip: Use 3 to 4 inches of white gravel depth over landscape fabric for the most effective weed suppression. Shallower applications allow weed seeds that blow in from outside to germinate in the rock layer — 3 to 4 inches prevents most wind-borne weed seeds from reaching the soil surface.
Mistake to avoid: Applying white gravel directly onto bare soil without landscape fabric underneath. Without fabric, gravel gradually sinks into the soil over time and becomes impossible to separate cleanly. Weeds also push up through the settled gravel with much less resistance than through properly installed fabric.
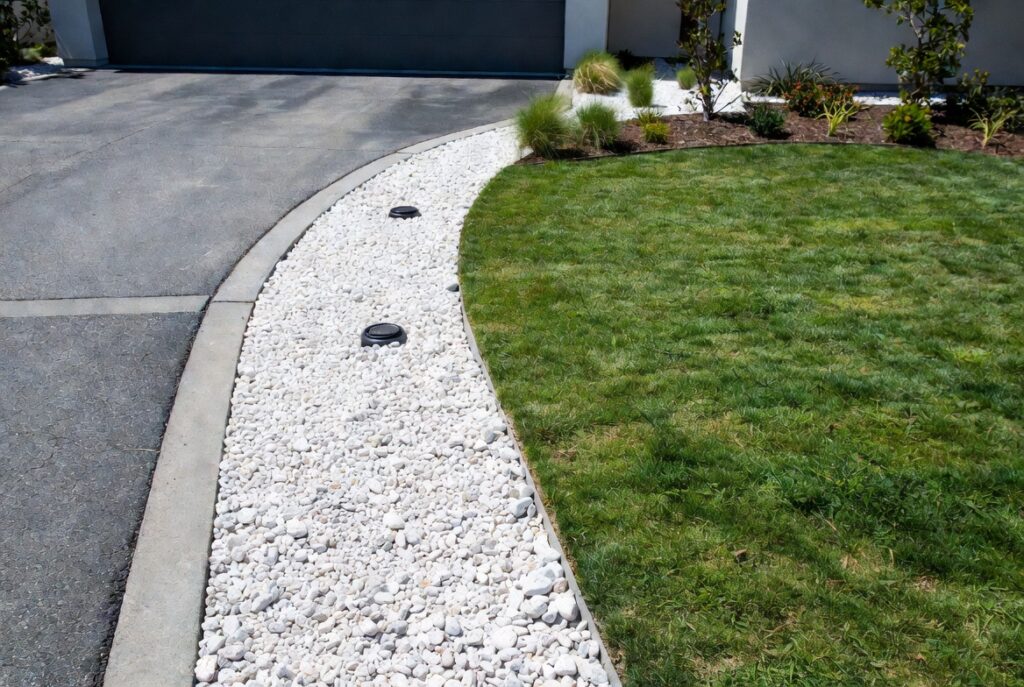
2. Create a White Rock Walkway
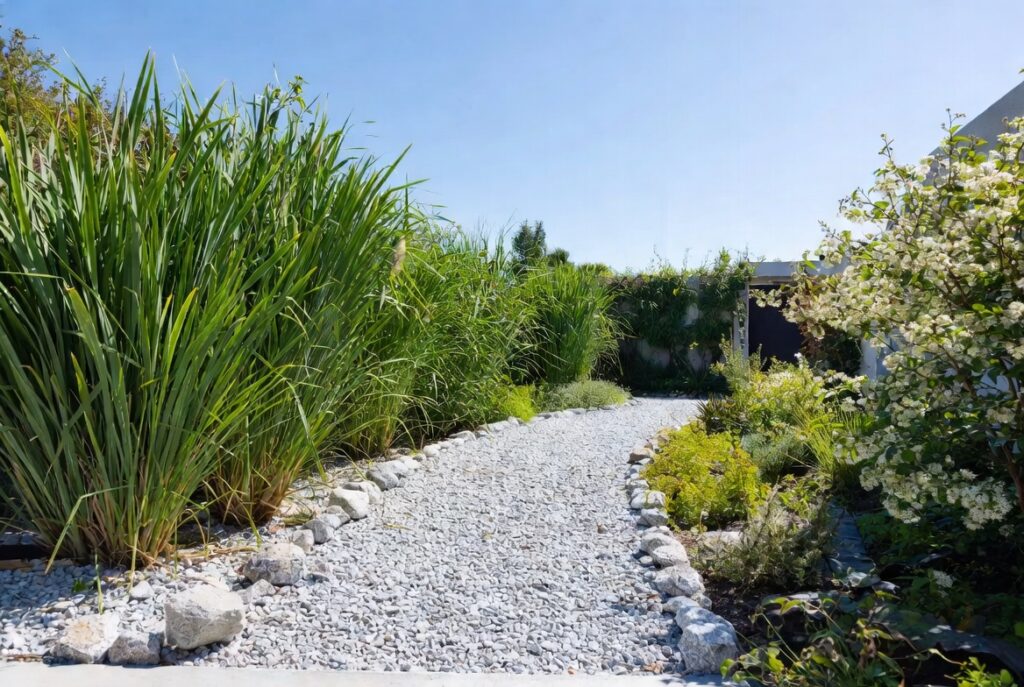
Best for: Garden paths, side yard passages, informal paths through planting areas
A white rock walkway — either as the path surface itself or as the surround for stepping stones — creates a clean, bright pathway that reflects light and defines the route clearly in both day and evening conditions. The contrast between white rock and the surrounding planting is immediately readable at a distance.
Two approaches: a continuous white gravel path (compacted slightly for stable walking, contained with metal or timber edging on both sides); or stepping stones set in white gravel (each stone provides solid footing while the gravel fills the space between, creating the visual effect of the path without requiring every step to land on stone).
Smart tip: Use stepping stones set in white gravel for garden paths that see moderate traffic rather than solid gravel paths. The stepping stones provide dry, stable footing in wet conditions; the white gravel between them provides the bright, clean visual effect and prevents the path from becoming muddy. The combination is both more practical and more attractive than either element alone.
Mistake to avoid: Using very fine white gravel (under 10mm) for a walkway. Fine gravel scatters with every footstep, migrating onto adjacent lawn or planting, and requires constant raking to maintain a neat appearance. Use 20mm rounded pea gravel or river stone for walkways — large enough to stay in place with normal foot traffic.
3. Build a Dry Creek Bed
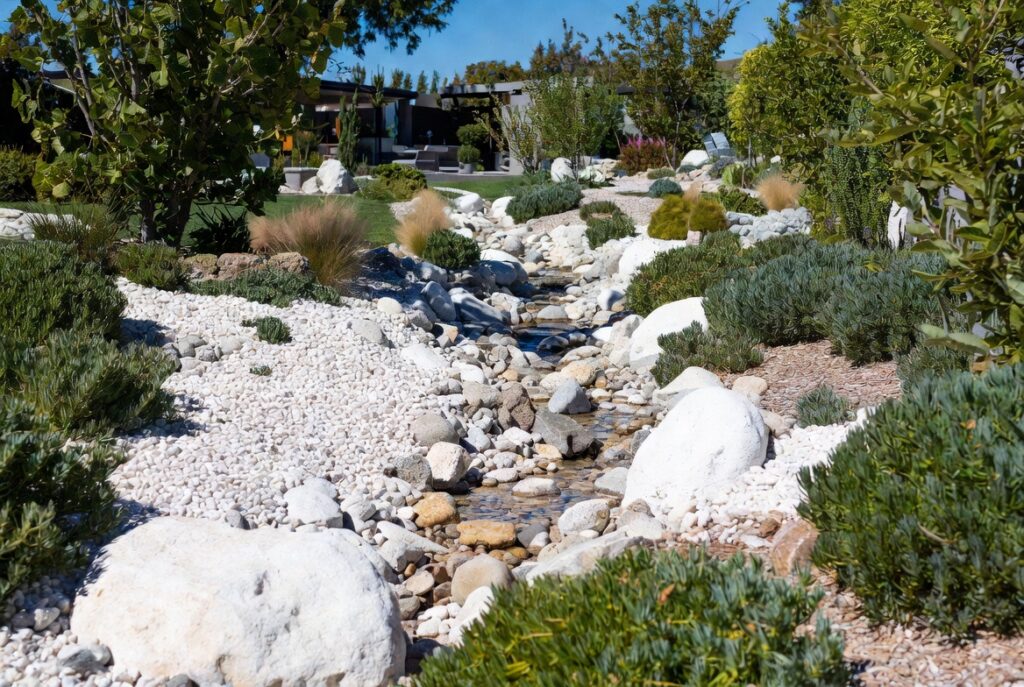
Best for: Flat or sloped yards where drainage is a challenge, any yard wanting a naturalistic landscape feature
A dry creek bed built with white river stones creates a flowing, water-suggesting feature that solves drainage problems while adding genuine visual interest. The smooth, rounded white stones look like water-worn river rock — at its best, the dry creek reads as a stream that happens to be dry at the moment.
The construction sequence: excavate a slightly winding channel 12 to 18 inches wide and 6 to 8 inches deep; line with landscape fabric; fill the center channel with smooth white river stones in varying sizes (largest boulders at the edges suggesting the banks; smaller rounded stones in the center suggesting the water flow); and plant ornamental grasses or native plants at the banks.
Smart tip: Make the dry creek bed curve gently rather than running in a straight line. Real watercourses always meander — they follow the path of least resistance around obstacles. A straight dry creek looks engineered rather than natural. Even gentle curves read as genuinely naturalistic.
Mistake to avoid: Using angular crushed white stone for a dry creek bed. Angular stone looks like construction material rather than water-worn river stone. Smooth, rounded white river stones are the only appropriate material — their form is what creates the convincing impression of water.
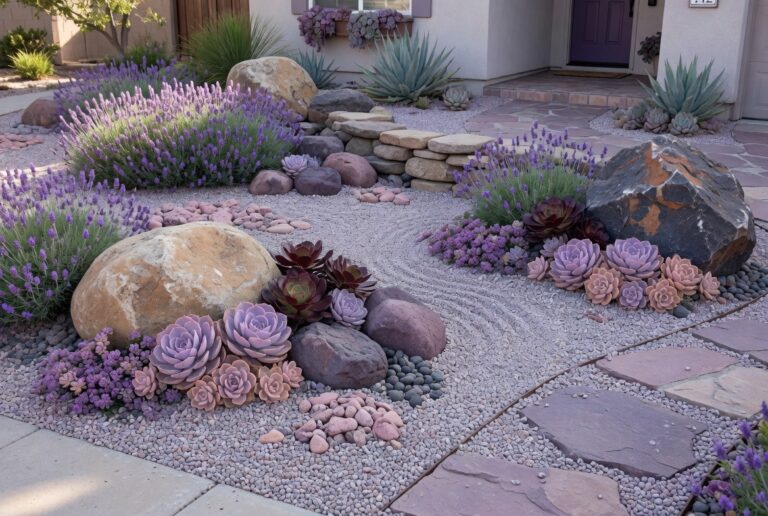
4. Frame a Succulent Garden
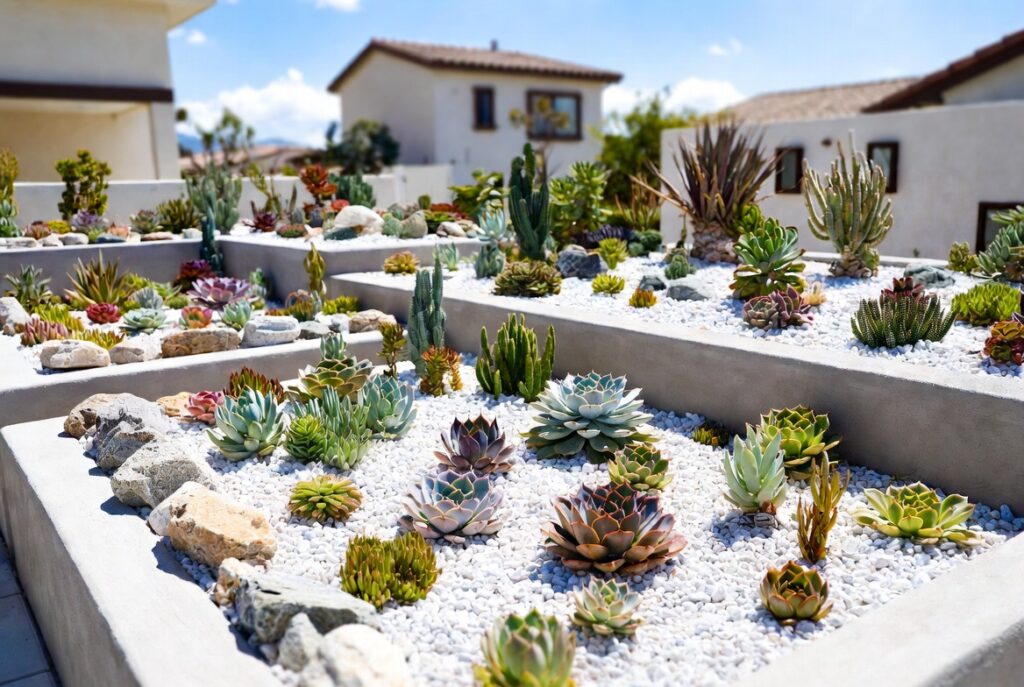
Best for: Hot, sunny yards — the most naturally compatible plant and rock combination available
White rock and succulents share the same environmental preferences — excellent drainage, full sun, minimal water — and create together one of the most visually cohesive landscape combinations available. The white rock suppresses weeds, reflects heat that succulents love, drains rapidly (preventing the root rot that kills more succulents than drought), and creates a bright background against which succulent colors — jade green, blue-grey, burgundy, silver — read with maximum clarity.
The most effective succulent and white rock combination: a varied collection of succulent forms (rosette echeveria, upright agave, spreading sedum, architectural aloe) planted through white marble chips or white pea gravel, with a few smooth white boulders anchoring the composition.
Smart tip: Plant succulents through small holes in landscape fabric installed under the white rock, rather than cutting away the fabric and exposing large soil areas. Fabric visible at the planting holes can be tucked under the surrounding rock. This approach minimizes the exposed soil area that weed seeds can colonize while keeping each succulent’s root zone accessible.
Mistake to avoid: Using white rock in a succulent garden in a wet climate without ensuring exceptional drainage. While white rock drains better than mulch, if the underlying soil doesn’t drain freely, water still pools at root level. In clay-heavy soils in wet climates, amend the planting area with coarse grit before installing the rock, or plant succulents in raised mounds above grade.
5. Create a Modern Zen Garden
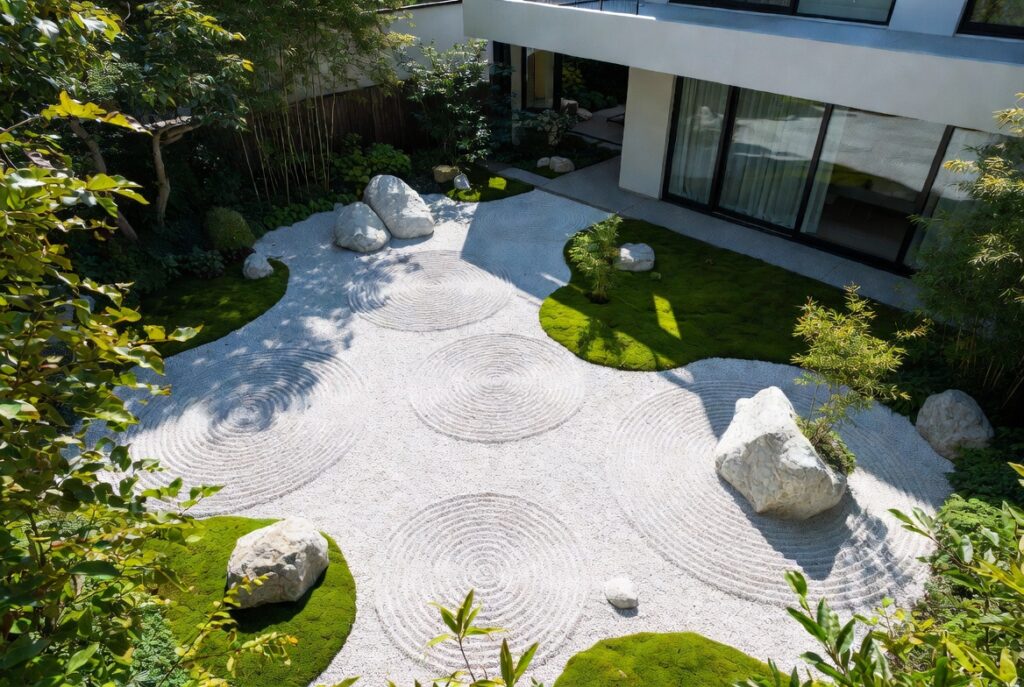
Best for: Contemporary homes, minimalist landscapes, anyone wanting a low-maintenance contemplative garden space
White gravel raked into patterns is the defining visual element of the traditional Japanese dry landscape garden — and it translates to modern residential landscapes as a minimalist feature of extraordinary calm. A rectangular or irregularly shaped white gravel area with three to five carefully placed boulders and no other planting creates a space that’s visually restful, genuinely low-maintenance, and immediately distinctive.
The gravel rake — a wide-toothed wooden rake specifically designed for raking gravel patterns — creates concentric circles around boulders, parallel lines suggesting water flow, or wave patterns across the surface. The patterns change every time the gravel is raked, making the feature continuously variable.
Smart tip: Use fine white granite grit (3 to 5mm) rather than larger gravel for a raked zen garden. Fine grit holds raked patterns clearly and has a refined, almost sand-like quality that suits the aesthetic. Larger gravel doesn’t hold patterns and reads as coarser and less refined.
Mistake to avoid: Creating a white gravel zen garden in a yard with large deciduous trees overhead. Autumn leaf fall into white gravel is extremely difficult to remove cleanly — leaves caught in the gravel stain it and require laborious hand-picking. Zen gardens suit open, sunny positions away from trees that drop significant leaf litter.
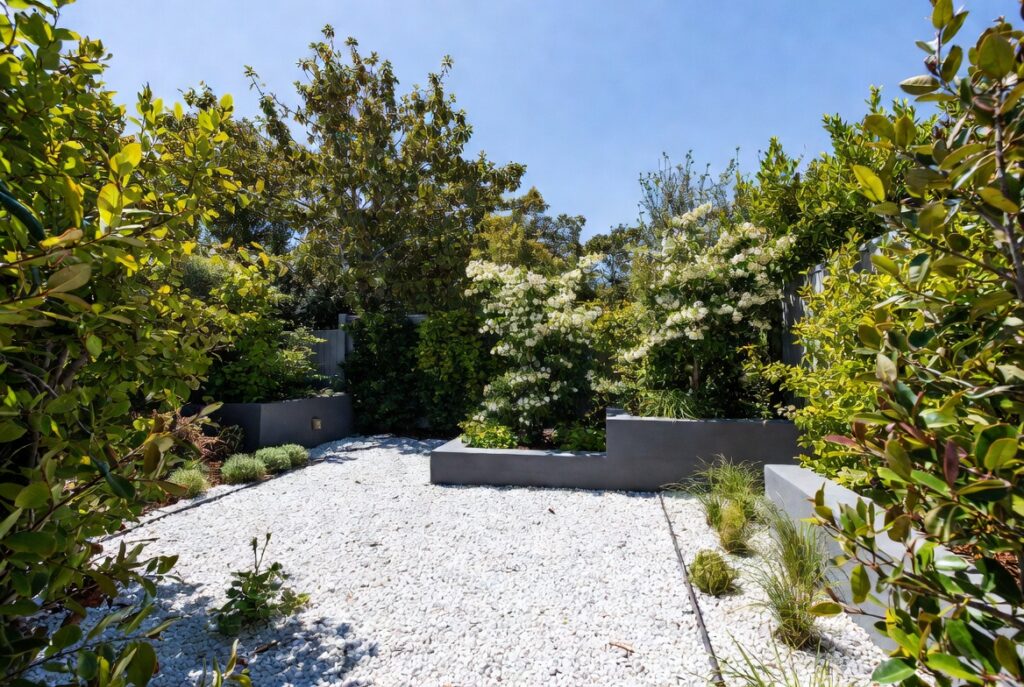
6. Ring Trees with White Rock
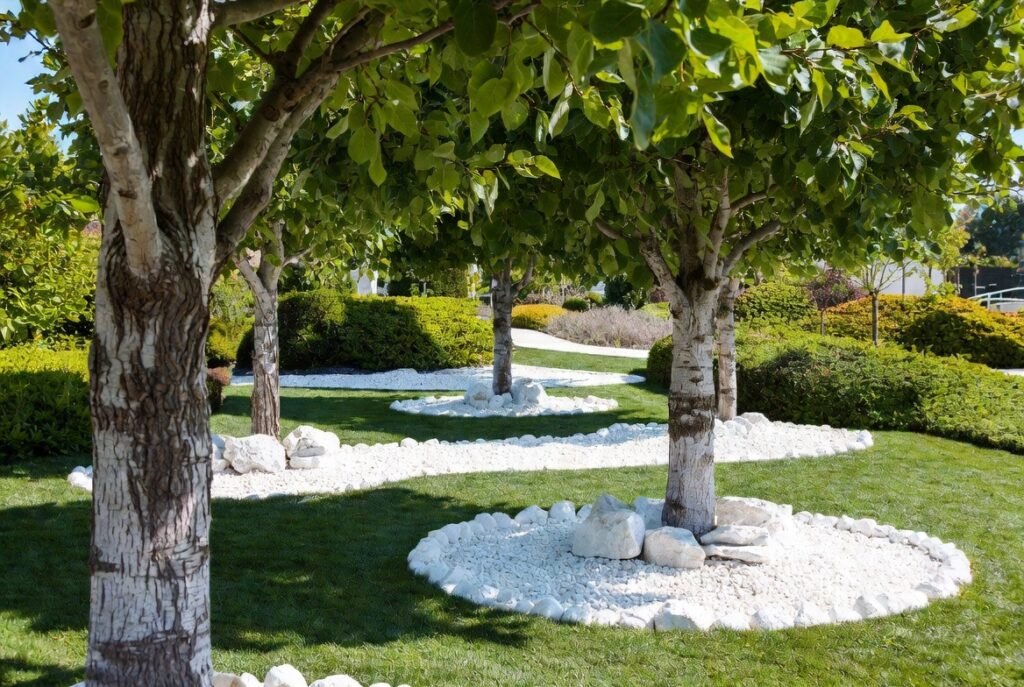
Best for: Any property with trees in lawn areas — a practical and attractive alternative to mowing around tree trunks
A circle or defined bed of white rock around the base of a tree solves one of the most common lawn maintenance frustrations: trimming around the tree trunk without damaging the bark. The white rock creates a clean boundary, eliminates the need for weed trimmer use near the trunk, and makes the tree a defined garden feature rather than an obstacle in a lawn.
The white rock ring makes the tree’s bark tones — warm brown, silver-grey, or russet depending on species — more visible by contrast, creating a composed tree-and-rock landscape element where there was previously just a tree in grass.
Smart tip: Use larger white river stones (50 to 100mm) for a tree ring rather than fine gravel. Larger stones stay in place as the lawn is mowed adjacent to them — fine gravel scatters onto the lawn with each mower pass and requires constant raking back into position.
Mistake to avoid: Mounding white rocks against the tree trunk — the “volcano mulching” mistake. Rocks (or any material) piled against a tree trunk create constantly damp conditions at the bark, encouraging fungal rot and bark decay. Keep rocks level and maintain a 3 to 4-inch gap of bare soil around the actual trunk.
7. White Rocks as Lawn Edging
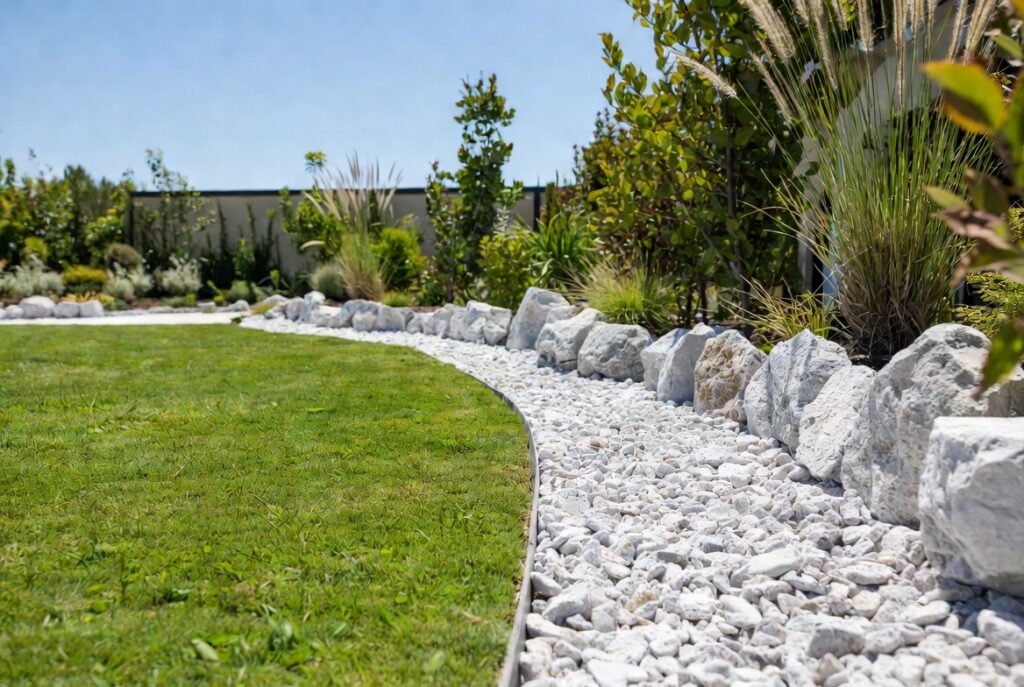
Best for: Defining the edge between lawn and planting beds, creating clean transitions between landscape zones
A row of white rocks along the edge of a planting bed or lawn boundary creates one of the cleanest, most defined border treatments available. The bright white line of rock against the green of the lawn is immediately visible and gives the landscape a precision that softer plant-only borders can’t achieve.
For a casual, garden-style edging: smooth white river stones 50 to 100mm diameter placed in a single row along the bed edge. For a more formal, architectural edging: larger white boulders or white limestone blocks placed at regular intervals as a defined border.
Smart tip: Set lawn edging rocks so their tops sit at approximately the same height as the adjacent lawn surface. Rocks that project significantly above lawn level are obstacles that catch mower wheels and trip people. Rocks set flush or just 1 to 2 inches above grade create a clean visual line without creating a hazard.
Mistake to avoid: Using white rocks as edging in a garden where children play frequently. Small white stones (under 50mm) used as edging are easily picked up and thrown — a safety issue in family gardens. Use larger stones (100mm and above) that can’t be easily moved as edging in gardens used by children.
8. Mix White Rocks with Dark Pavers
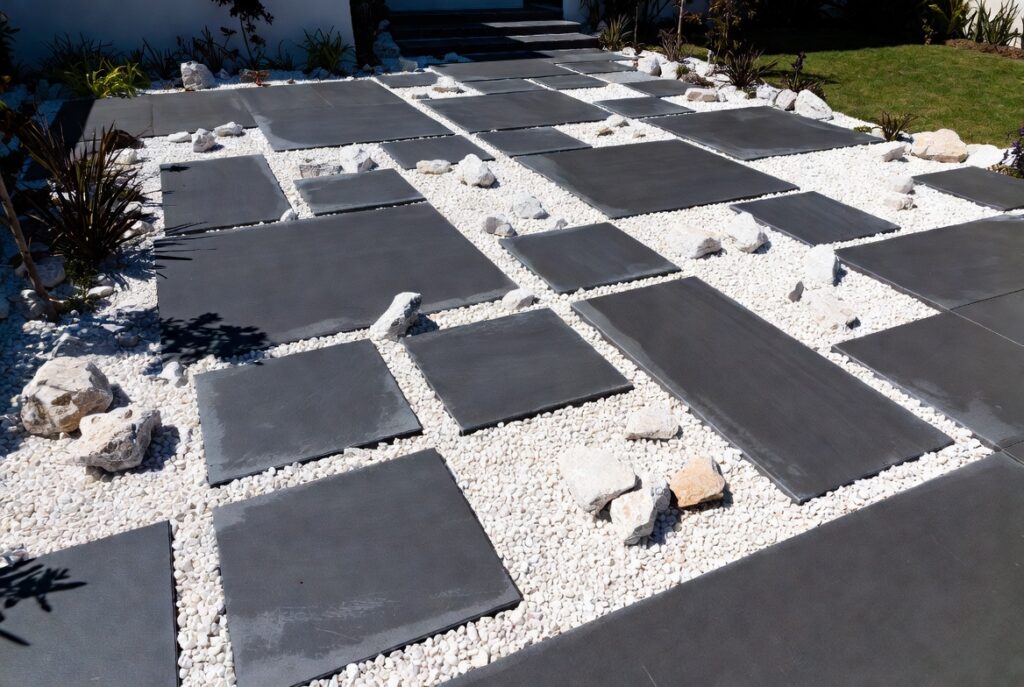
Best for: Contemporary and modern landscapes, driveways and patio areas needing visual interest
The combination of dark pavers (charcoal, slate grey, or near-black) with white rock fill between them creates a high-contrast landscape feature with strong contemporary character. The white rock fills the spaces between regularly spaced dark pavers — creating a pattern visible from the street and a surface that drains freely rather than creating runoff.
This combination is most effective in formal geometric arrangements: a grid of dark square pavers with white gravel between them; alternating strips of dark paving and white rock; or a stepping stone path with dark stones set in white rock.
Smart tip: Choose dark pavers in the 600x600mm or 600x300mm format for a white-rock-infill application. Larger pavers create a bolder, more architectural pattern that reads well at distance. Small pavers in white rock fill look fussy rather than designed. The proportion between paver size and white rock area determines whether the composition reads as deliberate or accidental.
Mistake to avoid: Using white rock with light-coloured pavers. The white rock loses its impact against a similar-toned surface — the contrast disappears and the combination looks washed out. White rock only achieves its full visual impact against dark or strongly colored adjacent materials.
9. Add Lighting to White Rock Beds
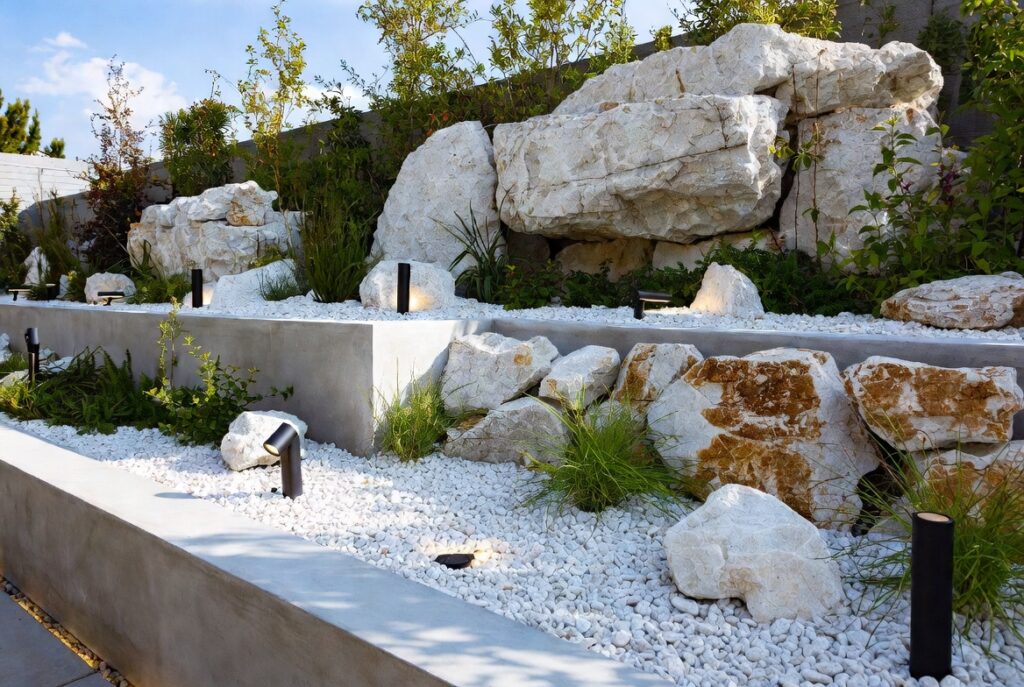
Best for: Any white rock landscape feature — lighting transforms the appearance at night dramatically
White rock’s light-reflecting quality makes it an exceptional partner for outdoor lighting. Where bark mulch and dark rock absorb light and disappear after dark, white rock reflects it — a white rock garden bed with low-voltage LED lighting glows in the dark in a way no other landscape material achieves.
Lighting options for white rock beds: recessed in-ground spotlights (uplighting trees or plants from rock level); path lights positioned in the rock (casting light across the rock surface and along the path); or LED strip lights along adjacent walls or steps (grazing across the white rock surface and emphasizing its texture).
Smart tip: Warm white LEDs (2700K) on white rock create the most attractive nighttime effect — the warm light brings out any cream or golden tones in the rock and creates a welcoming atmosphere. Cool white LEDs on white rock can look stark and institutional, particularly in residential garden applications.
Mistake to avoid: Overlighting a white rock garden area. White rock reflects so much light that a modest number of fixtures produces a bright result. Overlighting creates a glaring effect rather than an atmospheric one. Use the minimum number of fixtures needed to define the space and highlight the key plants or features within it.
10. Coastal Style White Rock Garden
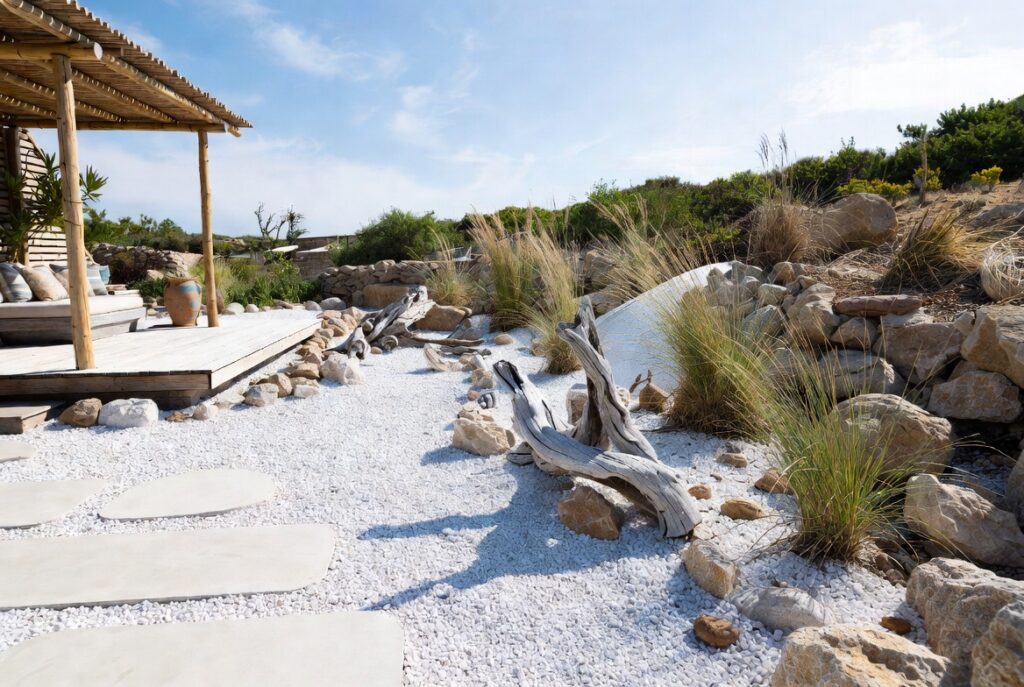
Best for: Homes near the coast, homes with grey or white exteriors, any property wanting a beach-inspired aesthetic
White rock naturally suggests coastal environments — it mimics the appearance of white sand beaches, crushed shells, and bleached coastal stone. A garden designed around this association — white rock as the ground layer, ornamental grasses (blue fescue, maiden grass) as the planting, with driftwood or coastal-toned boulders as accents — creates a genuinely coastal atmosphere regardless of actual proximity to the sea.
This aesthetic suits grey-toned, blue-grey, or white house exteriors particularly strongly — the color harmony between the house and the white rock in the garden creates a cohesive composition.
Smart tip: Ornamental grasses are the ideal planting companions for a coastal white rock garden. Their movement in wind, fine texture, and muted colors (blue-grey fescue, golden Hakonechloa, silvery miscanthus) are compatible with both the white rock and the coastal aesthetic. A combination of three grass varieties in a white rock bed achieves the look with minimal maintenance.
Mistake to avoid: Including brightly colored flowering plants in a coastal white rock design. Bold oranges, reds, and saturated pinks conflict with the restrained, bleached-tone palette that creates the coastal atmosphere. Stick to white, cream, lavender, pale pink, and blue-toned flowers if color is wanted.
11. White and Black Rock Contrast Design
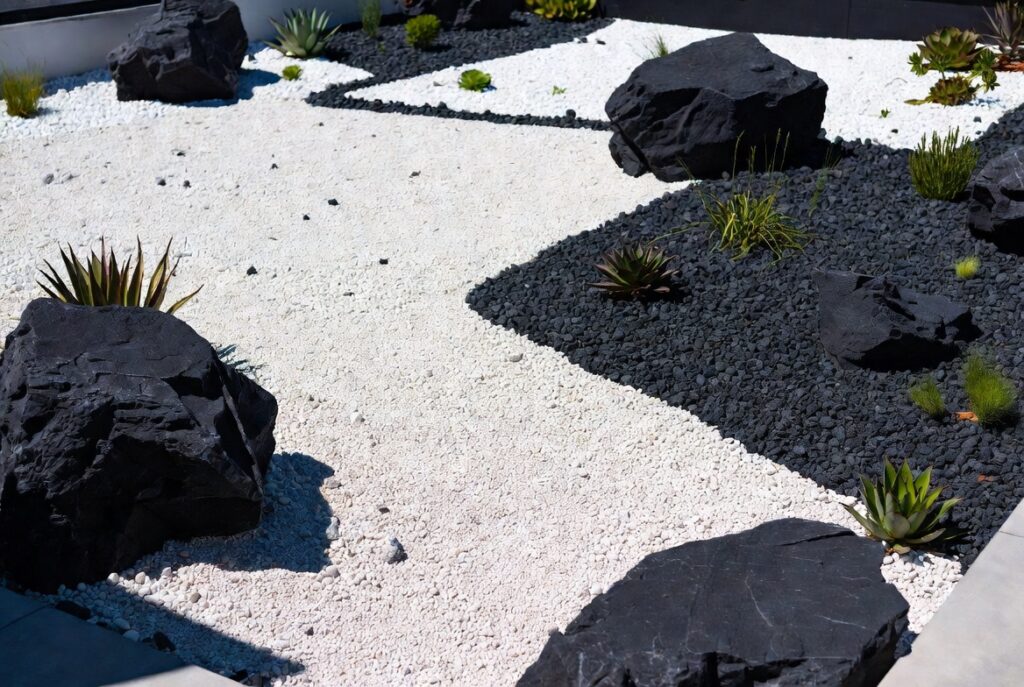
Best for: Bold, graphic landscape designs, contemporary homes, any yard wanting a strong visual statement
Using white and black rock together — in defined sections, geometric patterns, or yin-yang arrangements — creates a graphic, high-contrast landscape design with immediate visual impact. The combination is almost exclusively associated with contemporary aesthetics and suits modern architecture strongly.
The simplest version: alternating strips of white and black gravel separated by metal edging. A more elaborate version: a circular composition with white gravel on one half and black lava rock on the other, with a curved metal divider. Both create a landscape feature visible and readable from the street.
Smart tip: Use black lava rock rather than black basalt chips for the dark element in a black-and-white composition. Lava rock’s slightly porous, irregular texture contrasts with smooth white pea gravel in a way that adds tactile interest to the visual contrast — the difference in texture between the two materials is as compelling as the color contrast.
Mistake to avoid: Mixing white and black rock in a single area without a clear dividing line. White and black gravel that mingles at the boundary looks like contamination rather than design. Always separate the two materials with metal landscape edging that creates a clean, defined line between zones.
12. White Rock Around a Water Feature
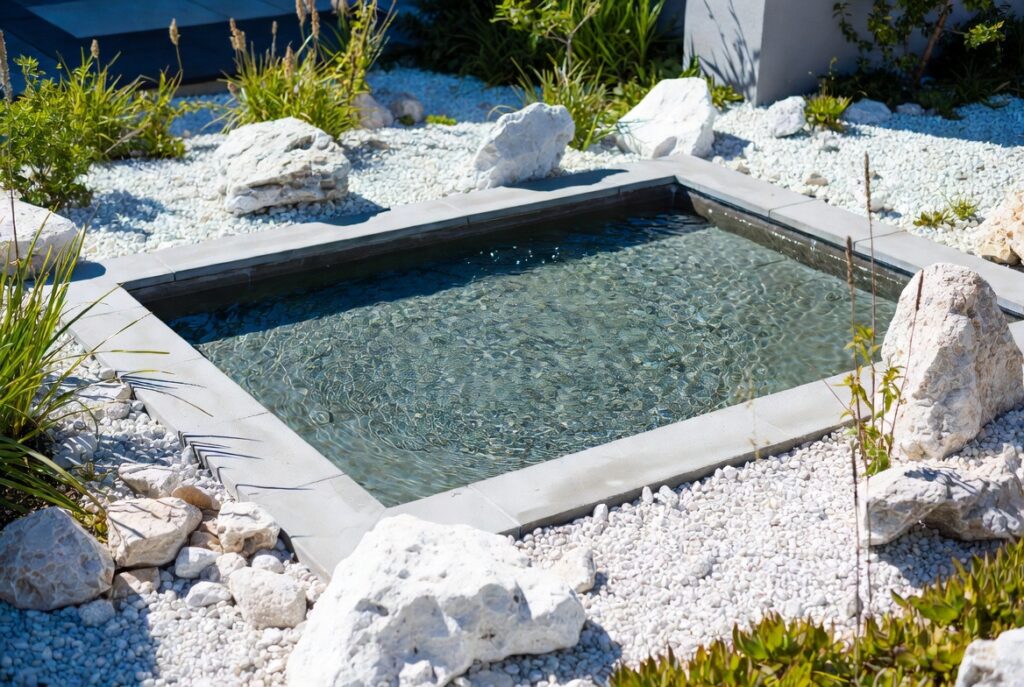
Best for: Ponds, fountains, and water features of any size — white rock enhances the reflective quality of water
White rock surrounding a water feature amplifies the feature’s visual impact — the bright rock frames the water, reflects light around the pond edge, and creates a clean, defined boundary between water and surrounding planting. The combination of still water and white stone has ancient precedents in Japanese and Mediterranean garden traditions.
For a pond edge: large smooth white river stones placed at the water’s edge, partially submerged; medium white pebbles filling the area between the pond edge and the surrounding planting; and a few boulders at varying heights to create a naturalistic bank.
Smart tip: Choose smooth, rounded river stones for water feature surrounds rather than angular crushed stone. Round stones at a water’s edge look naturally deposited; angular stones look quarried and placed. The smooth form of river stone is what makes the combination with water convincing.
Mistake to avoid: Using white limestone or calcium-rich rock around an established pond with fish or aquatic plants. Calcium-rich rock gradually raises the pH of pond water as it leaches into the water — a change that can stress fish and aquatic plants. Use silica-based white rock (quartz, quartzite, white river stone) around planted or stocked ponds.
13. Brighten a Shaded Corner
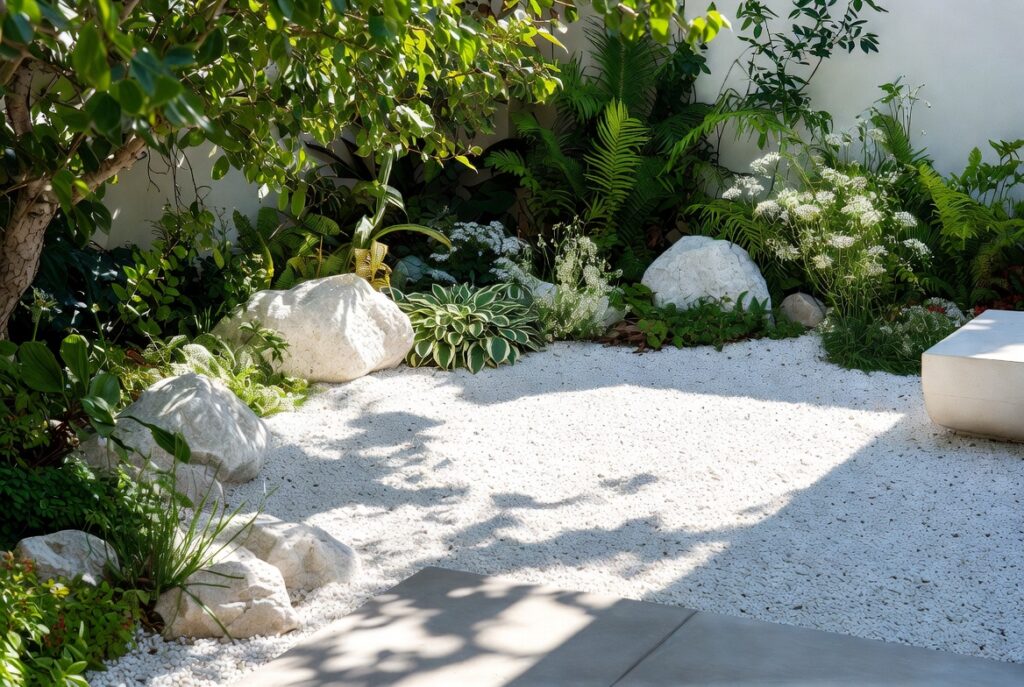
Best for: Dark corners of the garden where plants struggle and the space looks neglected
A shaded area — under a dense tree, between buildings, in a north-facing corner — where grass won’t grow and most plants struggle becomes a genuine design opportunity with white rock. Spread across a shaded area, white rock reflects what little light is available, making the corner appear significantly brighter than it actually is, and converting what looks like a neglected space into a deliberate, considered garden feature.
Plant shade-tolerant ferns or hostas in containers on the white rock surface — the pots visible against the white rock, with plants in scale with the space. Add a single piece of sculpture or a water feature for a focal point.
Smart tip: White rock in a shaded area requires less depth than in a sunny area — 2 inches is adequate in shade where weed pressure is lower. Use the depth savings to invest in the quality of the rock: smooth quartzite or white marble chips in a shaded corner look refined and deliberate where coarser white granite can look like a construction material.
Mistake to avoid: Expecting white rock to solve a drainage problem in a shaded area. Shaded corners are often damp because they receive little sunlight to evaporate moisture. White rock that drains freely still can’t evaporate moisture without sun — the rock sits in persistently damp conditions that accelerate staining and discoloration. Address the drainage cause before installing rock.
14. Use White Marble Chips in Flower Beds
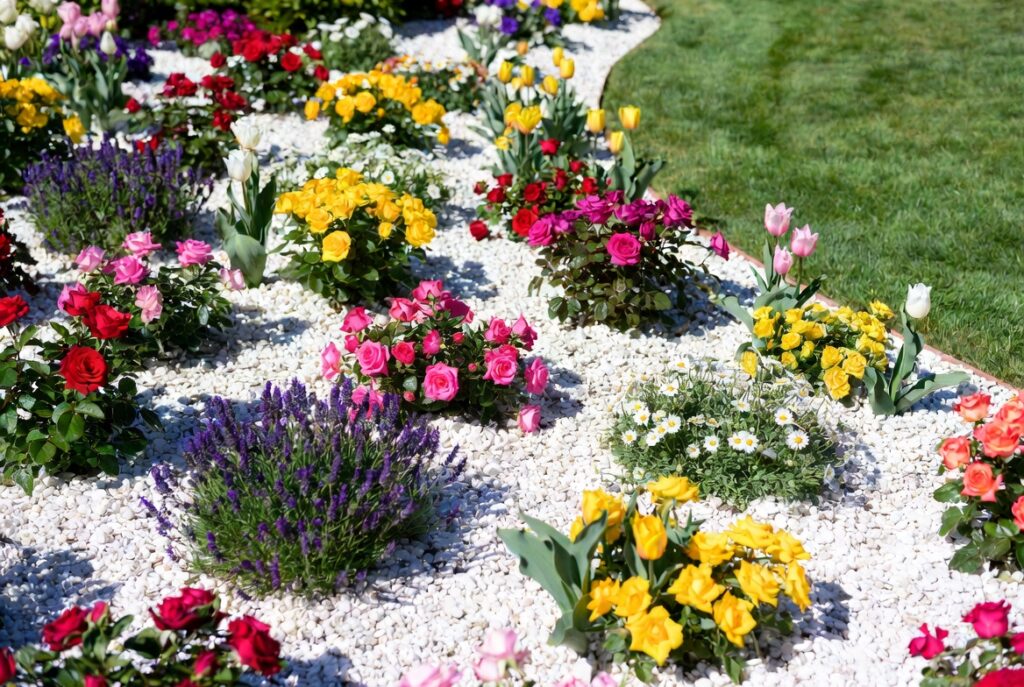
Best for: Formal and traditional gardens, high-visibility flower beds, any bed where a premium appearance is the goal
White marble chips — the most refined-looking white landscape rock available — have a brightness and slight translucency that other white rocks lack. In a formal flower bed, white marble chips create a surface that looks genuinely luxurious — more expensive in appearance than their actual cost.
The combination of white marble chips with deep green boxwood hedging, white roses, or pale lavender creates some of the most sophisticated garden compositions available. The white-on-green palette has been used in formal European gardens for centuries.
Smart tip: White marble chips stay whiter longer than other white rocks because their calcium carbonate composition resists the biological staining (algae, moss) that affects silica-based rocks in damp conditions. In wet climates, marble chips maintain their brightness significantly longer than white quartzite or white granite.
Mistake to avoid: Using white marble chips in a garden bed that receives heavy foot traffic or children’s play. Marble chips are less robust than river stone or quartzite — they chip and break more easily under impact. Use marble chips in decorative beds that aren’t walked on or disturbed regularly.
15. Stage Containers on White Rock
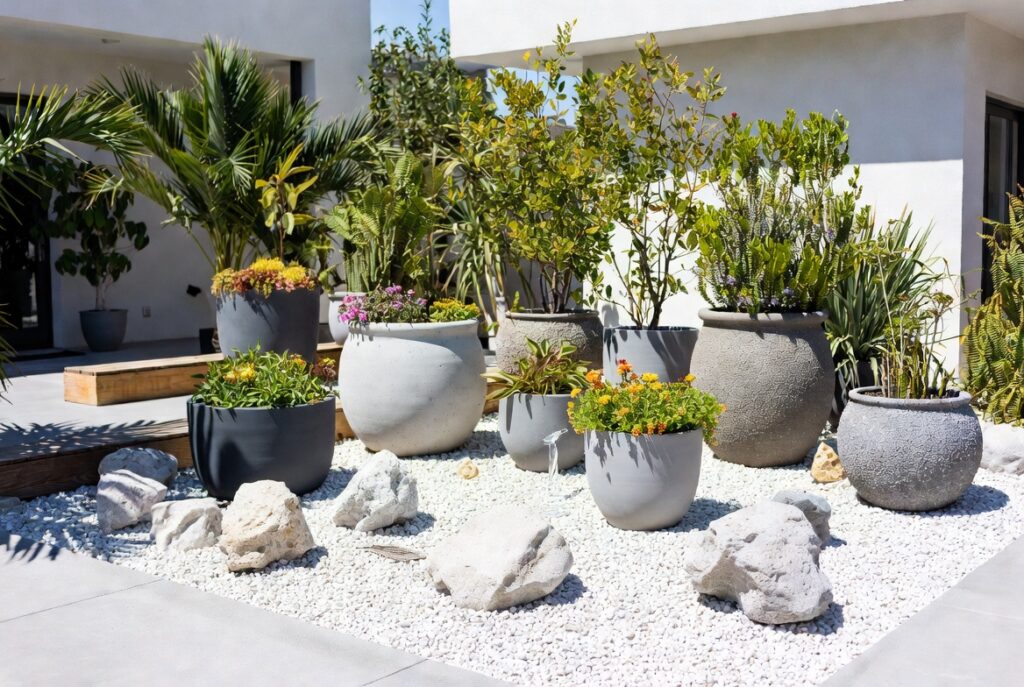
Best for: Patio and deck edges, garden focal points, statement container plantings that need a composed setting
Positioning large containers on a white rock base — a circle or square of rock surrounding each pot — elevates the container visually and prevents it from sitting on bare soil where rain splash muddies the pot and damages the plant base. The white rock creates a defined “stage” for the container that reads as intentional and composed.
This technique is particularly effective for statement containers — large ceramic pots, architectural concrete planters, or terracotta urns — where the container itself is as decorative as its contents.
Smart tip: Create a consistent staging area for multiple containers by spreading white rock across a defined rectangular or circular area (contained with metal edging) and positioning pots within it. A collection of three containers on a shared white rock stage looks like a composed garden feature; the same three pots scattered on bare soil looks like they haven’t found their permanent positions.
Mistake to avoid: Using white rock staging around containers without raising the pots on feet. Containers sitting directly on rock retain moisture at their base — particularly in pots without adequate drainage holes. Use pot feet (small terracotta or metal risers) to elevate containers 1 to 2 inches above the rock surface, allowing air circulation and drainage.
16. White Rock Slope Erosion Control
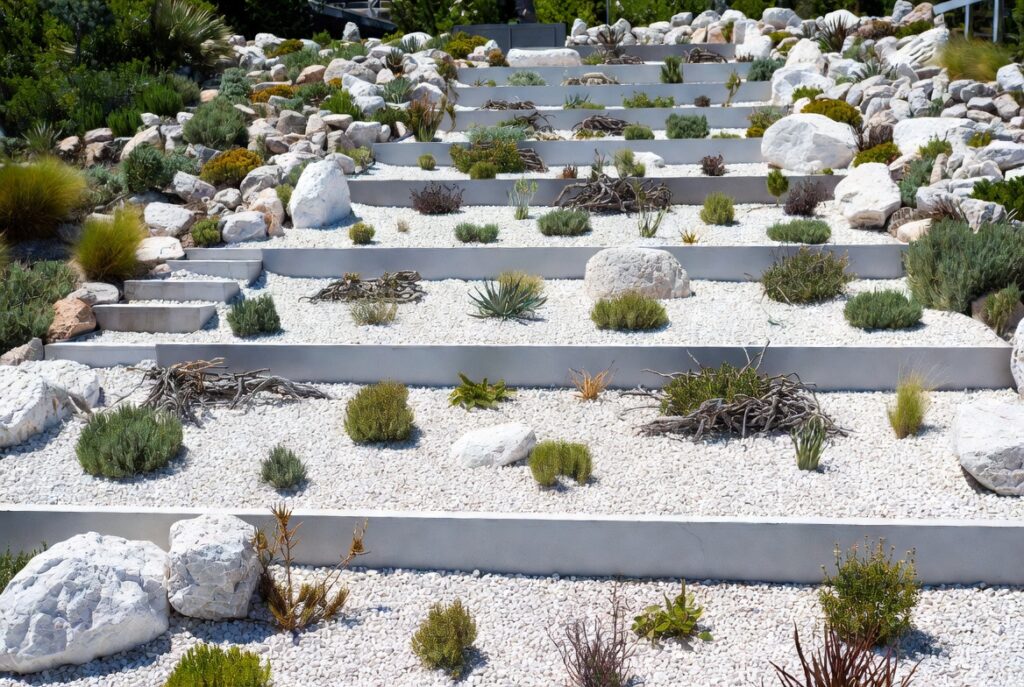
Best for: Sloped properties where erosion is a problem and planting is difficult to establish
White rock on a slope addresses erosion practically and visually simultaneously. The rock’s weight holds soil in place during heavy rainfall; the landscape fabric underneath prevents soil movement; and the bright surface of white rock on a slope is visible and attractive from a distance in a way that bark mulch or bare soil isn’t.
For steep slopes: use larger white boulders (200mm and above) as the primary erosion control, with smaller white river stone filling between them. The larger stones provide genuine mass and resistance; the smaller fill stone provides coverage and visual continuity.
Smart tip: On slopes, install landscape fabric in sections from the top down, overlapping each section by at least 12 inches so water running down the slope passes over the overlaps rather than under them. Fabric installed bottom to top creates channels at each overlap where water can get under and carry soil away.
Mistake to avoid: Using very fine white gravel on a steep slope. Fine material washes downhill in heavy rain regardless of the landscape fabric beneath — each rainfall carries some material from the upper part of the slope to the lower. Use rocks with a minimum 30mm diameter on slopes steeper than 1 in 4.
17. Driveway Border with White Rock
Best for: Driveways needing definition, homes wanting cleaner transitions between driveway and lawn or planting
A white rock border along a driveway edge — contained between the driveway surface and a metal edging strip — creates a clean, defined transition that prevents grass from encroaching onto the driveway and mud from splashing onto the driveway surface from adjacent planting. The white rock also functions as a nighttime reflector — catching headlights and defining the driveway edge in low visibility conditions.
Smart tip: Use 50mm white river stone for a driveway border rather than fine gravel. Larger stones stay in position when cars pull in and out of the driveway, resisting the displacement that smaller stones suffer when vehicle tires brush the border. They also resist being kicked onto the driveway surface by foot traffic.
Mistake to avoid: Installing a white rock driveway border without a firm edging restraint on both sides. White rock between the driveway surface and a metal edging strip stays contained; white rock without an inner edging (the driveway edge itself isn’t always adequate) gradually spreads onto the driveway surface and creates a tire-damaging and aesthetically poor result.
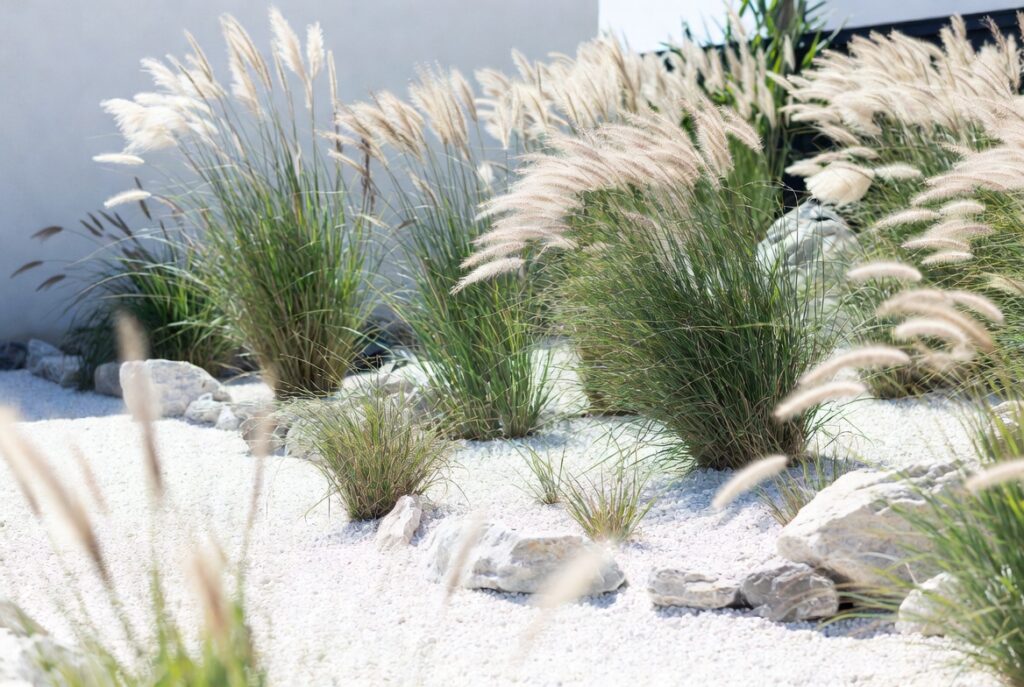
18. Pair White Rocks with Ornamental Grasses
Best for: Any white rock landscape — grasses are the most naturally compatible planting for white rock applications
Ornamental grasses planted in or alongside white rock combine the static, reflective quality of the rock with the movement, fine texture, and seasonal dynamism of grass. The contrast between the bright, stable rock surface and the swaying grass above it creates a landscape composition of genuine visual richness.
The best grass and white rock combinations: blue fescue (Festuca glauca) in white marble chips — the steel blue of the grass against white rock is one of the most elegant combinations in contemporary landscaping; fountain grass (Pennisetum) with white pea gravel — the arching form of fountain grass against the flat rock surface creates a strong contrast of form; Japanese forest grass (Hakonechloa macra) cascading over white river stones — the golden-green waterfall of Hakonechloa on white stone has a Japanese garden quality.
Smart tip: Plant ornamental grasses in irregular groupings of three or five through white rock rather than in single specimens or evenly spaced rows. Grouped grasses create a naturalistic, colony-like quality that looks appropriate with the organic character of rock. Evenly spaced individual specimens look like a planting scheme rather than a garden.
Mistake to avoid: Choosing tall, vigorous grass varieties that will overwhelm a white rock feature within two seasons. Miscanthus sinensis can reach 6 to 8 feet with an equivalent spread — appropriate for a large landscape feature, completely overwhelming in a modest white rock bed. Match grass vigor to the available space.
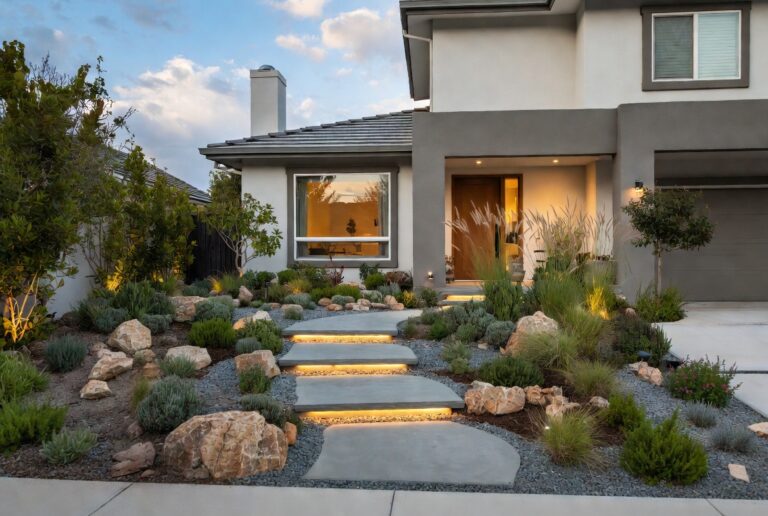
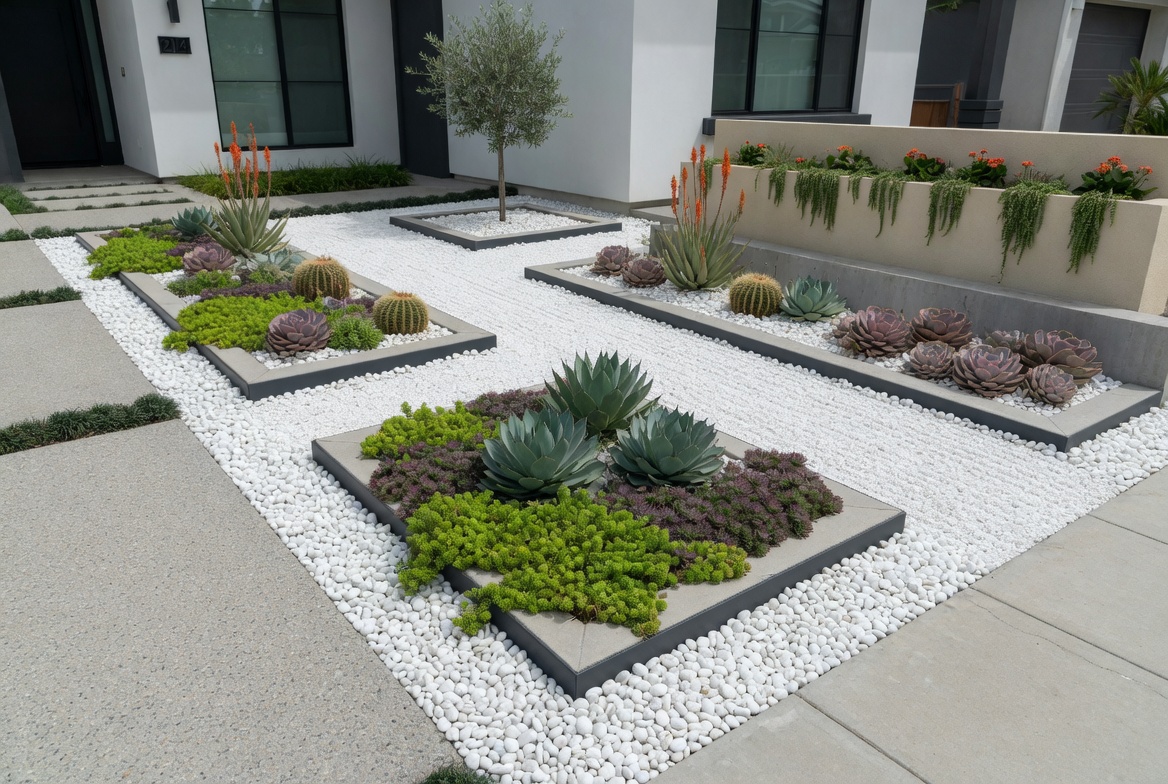
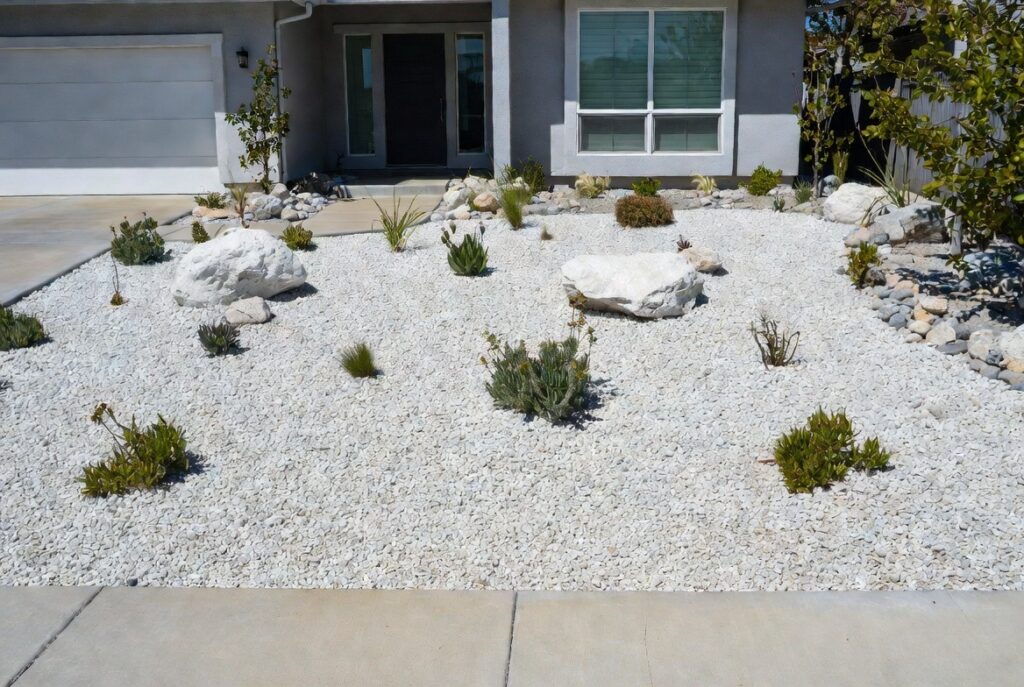
19. Full Front Yard White Rock Replacement
Best for: Drought climates, water-restricted properties, homeowners wanting maximum reduction in lawn maintenance
Replacing an entire front lawn with white rock — combined with carefully chosen drought-tolerant plants and hardscape elements — eliminates lawn mowing, irrigation, fertilizing, and seasonal lawn care permanently. The initial installation cost is offset within a few years by the elimination of ongoing lawn maintenance costs.
A full front yard white rock installation that looks designed rather than bare requires: clear zones of planting (not just rock); hardscape elements (stepping stones, a defined path, a patio area); and enough plant variety and height to create visual interest without high water use.
Smart tip: Before committing to a full front yard white rock replacement, check local ordinances and HOA regulations. Some communities have restrictions on the percentage of front yard that can be covered by hardscape or rock — regulations that may affect the design before significant investment is made.
Mistake to avoid: Installing a full white rock front yard without any planting and expecting it to look like a garden. A yard of nothing but white rock looks like an empty parking lot rather than a designed landscape. Planting — even a few well-chosen drought-tolerant shrubs and grasses — is what converts a rock-covered yard into a garden.
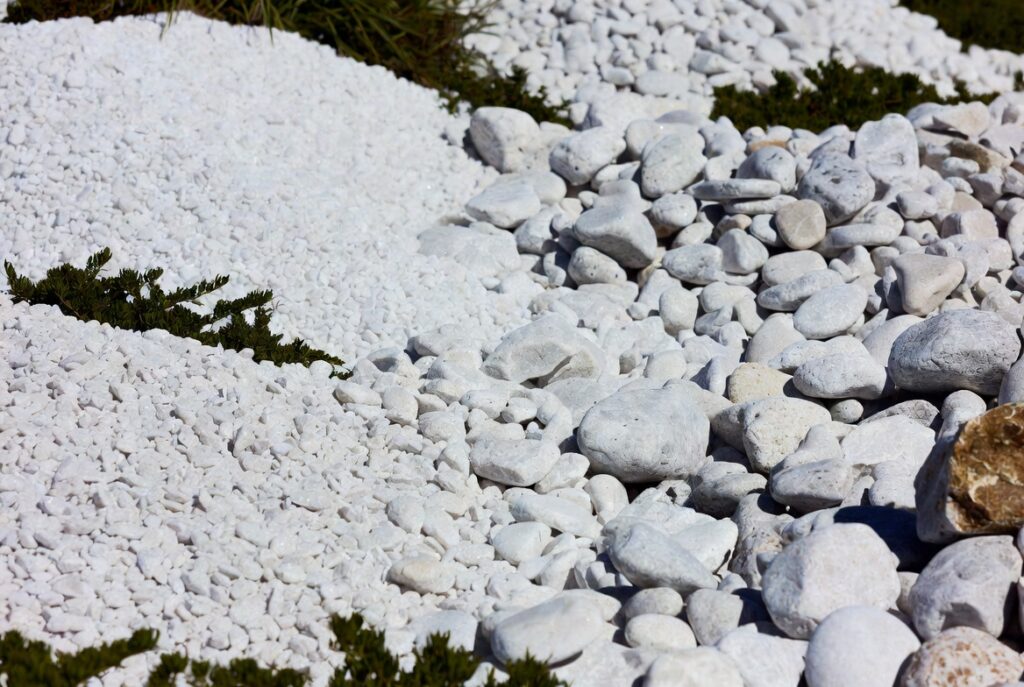
20. Choosing the Right White Rock Type
Best for: Anyone planning a white rock installation — material choice determines appearance, longevity, and maintenance requirements
Not all white rocks are the same. The differences between types — in brightness, texture, durability, and maintenance requirements — are significant enough to affect both the appearance and the long-term performance of any installation.
White marble chips: the brightest and most refined-looking option. Calcium-based, so slightly reactive with acidic soils and rain. Chips and breaks more easily than harder stone. Excellent for formal, high-visibility applications. White pea gravel (quartzite): smooth, rounded, durable. Slightly less bright than marble but more robust. The best general-purpose white rock for walkways, bed mulch, and zen gardens. White river stone (various sizes): smooth, rounded by water wear, available in sizes from 20mm to 200mm+. Durable and natural-looking. The best choice for dry creek beds and water features. White granite chips: angular crushed stone, the least expensive option. Looks more industrial than rounded alternatives. Suits utility applications better than decorative ones. White limestone: warm white, slightly textured. Can raise pH in adjacent soil over time. Suits Mediterranean-style gardens.
Smart tip: Order a sample of any white rock before purchasing in quantity and view it in your actual garden conditions — in your specific light, against your house color, and adjacent to your existing planting. White rocks look different in a supplier’s yard than they do in your specific garden context.
Mistake to avoid: Choosing white rock based on price per ton without considering maintenance implications. Cheap angular white crushed stone may be significantly less expensive than smooth white pea gravel, but its appearance is sufficiently less attractive that the cost saving is generally not worth the aesthetic trade-off in decorative applications. For utility applications (slope erosion control, drainage channels), the cheaper option is entirely appropriate.
Before You Start
- Install landscape fabric first, always. Every white rock application over bare soil needs landscape fabric underneath. Without it, rocks sink into soil within one to two seasons and become impossible to separate cleanly. Fabric installation is the step that’s most tempting to skip and most regretted when omitted.
- Calculate quantity carefully. A 3-inch deep application of white pea gravel requires approximately 0.75 cubic feet per square foot of coverage. Calculate the square footage of the area, multiply by 0.75, and add 10% for settling. Underordering and matching a second delivery to the exact color is difficult.
- Consider heat in hot climates. White rock reflects heat upward as well as outward — in very hot climates, white rock adjacent to seating areas or children’s play zones can create uncomfortably hot conditions. Position white rock features away from areas used during the hottest part of the day.
- Plan maintenance access. White rock beds require occasional raking to remove debris and refresh the surface. Ensure all areas of the installation are accessible without walking on the rock surface.
Conclusion
White rock works in a landscape because it does something unusual: it contributes brightness rather than absorbing it. Every other common landscape material — bark mulch, dark stone, soil — absorbs and darkens. White rock reflects and brightens. This quality makes it particularly effective in small yards where reflected light increases the apparent space, in shaded areas where any additional brightness improves the atmosphere, and as a contrasting background that makes plant colors more vivid. The key to using it well is pairing it with materials and plants that benefit from the contrast — and installing it properly over landscape fabric so it stays clean, bright, and in place indefinitely.