
20 Xeriscape Ideas for a Water-Wise Stunning Landscape
Xeriscaping is not a style of garden — it’s a principle. The principle is that plants should be matched to the conditions that already exist rather than conditions being artificially maintained to suit plants. A lawn in a climate that receives 10 inches of annual rainfall requires constant irrigation to survive. A xeriscape in the same location uses plants adapted to 10 inches of annual rainfall and requires almost none. The result uses 50 to 70 percent less water than a conventional landscape while often looking more considered and more distinctly regional than the generic lawn-and-foundation-planting approach it replaces. These 20 ideas cover every aspect of xeriscape design — from the initial planning decisions that determine long-term water use to the specific plants, materials, and features that make a water-wise garden genuinely beautiful.
1. Plan Your Hydrozones First
Best for: Any new xeriscape installation — this planning step determines the long-term water efficiency of everything that follows
Hydrozoning — dividing the landscape into zones based on water requirement — is the planning foundation of effective xeriscape design. Without hydrozoning, drought-tolerant plants end up adjacent to water-hungry ones, making efficient irrigation impossible: either the drought-tolerant plants are overwatered or the thirsty plants are stressed.
The typical three-zone structure: a moderate-water zone immediately adjacent to the house (visible from the street, easily accessed for hand watering, containing plants that benefit from more regular moisture); a low-water zone further from the house (established plants that need only occasional irrigation during dry spells); and a very-low-water zone at the property perimeter (natives and drought-adapted plants that survive on natural rainfall once established).
Smart tip: Walk your property after heavy rainfall and note where water naturally pools or runs off. Low points accumulate water and suit moisture-tolerant plants; high points drain quickly and suit drought-adapted plants. Working with the existing water movement of the site reduces the irrigation needed for any zone.
Mistake to avoid: Creating hydrozones on paper without walking the site at different times of day. Sun exposure, shade from trees and buildings, and existing drainage patterns aren’t visible on a plan — they require direct observation. A zone that looks like full sun on a plan may be shaded by a building wall from noon onward, fundamentally changing which plants will succeed there.
2. Replace Lawn with a Gravel Garden
Best for: Any homeowner facing high water bills, drought restrictions, or simply wanting to reduce lawn maintenance
A gravel garden replacing lawn is the single most impactful water reduction change available in residential landscaping. Lawn is the most water-intensive element of most residential landscapes — it requires approximately 1 inch of water per week through the growing season, applied consistently. A gravel garden requires essentially none after establishment.
The installation process: excavate the lawn area to 6 inches, add a layer of compost mixed into the existing soil, install landscape fabric, and cover with 3 to 4 inches of decorative gravel. Plant drought-tolerant perennials through the fabric at generous spacing — the gravel between plants suppresses weeds and retains soil moisture simultaneously.
Smart tip: Use decomposed granite or natural rounded pea gravel rather than angular crushed stone for a gravel garden. Decomposed granite compacts slightly and creates a stable walking surface that works within the planting. Angular crushed stone scatters with foot traffic and has an industrial quality that doesn’t suit planted garden contexts.
Mistake to avoid: Removing all organic matter from the soil before installing gravel. The plant roots in a gravel garden still need soil biology to function. Gravel is a surface material only — the soil beneath needs amendment and organic matter to support plant establishment and long-term performance.
3. Plant Lavender as a Ground Cover
Best for: Sunny, well-drained slopes and borders — lavender is the most versatile xeriscape plant available in temperate climates
Lavender (Lavandula) combines exceptional drought tolerance with visual beauty, fragrance, and wildlife value in a way that few other plants match. Once established in well-drained soil and full sun, it requires virtually no supplemental irrigation in temperate climates, produces months of bloom that attracts bees and butterflies, and creates a silvery-green ground cover that looks good year-round.
For ground cover applications, ‘Hidcote’ and ‘Munstead’ (compact, 18 inches) suit smaller spaces; ‘Provence’ and ‘Grosso’ (30 to 36 inches) cover larger areas more quickly. ‘Phenomenal’ is particularly drought-tolerant and performs well in humid climates where other lavenders struggle.
Smart tip: Plant lavender in groups of three or five of the same variety rather than mixing multiple varieties in the same bed. Uniform planting creates the carpet effect that makes lavender look like a ground cover rather than a collection of individual plants. Different varieties have different heights and bloom times — mixing them creates an uneven, inconsistent appearance.
Mistake to avoid: Planting lavender in heavy clay soil or in positions with poor drainage. Lavender’s primary weakness is root rot in wet conditions — it’s more likely to fail from excessive moisture than from drought. Amend heavy soil with grit and compost before planting, or build a slightly raised bed to improve drainage.
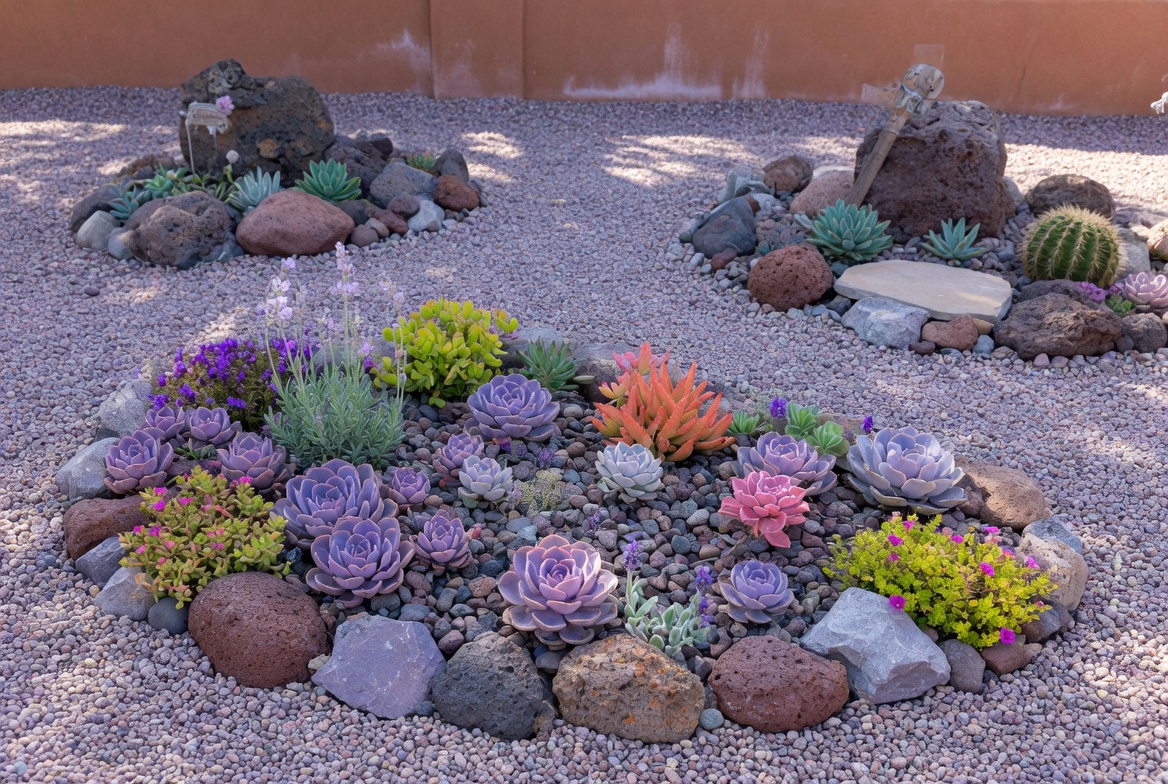
4. Create a Succulent Display Bed
Best for: Hot, sunny climates — the most dramatic xeriscape planting option available
Succulents — plants that store water in their leaves, stems, or roots — are the most drought-tolerant garden plants available. In appropriate climates, an established succulent bed requires watering only during extended periods without rainfall, typically just a few times per year.
The visual diversity of succulents is extraordinary: echeveria in rosette forms from 2 inches to 18 inches across; agave with bold architectural presence from 2 feet to 8 feet; sedum in low mats and upright clumps; aloe with vivid orange flowers in winter; Sempervivum (hen and chicks) that spreads to fill gaps between stones.
Smart tip: Create height variation in a succulent bed by using larger architectural specimens (agave, aloe, tall euphorbia) as focal points, medium rosette succulents (large echeveria, Aeonium) as infill, and low ground-covering succulents (sedum, Delosperma, Sempervivum) between them. The layered composition looks designed rather than collected.
Mistake to avoid: Planting succulents in shade or in regions with high humidity and cold wet winters without choosing cold-hardy varieties. Most dramatic succulents (tropical agave, echeveria, aeonium) are not frost-hardy. In cold climates, choose specifically hardy varieties — Sempervivum, Sedum, and cold-hardy agave varieties (Agave parryi, A. havardiana) tolerate significant frost.
5. Use Native Plants for Your Region
Best for: Any xeriscape — native plants are the highest-performing choice for long-term water efficiency
Native plants — species that evolved in your specific region — are the most reliably drought-tolerant option available because they’ve spent thousands of years adapting to your climate’s specific rainfall patterns, temperature extremes, and soil conditions. Once established, they require no supplemental irrigation in most years because they’re calibrated to survive on whatever rainfall your region naturally provides.
Native plant selection by region: Pacific Northwest — ceanothus, manzanita, native fescues, Oregon grape; Southwest — desert willow, purple sage, penstemon, agave; Midwest — little bluestem grass, coneflower, black-eyed Susan, prairie dropseed; Southeast — muhly grass, beautyberry, sparkleberry, native azaleas in adapted varieties.
Smart tip: Source native plants from local nurseries that grow regionally appropriate stock rather than from large national suppliers. A plant labeled as native to a region but grown in a completely different climate may not be well-adapted to your specific local conditions. Locally grown plants establish more readily.
Mistake to avoid: Assuming all native plants require no maintenance once established. Native plants need regular watering for their first season (sometimes two) while they develop root systems. Establishment irrigation — thorough watering every 7 to 10 days during the first growing season — is essential even for drought-tolerant natives.
6. Install a Drip Irrigation System
Best for: Any xeriscape with plants that need establishment irrigation or occasional deep watering
Even a drought-tolerant landscape benefits from occasional deep watering, particularly during establishment and during extended periods without rainfall. A drip irrigation system delivers water directly to plant root zones at low flow rates, eliminating the surface evaporation and runoff that overhead sprinklers produce — making every unit of water applied significantly more efficient.
Drip systems use 30 to 50 percent less water than conventional spray irrigation while achieving better plant establishment because water reaches roots slowly enough to be absorbed rather than running off. They also keep foliage dry, reducing fungal disease pressure on xeriscape plants.
Smart tip: Install drip irrigation on a timer set to water in the early morning (4 AM to 7 AM). Early morning watering minimizes evaporation loss (air is cooler and wind is typically calmer), allows foliage to dry before evening (reducing fungal disease), and delivers water during the period of lowest demand on municipal water supplies.
Mistake to avoid: Setting the drip timer to water too frequently. The most common drip irrigation mistake is watering too often at low volumes. Deep, infrequent watering — running the system for longer periods less frequently — encourages roots to grow deeply, which dramatically improves drought resilience. Frequent shallow watering keeps roots near the surface where they’re vulnerable to dry spells.
7. Add Ornamental Grasses
Best for: Any xeriscape needing movement, texture, and year-round structure
Ornamental grasses are among the most versatile and drought-tolerant landscape plants available. Most established ornamental grasses require minimal supplemental irrigation, provide four-season interest (spring green, summer full form, autumn color, winter seed head architecture), and require virtually no maintenance beyond an annual cut-back.
Best ornamental grasses for xeriscape: Festuca glauca (blue fescue — compact, intensely blue, exceptional drought tolerance); Bouteloua gracilis (blue grama — native prairie grass, wispy and elegant); Panicum virgatum (switch grass — tall, architectural, brilliant autumn color); Muhlenbergia capillaris (muhly grass — pink-purple cloud of flowers in autumn, spectacular).
Smart tip: Cut ornamental grasses back hard once per year in late winter before new growth emerges — not in autumn. Autumn cutting removes the winter seed head structure that birds feed from and that creates visual interest in the winter landscape. The annual cut takes 5 minutes per plant and keeps established grasses vigorous indefinitely.
Mistake to avoid: Dividing ornamental grasses too infrequently. After 3 to 5 years, the center of many grass clumps dies out, leaving a ring of growth with a dead center. Dig and divide established grass clumps every 3 to 4 years to maintain vigor and full-clump appearance.
8. Build a Rock Garden on a Slope
Best for: Sloped properties where erosion is a concern and conventional planting is difficult to establish
A rock garden — terraced levels of natural stone with drought-tolerant plants in the pockets between rocks — solves three xeriscape challenges simultaneously. The rocks slow water runoff on slopes, retaining moisture in the planting pockets between them. The excellent drainage that rock gardens provide suits most drought-tolerant plants. And the visual effect of rocks and plants together creates a landscape with genuine character.
The construction sequence: place the largest boulders first, setting them partially into the slope for stability. Position them with their natural stratification lines horizontal — as they would appear in a natural rock outcrop. Fill planting pockets between rocks with a mix of existing soil and grit. Plant drought-tolerant plants and allow them to colonize between the rocks naturally over time.
Smart tip: Use locally quarried stone — material from the same geological formation as the bedrock beneath your property. Local stone looks as though it belongs in the landscape because it literally does. Imported stone from a different geological region can look placed regardless of how carefully it’s arranged.
Mistake to avoid: Using rounded river stones as the primary material in a hillside rock garden. River stones are rounded by water flow — they look naturally appropriate in a riverbed or dry stream but incongruous in a hillside rock garden, where angular or stratified stones would naturally occur. Match the stone form to the garden type.
9. Create a Mediterranean Style Garden
Best for: Temperate climates with dry summers and mild winters — the climate that Mediterranean plants evolved for
The Mediterranean garden aesthetic — terracotta, herbs, olives, lavender, rosemary, gravel, and terracotta — is one of the most naturally xeric garden styles available because the plants that create it evolved in a climate characterized by summer drought and winter rainfall. In Mediterranean and similar climates (California, parts of Australia, South Africa, and the Pacific Coast), these plants are genuinely well-adapted rather than merely tolerant.
Key plants: olive (Olea europaea) — the most evocative Mediterranean tree, drought-tolerant and long-lived; rosemary — structural and aromatic, very drought-tolerant when established; cistus (rock rose) — drought-tolerant shrub with papery flowers; phlomis — architectural grey-leaved shrub with whorls of yellow or purple flowers; thyme — low ground cover, drought-tolerant.
Smart tip: Gravel mulch is the authentic Mediterranean garden ground covering — it reflects heat, drains quickly, suits the plants, and contributes to the aesthetic. Use pale buff or terracotta-toned gravel to reinforce the warm color palette of Mediterranean planting.
Mistake to avoid: Planting Mediterranean plants in cold, wet climates without choosing cold-hardy varieties. Lavender, rosemary, and cistus vary considerably in cold hardiness — the commonly available varieties may not survive winters below about -5°C (23°F). Research specific variety cold hardiness before planting in marginal climates.
10. Use Decomposed Granite Paths
Best for: Xeriscape gardens needing pathways that are permeable, low-cost, and visually appropriate to the aesthetic
Decomposed granite (DG) — partially weathered granite that has broken down to a fine, sandy gravel — makes the most appropriate pathway material for a xeriscape garden. It’s permeable (allows water into the soil rather than creating runoff), it’s natural-looking and complements drought-tolerant planting, it compacts to a stable walking surface, and it’s significantly less expensive than paving.
DG paths can be installed without edging on firm ground. In sandy or loose soil, a metal or plastic edging strip on each side prevents the material from spreading into adjacent planting beds over time.
Smart tip: Stabilized decomposed granite — DG mixed with a polymer binder before application — creates a harder, more stable surface that holds together better in heavy rain and is more comfortable to walk on. The stabilized version costs slightly more but suits high-traffic paths significantly better than unstabilized DG.
Mistake to avoid: Using plain decomposed granite in a path that gets significant foot traffic from people wearing shoes with defined heels. Plain DG is comfortable in flat shoes but uncomfortable in heels and can become uneven with heavy use. For formal or high-traffic paths, stabilized DG or stepping stones set in DG provide better performance.
11. Plant Agave as a Statement Plant
Best for: Hot, dry climates — agave is the most architecturally dramatic xeriscape plant available
Agave is one of the most distinctive plant forms in the landscape — its bold rosette of thick, pointed leaves makes an unmistakable statement. A mature specimen of Agave americana can reach 6 feet tall and 8 feet wide, commanding its space with genuine architectural presence. Smaller species and varieties suit more modest garden situations while retaining the characteristic bold form.
Agave is xerophytic to an extreme degree — its fleshy leaves store water that sustains the plant through extended periods without rainfall. In appropriate climates, an established agave requires essentially no supplemental irrigation.
Smart tip: Use agave sparingly — one specimen in a prominent position makes a statement; three agaves of the same species spaced through a border creates a rhythm; a collection of many different agave species looks like a botanical collection rather than a designed garden. Restraint amplifies the impact of a dramatic plant.
Mistake to avoid: Planting agave near paths, children’s play areas, or seating. The leaf tips of most agave species are sharply pointed and genuinely dangerous — capable of causing serious puncture injuries. Position agave in viewing beds where it won’t be brushed by passing people, and choose tip-less or soft-leaf varieties (Agave attenuata) for any garden used by children.
12. Add a Rain Garden for Drainage
Best for: Properties where stormwater runoff is a problem, any xeriscape where capturing rainfall improves plant establishment
A rain garden — a shallow depression planted with moisture-tolerant plants positioned to capture and absorb stormwater runoff from roofs, driveways, and hard surfaces — turns a drainage problem into a garden feature. Instead of rainwater running off the property into storm drains, it’s captured in the rain garden where it slowly infiltrates into the soil, recharging groundwater and watering the surrounding landscape.
A correctly designed rain garden should drain completely within 24 to 48 hours after a rainfall event — it’s not a pond, but a temporary water-holding area that absorbs its captured water into the ground.
Smart tip: Connect downspouts to the rain garden via a simple channel or buried pipe, directing roof runoff to the depression. A roof collecting 1 inch of rainfall produces approximately 600 gallons of runoff per 1,000 square feet — routing even part of this to a rain garden provides meaningful irrigation to surrounding plants.
Mistake to avoid: Positioning a rain garden within 10 feet of the house foundation. Water pooling near foundations creates moisture problems in basements and crawl spaces. The rain garden should be positioned where it intercepts runoff before it reaches the house, not adjacent to the foundation.
13. Grow Russian Sage and Yarrow
Best for: Any temperate xeriscape garden — two of the most reliable and beautiful drought-tolerant perennials available
Russian sage (Perovskia atriplicifolia) and yarrow (Achillea) are the two perennials most consistently recommended for xeriscape gardens because both combine outstanding drought tolerance with genuine visual beauty and long bloom seasons.
Russian sage produces lavender-blue flower spikes on silver-white stems from July through October — a color combination that suits virtually every garden palette and photographs exceptionally well. It reaches 3 to 5 feet in height and width and requires virtually no maintenance beyond an annual cut-back.
Yarrow (Achillea millefolium and its cultivars) blooms in flat-topped clusters from June through September in colors from white and cream through yellow and orange to deep red and burgundy. It spreads gently, tolerates poor soils, and requires no irrigation once established in most temperate climates.
Smart tip: Plant Russian sage and yarrow together — the airy, vertical form of Russian sage contrasted with the flat, horizontal flower heads of yarrow creates a classic complementary pairing. Both reach similar heights (3 to 4 feet) and bloom simultaneously through summer, creating a sustained display with minimal intervention.
Mistake to avoid: Cutting Russian sage back in autumn. The grey-white stems provide winter structural interest and some frost protection for the crown. Cut back to 6 to 8 inches in late winter or early spring when new growth is emerging — not in autumn when the plant is completing its season.
14. Use Mulch to Retain Moisture
Best for: Every xeriscape — mulch is the most universally impactful low-cost improvement available
Mulch — a layer of organic or inorganic material applied to the soil surface around plants — reduces soil moisture evaporation by up to 70% in hot conditions. In a xeriscape context, this means established plants need irrigation much less frequently and new plants establish faster because moisture remains available at root depth longer after each watering or rainfall event.
Organic mulches (bark chips, wood chips, straw, compost) improve soil as they decompose, add organic matter, and support soil biology. Inorganic mulches (gravel, decomposed granite) don’t decompose and don’t improve soil, but they last indefinitely and suit xeriscape aesthetics particularly well.
Smart tip: Apply mulch to a depth of 3 to 4 inches for maximum moisture retention benefit. Shallower applications provide some benefit but less effectively. Thicker applications (over 6 inches of organic mulch) can prevent rainfall from reaching the soil and create anaerobic conditions at the soil surface. The 3 to 4-inch range is the practical optimum.
Mistake to avoid: Mounding mulch against plant stems or tree trunks — the “mulch volcano” that appears in many landscapes. Mulch in contact with bark traps moisture against the stem, which creates conditions for fungal rot and bark damage. Leave a 3 to 4-inch gap of bare soil around every stem and trunk.
15. Create a Native Wildflower Meadow
Best for: Large gardens, any property where lawn replacement is desired, gardeners who want to support local pollinators
A native wildflower meadow replaces high-maintenance, high-water lawn with a dynamic, self-sustaining plant community that requires almost no irrigation after establishment, needs mowing only once per year, and provides exceptional habitat for native bees, butterflies, and birds.
The establishment process requires patience: in the first year, what’s growing is a mixture of wildflower seedlings and weed seedlings that are indistinguishable from each other at early growth stages. The second year, the meadow begins to look intentional as wildflowers outcompete most weeds. The third year, it’s established.
Smart tip: Mow the meadow in late autumn after plants have set seed and birds have had access to the seed heads through winter. Cut to 4 to 6 inches — low enough to prevent woody shrubs from establishing, high enough to leave overwintering insect eggs and pupae in the remaining stems undisturbed.
Mistake to avoid: Sowing generic “wildflower meadow” seed mixes without checking whether the species included are native to your region. Many commercial wildflower mixes contain attractive but non-native species that look good but provide minimal ecological value compared to genuinely local natives. Source regionally specific seed mixes for maximum wildlife benefit.
16. Add a Hardscape Patio Area
Best for: Xeriscape gardens where outdoor living space is needed without lawn or high-water planting
Replacing a lawn area with a hardscape patio — flagstone, decomposed granite, permeable pavers, or concrete — eliminates water use from that area entirely while creating functional outdoor living space. A well-designed xeriscape combines low-water planting zones with hardscape living areas, reducing the planted area that requires any irrigation while increasing the usable outdoor space.
Permeable paving — concrete pavers with gaps, porous concrete, or flagstone set in compacted gravel rather than mortar — allows rainfall to penetrate the surface and recharge the soil below rather than running off into storm drains.
Smart tip: Surround patio areas with drought-tolerant planting at the edges — lavender, rosemary, ornamental grasses, or low-water perennials. The planting softens the hard edge of the patio, reduces the heat island effect of large paved surfaces, and creates a more inviting, garden-connected atmosphere.
Mistake to avoid: Installing impermeable hardscape over a large percentage of the property without considering drainage implications. When rainfall can’t penetrate the soil, it runs off — and in significant volumes, it runs off quickly, potentially causing erosion, flooding, or neighbor disputes. Keep impermeable surfaces to the minimum necessary and supplement with permeable options.
17. Plant Rosemary as a Border
Best for: Sunny, well-drained borders in temperate climates — rosemary is one of the most practical and beautiful xeriscape border plants
Rosemary (Salvia rosmarinus, formerly Rosmarinus officinalis) is simultaneously a culinary herb, a flowering shrub, a drought-tolerant landscape plant, and a pollinator plant of outstanding wildlife value. Established rosemary requires virtually no supplemental irrigation in temperate climates and provides year-round interest — evergreen foliage, winter to spring flowers in blue, white, or pink depending on the variety.
As a border plant: upright varieties (Tuscan Blue, Miss Jessop’s Upright) create a low-medium hedge to 3 to 4 feet; prostrate varieties (Prostratus) trail and spread along the ground, spilling over walls and edges.
Smart tip: Harvest rosemary regularly throughout the growing season — cutting stems for kitchen use is the same as the regular light pruning that keeps the plant compact and productive. A rosemary that’s harvested from regularly stays bushy and low; one that’s never cut becomes woody, open, and less attractive over time.
Mistake to avoid: Hard pruning old rosemary into bare wood. Unlike many shrubs, rosemary doesn’t regenerate from old wood reliably. Cutting into stems that have no green leaves typically kills those stems. Always prune into green growth, never below the lowest leaves on any stem.
18. Install a Rainwater Harvesting System
Best for: Any xeriscape garden in a climate with seasonal rainfall — capturing rain provides free, plant-appropriate irrigation water
A rainwater harvesting system — from a simple barrel connected to a downspout to an underground cistern holding thousands of gallons — captures rainfall from rooftops and stores it for use on the garden during dry periods. Collected rainwater is soft (low mineral content), unchlorinated, and at ambient temperature — ideal for plant irrigation.
A standard 50-gallon rain barrel connected to one downspout captures the runoff from approximately 80 square feet of roof per inch of rainfall. Multiple barrels connected in series, or a larger cistern, scale the storage to match the property’s irrigation needs.
Smart tip: Position rain barrels at the highest available downspout on the property — gravity allows the stored water to be distributed to lower areas of the garden without pumping. Even a modest elevation difference of 2 to 3 feet between the barrel and the delivery point creates enough pressure for a soaker hose.
Mistake to avoid: Allowing stored water to stagnate in unsealed barrels. Stagnant water grows algae and provides breeding habitat for mosquitoes within days in warm weather. Use barrels with sealed tops and screened inlet openings — a sealed barrel with only a screened opening prevents mosquito access while allowing water collection.
19. Add a Focal Point Drought-Tolerant Tree
Best for: Any xeriscape garden needing a structural anchor — a tree provides shade, scale, and year-round presence
A drought-tolerant specimen tree provides shade that reduces the water requirement of surrounding plants (shaded plants transpire less and retain soil moisture longer), creates structure that persists through winter when lower plants are dormant, and provides the vertical scale that makes a garden feel complete.
Best drought-tolerant trees by climate: arid Southwest — desert willow (Chilopsis linearis), palo verde (Cercidium), mesquite (Prosopis); Mediterranean climates — olive (Olea europaea), carob (Ceratonia siliqua), California buckeye; temperate climates — honey locust (Gleditsia triacanthos), Turkish oak (Quercus cerris), hackberry (Celtis).
Smart tip: Water a newly planted drought-tolerant tree deeply and infrequently during its first two years — deep watering every 10 to 14 days rather than shallow watering every few days. Deep watering encourages deep root development that gives the tree its eventual drought resilience. Shallow watering produces shallow roots that never develop true drought tolerance.
Mistake to avoid: Choosing a drought-tolerant tree based only on water requirements without considering mature size. A desert willow that reaches 20 feet wide may be appropriate for a large xeriscape border but will overwhelm a small front garden. Always research and plan for the tree’s mature dimensions, not its size at purchase.
20. Improve Soil Before You Plant
Best for: Every xeriscape — soil preparation determines how quickly plants establish and how much irrigation they need long-term
Soil preparation is the step most often skipped in xeriscape installation and the one most responsible for plant failure and high water use after establishment. Drought-tolerant plants placed in compacted, nutrient-poor, or poorly draining soil take significantly longer to establish and require substantially more irrigation during establishment than the same plants in properly prepared soil.
The preparation differs by soil type: clay soil needs amendment with coarse grit and compost to improve drainage; sandy soil needs organic matter to improve moisture retention; compacted soil needs deep aeration before planting. The goal is soil that drains well but retains enough moisture to sustain plant establishment.
Smart tip: Have your soil tested before preparing it. A simple soil pH and nutrient test (available from cooperative extension services or garden centers) identifies what amendments are actually needed rather than what you assume are needed. Unnecessary amendments waste money and time; a test directs amendments precisely where they’re needed.
Mistake to avoid: Using standard multipurpose compost in large quantities to amend soil for drought-tolerant plants. Most drought-adapted plants prefer lean soil — high fertility (from heavy compost amendment) encourages lush, soft growth that’s more susceptible to drought stress rather than the compact, tough growth that drought tolerance requires. Use compost sparingly — improving soil structure rather than dramatically increasing fertility.
Before You Start
- Understand your climate deeply. Average annual rainfall, seasonal distribution (summer dry vs. winter dry), typical temperature extremes, and frost dates all determine which xeriscape plants will succeed. Regional specificity matters more in xeriscape design than in any other garden approach.
- Start with a water audit. Know how much you currently spend on landscape irrigation before designing a xeriscape — it gives you a baseline against which to measure the improvement and helps prioritize which areas of the landscape to tackle first.
- Establish before calling it finished. Xeriscape plants need 1 to 2 growing seasons of establishment irrigation before they demonstrate their drought tolerance. Don’t judge the design’s water performance until the plants have had time to develop their root systems.
- Check local rebate programs. Many water utilities in drought-prone regions offer rebates for lawn replacement and xeriscape installation. Research available programs before starting — they can meaningfully reduce installation costs.
Conclusion
Xeriscape design rewards honest planning more than any other garden approach. The choices that determine long-term success — hydrozoning, soil preparation, plant selection matched to actual site conditions — happen before a single plant goes into the ground. Get these right and the garden becomes progressively lower maintenance with every passing season as plants establish and root systems deepen. The garden that requires the least water is not the one with the fewest plants — it’s the one where every plant is in the right place, doing exactly what it evolved to do.