A wall niche is one of the most efficient design decisions available in any room. It adds depth and visual interest to a flat wall, provides display or storage space without consuming any floor area, and creates an architectural feature that looks built-in and intentional regardless of the room’s size or style. A well-designed niche does what no piece of freestanding furniture can: it becomes part of the wall itself, making the room feel more considered and more permanent. These 20 ideas cover every room, every style, and every application — from a simple bathroom shower niche to a full floor-to-ceiling library wall — with practical guidance on what makes each type work.
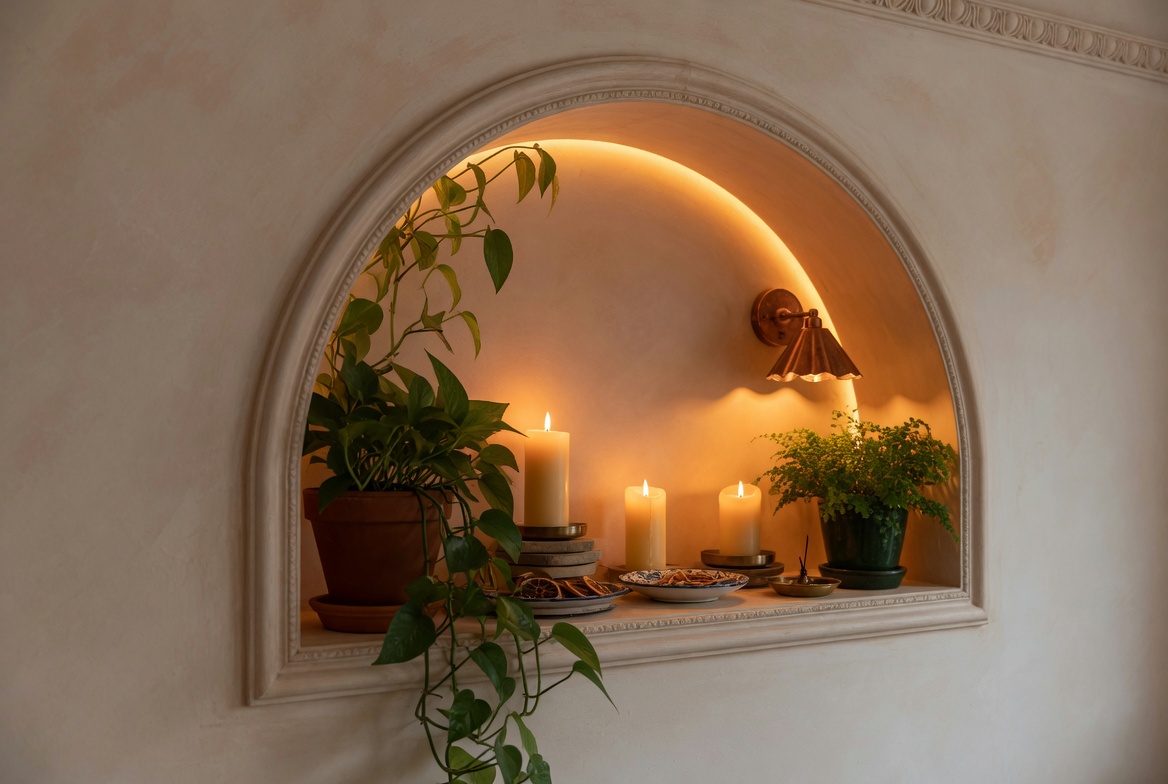
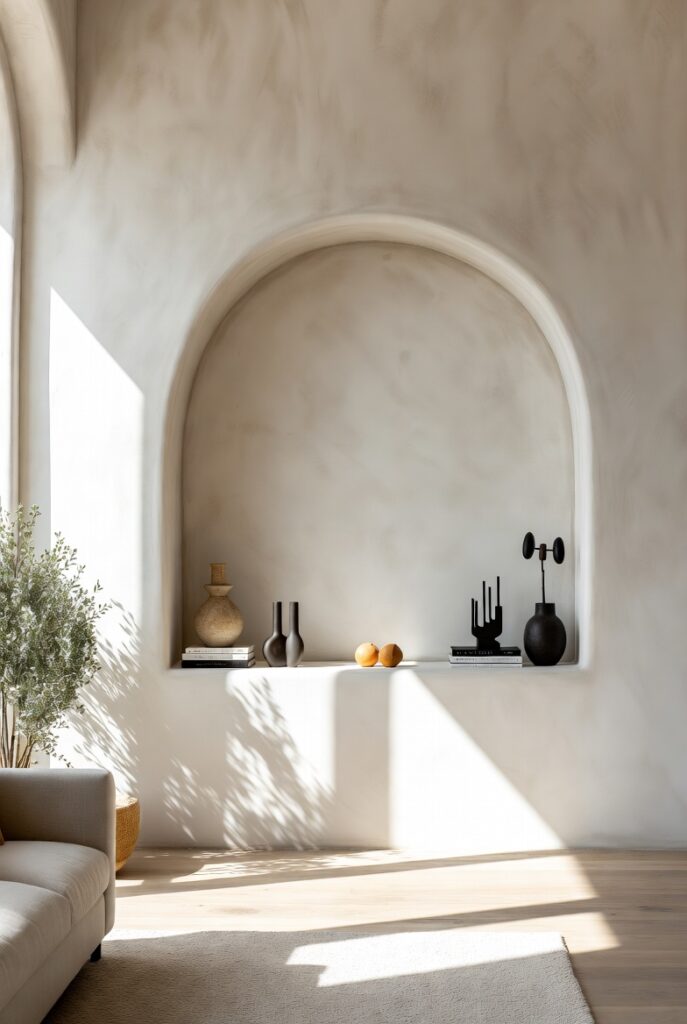
1. Arched Display Niche
Best for: Living rooms, bedrooms, and hallways — any room where a soft architectural focal point is desired
An arched niche — a recessed wall opening with a curved top — is having a significant design moment because it softens the typically hard geometry of contemporary interiors. Where rectangular niches suit strictly modern and minimalist spaces, the arched form bridges contemporary and traditional aesthetics, adding warmth and character to rooms that would otherwise feel angular and cool.
The arch height can vary dramatically depending on the application: a shallow arched niche 24 inches wide and 36 inches tall makes an elegant display alcove for a single sculpture or a collection of candles; a larger arched niche 36 to 48 inches wide and 60 to 72 inches tall creates a dramatic architectural focal point that defines the wall.
Smart tip: Paint or plaster the interior of an arched niche in a color that contrasts with the surrounding wall — even a slightly deeper tone of the same color — to create depth and make the arch visible from across the room. A niche painted the same color as the surrounding wall can disappear visually rather than reading as an architectural feature.
Mistake to avoid: Placing too many objects in an arched niche. The arch’s graceful curve is the feature — cluttering it with multiple small items defeats the purpose. One substantial object (a large vase, a sculptural piece, a cluster of candles at varying heights) commands the space more effectively than an assortment of smaller items.
2. Bathroom Shower Niche
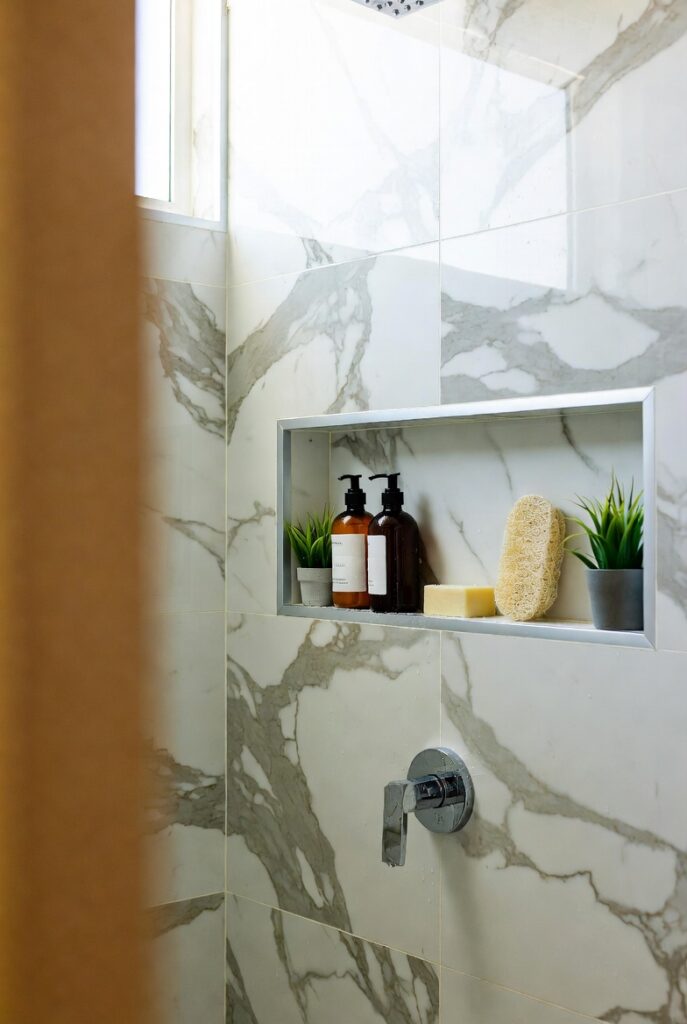
Best for: Any shower enclosure — the most practical wall niche application in the home
A shower niche — a recessed shelf built into the shower wall — eliminates the clutter of bottles, razors, and products that accumulate on ledges, shampoo racks, and shower floors. It provides a clean, permanent storage solution that’s part of the wall rather than an addition to it, creating the spa-like order that makes a shower feel genuinely luxurious.
Shower niches can be tiled to match the surrounding shower walls (the most seamless approach) or tiled in a contrasting material that makes the niche a design feature — a strip of mosaic tile, a different colored tile, or a different tile size or orientation that draws the eye.
Smart tip: Position the shower niche at a height where products can be reached comfortably without bending or reaching awkwardly — typically 48 to 54 inches from the shower floor for the bottom of the niche. A niche positioned too high requires reaching overhead with wet hands; too low requires uncomfortable bending. Test the reach from your actual standing position before finalizing the height.
Mistake to avoid: Building a shower niche into an exterior wall in a cold climate. Cutting into an exterior wall for a niche removes insulation and can create a thermal bridge — a cold spot in the wall that leads to condensation, mold, and heat loss. Position shower niches in interior walls only, or in exterior walls only after consulting a builder about adequate insulation around the niche.
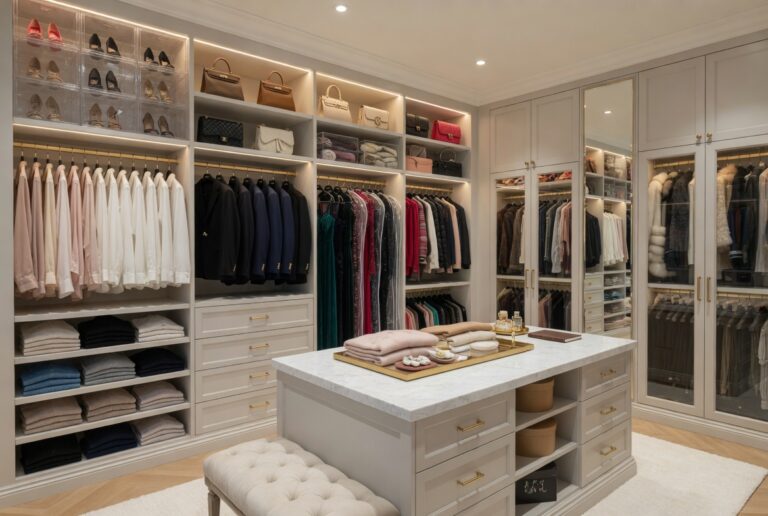
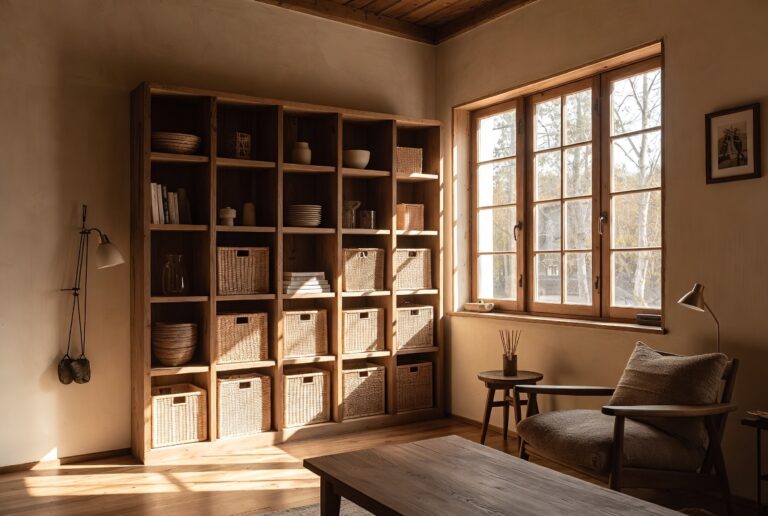
3. Recessed Bookshelf Niche
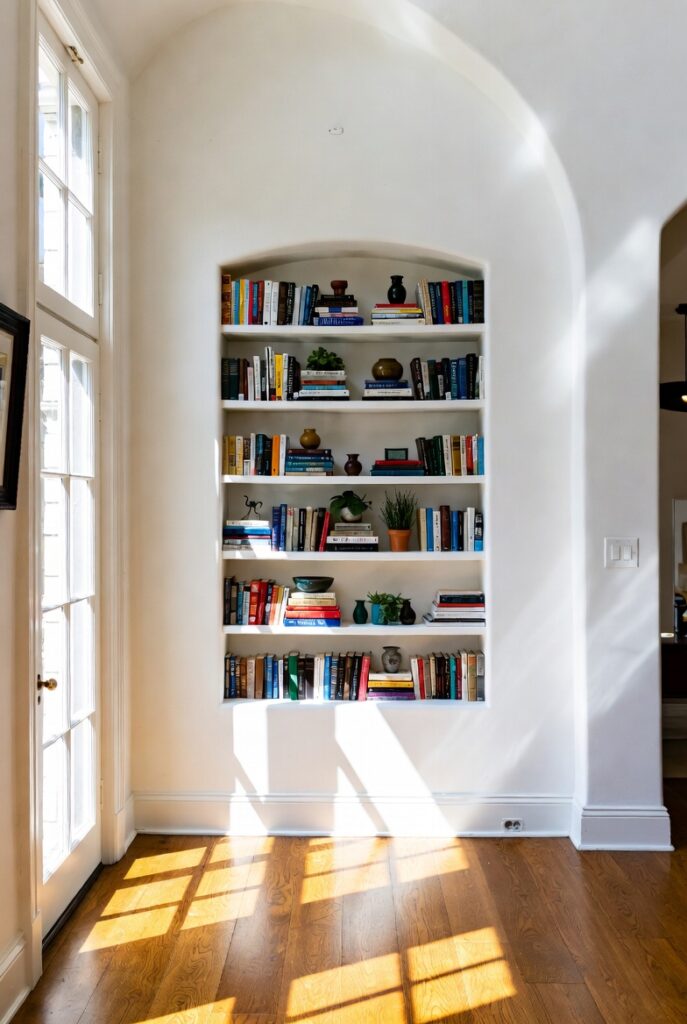
Best for: Living rooms, home offices, and bedrooms — anywhere books or display objects need a home without freestanding furniture
A recessed bookshelf niche — shelving built into the wall cavity rather than projecting from it — provides the storage capacity of a freestanding bookcase without using any floor space. The shelves sit flush with the surrounding wall surface, creating a clean, architectural integration that freestanding bookcases can’t match.
Between standard wall studs (16 inches apart), a shallow niche can hold paperback books. Between structural cavities or in purpose-built stud framing, a deeper niche (10 to 14 inches) accommodates hardbacks, decorative objects, and plants. A full alcove built between two walls can house a complete floor-to-ceiling library.
Smart tip: Paint the back wall of a recessed bookshelf niche in a contrasting or accent color to create depth and make the books visible from across the room. A dark navy, forest green, or warm terracotta back wall behind cream or white shelves creates a striking composition that draws the eye and makes even a modest niche feel designed.
Mistake to avoid: Installing fixed shelves at equal spacing in a bookshelf niche. Adjustable shelves — mounted on standards that allow repositioning — suit a real book collection far better than fixed shelves, because books vary significantly in height. Fixed equally-spaced shelves leave wasted space above shorter books and can’t accommodate oversized volumes without modification.
4. TV and Media Wall Niche
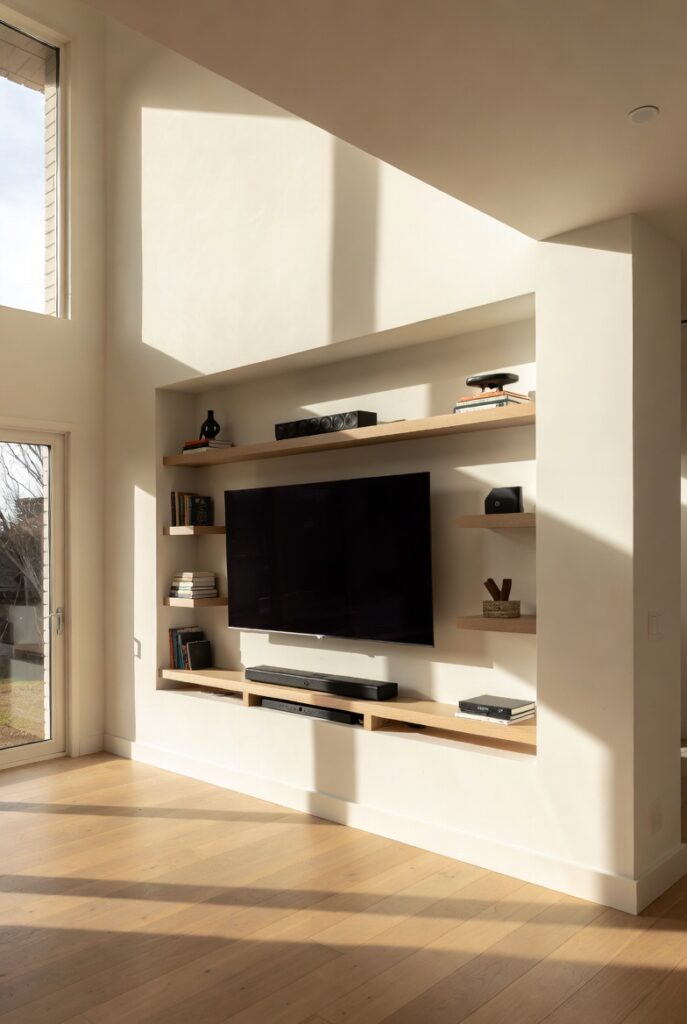
Best for: Living rooms and bedrooms where the television currently sits on furniture — a recessed TV niche creates a cleaner, more architectural appearance
Recessing a television into the wall — creating a niche sized for the TV with storage for media equipment on either side or below — eliminates the furniture typically required to support a wall-mounted TV and creates a coherent, integrated media wall rather than a TV floating on a painted surface.
The niche depth required depends on the equipment: a flat-panel TV needs minimal depth (the TV itself is thin); any equipment stored beside or behind it (soundbar, streaming devices, game consoles) requires deeper accommodation. Cable management within the niche — routing cables through the wall rather than leaving them visible — is essential to the clean appearance.
Smart tip: Install LED bias lighting (a strip of warm-toned LEDs) around the back of the TV niche, facing the wall behind the television. The soft ambient glow reduces the contrast between the bright screen and the surrounding dark wall — measurably reducing eye strain during extended viewing — and creates an attractive ambient light source for evening use.
Mistake to avoid: Building a TV niche without planning for ventilation. Television and media equipment generates heat that must dissipate — equipment enclosed in a tight niche without adequate airflow overheats and fails prematurely. Ensure the niche has ventilation gaps at the top and bottom, or install a small fan to circulate air within the niche cavity.
5. Illuminated Accent Niche
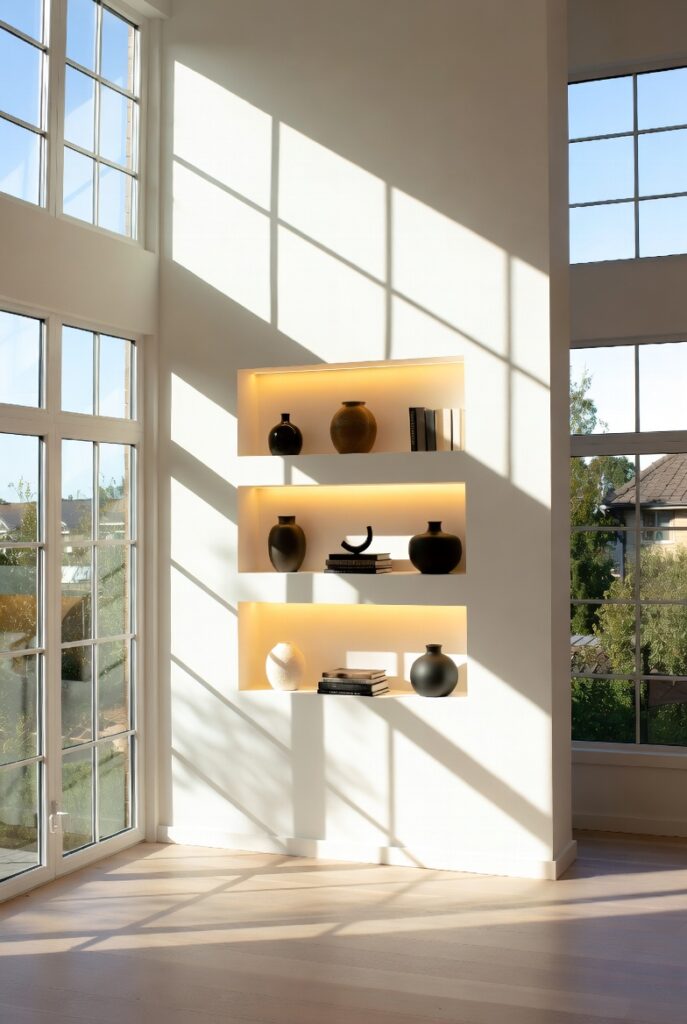
Best for: Any room where a niche serves primarily as a display feature rather than functional storage
An illuminated niche — with LED strip lights installed at the top, bottom, or both edges of the recess — transforms even a modest display space into a genuinely striking feature. The light grazing across the back wall of the niche emphasizes its depth, highlights the objects displayed within, and creates a warm ambient light source that contributes to the room’s overall lighting scheme.
The lighting can be concealed behind a small lip at the niche edge (so the light source is hidden and only the effect is visible) or exposed as decorative strip lighting that’s part of the aesthetic.
Smart tip: Use warm white LED strips (2700K) in a living room or bedroom niche where atmosphere is the priority. Use slightly cooler LEDs (3000K) in a kitchen or bathroom niche where visibility is more important than ambience. The light temperature inside the niche affects how the displayed objects look — warm light flatters organic materials (wood, ceramics, plants) while cooler light suits glass and metallic objects.
Mistake to avoid: Using brightly colored LED strips in an illuminated display niche. RGB LED strips — red, green, and blue color-changing lights — look striking in product photographs but create an unsettling, commercial atmosphere in a home setting. Warm or neutral white LEDs create the most flattering and liveable illuminated niche effect.
6. Entryway Key and Mail Niche
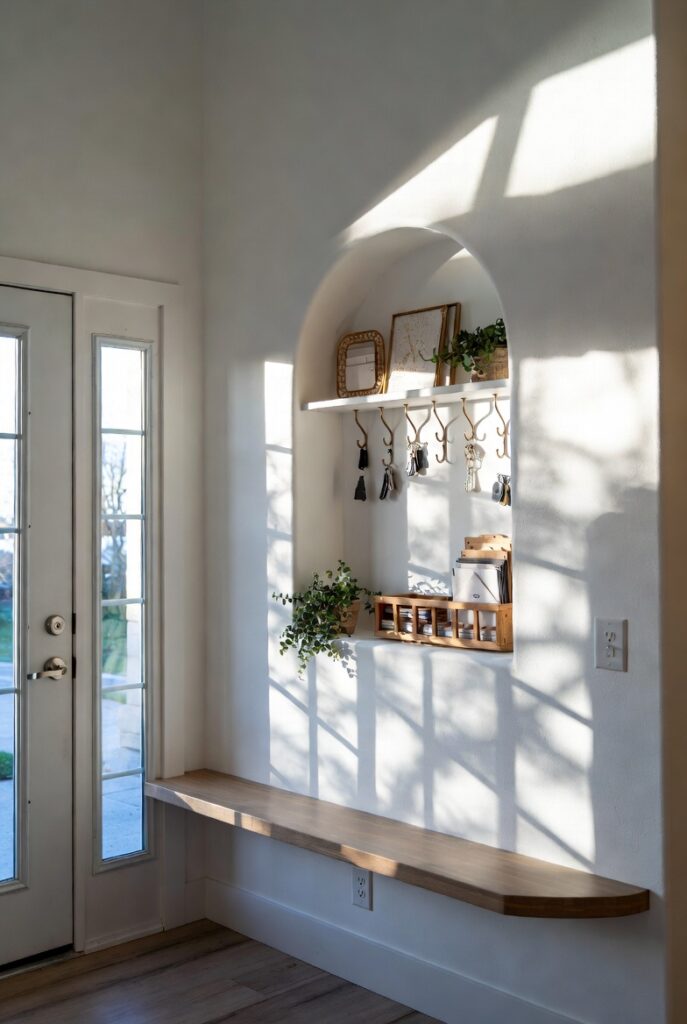
Best for: Hallways and entryways — the most practical niche application for managing daily arrival items
An entryway niche — a recessed opening in the hallway wall with hooks for keys, a small shelf for mail and parcels, and a mirror — creates a dedicated arrival station that eliminates the scatter of keys on counter tops, mail on chairs, and bags on the floor. Everything needed for departure (keys, wallet, sunglasses, bags) has a specific, accessible place in one defined space.
The most functional entryway niche dimensions: 24 to 36 inches wide, 8 to 12 inches deep, and 24 to 36 inches tall — deep enough to accommodate a small bowl for keys and a mirror, and tall enough to display both utility (hooks, shelf) and visual interest (mirror, small plant or artwork).
Smart tip: Add a small mirror within or directly above the entryway niche for a last-check before leaving — this doubles the niche’s utility without adding any floor space requirement. A mirror at face height (centered at 57 to 60 inches from the floor) provides the most functional reflection for a final appearance check.
Mistake to avoid: Making an entryway niche too shallow for functional use. A niche shallower than 4 inches can hold very little — hooks for keys, but no shelf for mail, no bowl for small items, no space for a plant or decorative element. A minimum depth of 6 to 8 inches allows the niche to function as both a practical arrival station and a decorative element.
7. Plant and Greenery Niche
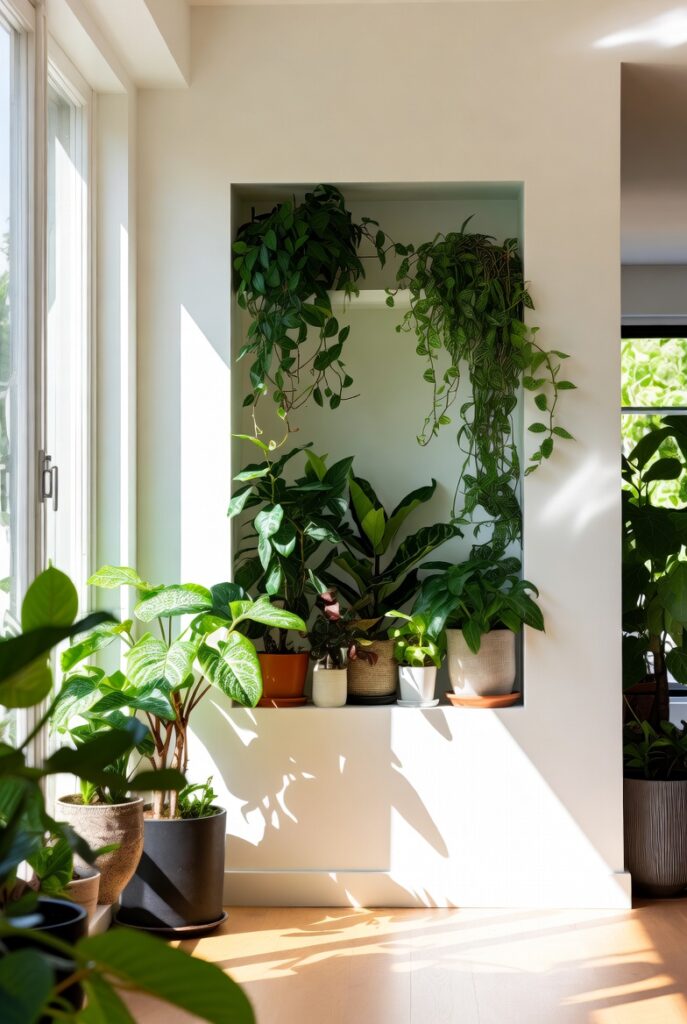
Best for: Any room where plants are desired but floor and surface space is limited — hallways, bathrooms, and bedrooms particularly benefit
A dedicated plant niche — a recessed space designed specifically for one or more plants — brings greenery into the room without requiring a planter on a surface or a plant stand on the floor. The niche frames the plant, making it a deliberate design element rather than an addition to an already-furnished space.
The most effective plant niches: large enough for a substantial specimen (a fiddle-leaf fig, a trailing pothos, a bird of paradise) rather than a collection of small pots; positioned where the plant’s light requirements can be met (near a window, or with a grow-light LED strip installed within the niche); and lined with waterproof material if watering will happen in situ.
Smart tip: A trailing plant — pothos, string of pearls, heartleaf philodendron — in a niche positioned above eye level creates a cascading effect as the trails fall from the niche opening. This creates a living curtain effect that’s visually striking and uses the vertical dimension of the niche more dramatically than an upright plant.
Mistake to avoid: Installing a plant niche in a position with insufficient light and then choosing plants that require more light than the position provides. Assess the natural light reaching the niche position honestly before choosing the plants — a niche in a dark hallway suits only genuinely low-light tolerant plants (snake plant, ZZ plant, cast iron plant) rather than the photogenic but light-demanding species that appear in design photographs.
8. Symmetrical Fireplace Niches
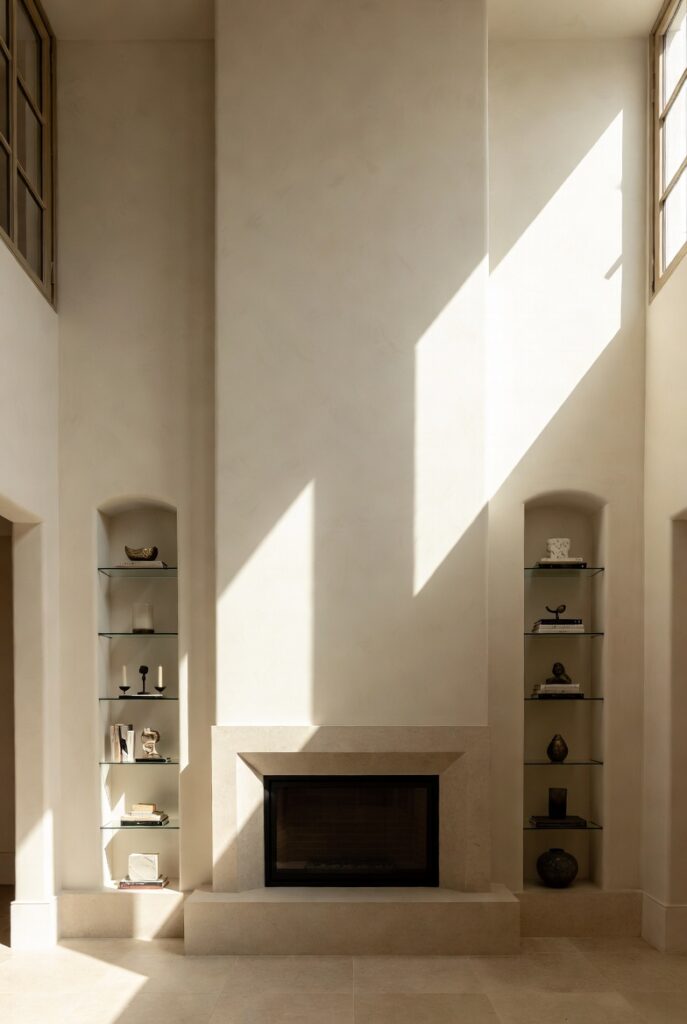
Best for: Living rooms with a fireplace — the most classic built-in niche configuration in residential architecture
Symmetrical niches built into the walls on either side of a fireplace — an arrangement common in Georgian, Victorian, and Arts and Crafts architecture — are among the most satisfying architectural details in a living room. The niches balance the visual weight of the fireplace, provide display and storage space in the sections of wall that are otherwise difficult to furnish, and create the sense of a deliberately composed room rather than furniture placed in a space.
The traditional approach: floor-to-ceiling built-in joinery on either side of the chimney breast, with the lower section closed (cupboards with doors for concealed storage) and the upper section open (shelving for books and display objects). This combination maximizes both storage and display while maintaining visual symmetry.
Smart tip: When building symmetrical fireplace niches, make the shelving heights consistent across both niches — the horizontal lines of shelves continuing visually across the fireplace breast creates the strongest sense of composed, architectural design. Mismatched shelf heights between the two sides creates a less resolved, more casual appearance.
Mistake to avoid: Installing only open shelving in fireplace niches without any closed storage beneath. Open shelving requires consistent curation — everything on every shelf is permanently visible. Without the closed lower section for concealed storage, the niches become permanent display areas that require constant maintenance to look organized. The lower cupboard element provides the everyday practicality that makes the overall design liveable.
9. Reading Nook Built-In Niche
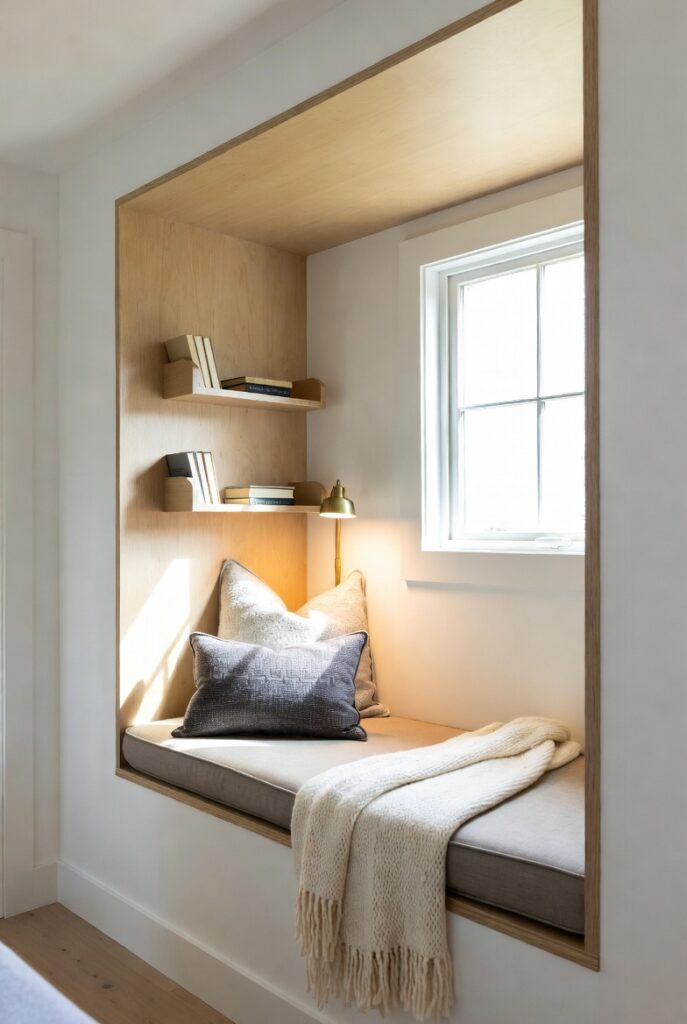
Best for: Deeper alcoves in living rooms, bedrooms, and bay windows — any space large enough for a built-in seat
A reading nook built into a deep niche or alcove — a cushioned bench with storage beneath, shelving on the side walls, and adequate lighting — is among the most universally desired domestic spaces. The niche provides the sense of enclosure that distinguishes a reading nook from simply a chair by a bookshelf. Being slightly set into the wall, with a degree of visual separation from the main room, creates the private, focused quality that makes reading nooks so appealing.
The minimum dimensions for a functional reading nook: 24 inches deep (for comfortable seated reading with legs extended), 36 to 48 inches wide (for a single adult), and ceiling height adequate to sit upright comfortably (a minimum of 40 inches from seat to ceiling).
Smart tip: Install storage drawers or lift-up storage in the bench base of a reading nook — the under-seat volume is significant and perfectly suited for storing books, blankets, or items used in the nook. A reading nook with storage beneath is more functional than one with a solid base and makes the nook genuinely useful rather than purely atmospheric.
Mistake to avoid: Building a reading nook bench at the wrong height. A seat surface 17 to 19 inches from the floor is comfortable for most adults. Higher than 19 inches creates a perch rather than a seat; lower than 17 inches makes standing up from the seat difficult. The seat height is determined by the top of the cushion, not the base of the bench — account for cushion thickness when planning the bench height.
10. Kitchen Backsplash Niche
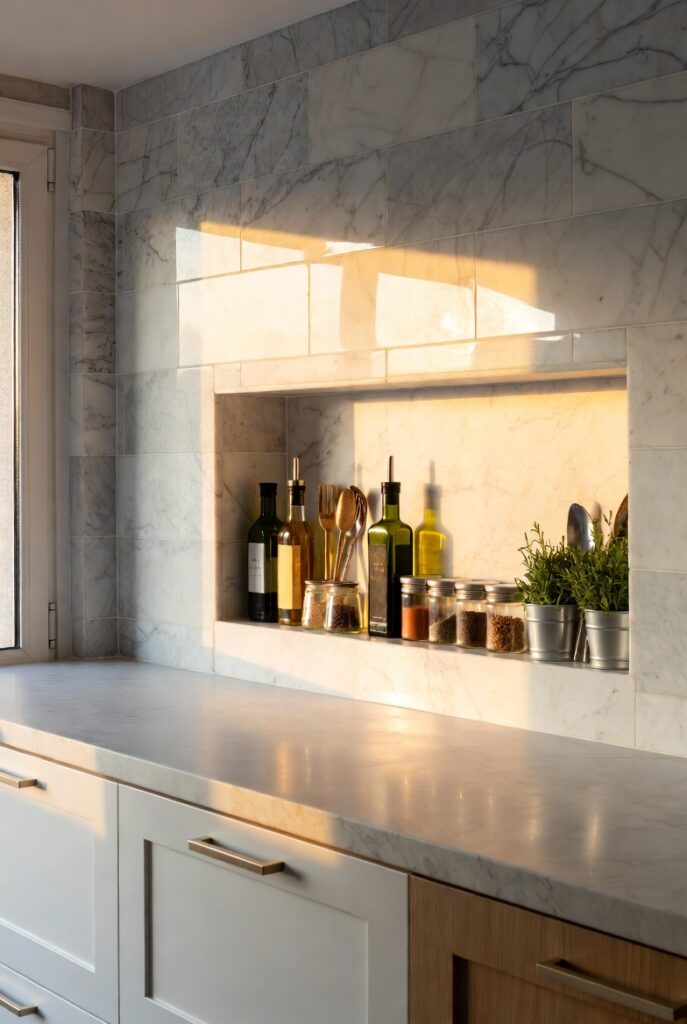
Best for: Kitchen walls where a small recessed shelf would provide convenient access to frequently used items
A kitchen niche — a shallow recessed opening in the backsplash area between counter and upper cabinets — provides a convenient, integrated storage spot for oils, spices, small appliances, or decorative items that are accessed regularly but clutter the counter surface when stored on it.
The typical kitchen backsplash niche is shallow (4 to 6 inches deep), built between studs (14 to 16 inches wide), and positioned at a comfortable reaching height above the counter surface. Tiled in the same or contrasting tile as the surrounding backsplash, it looks like part of the kitchen’s designed surface rather than an added element.
Smart tip: A kitchen backsplash niche in the cooking area — immediately behind the stove or hob — provides the most convenient access to oils, salt, and frequently used spices. The items used most in cooking are accessed from the most convenient position: arms-reach, at counter height, within the cooking zone.
Mistake to avoid: Installing a kitchen backsplash niche in an exterior wall. Kitchen exterior walls often contain insulation, vapor barriers, and structural elements that can’t be removed without significant consequence. Position kitchen niches in interior walls between studs where no services are present — always check for electrical, plumbing, and structural elements before cutting into any wall.
11. Mini Bar or Drinks Station Niche
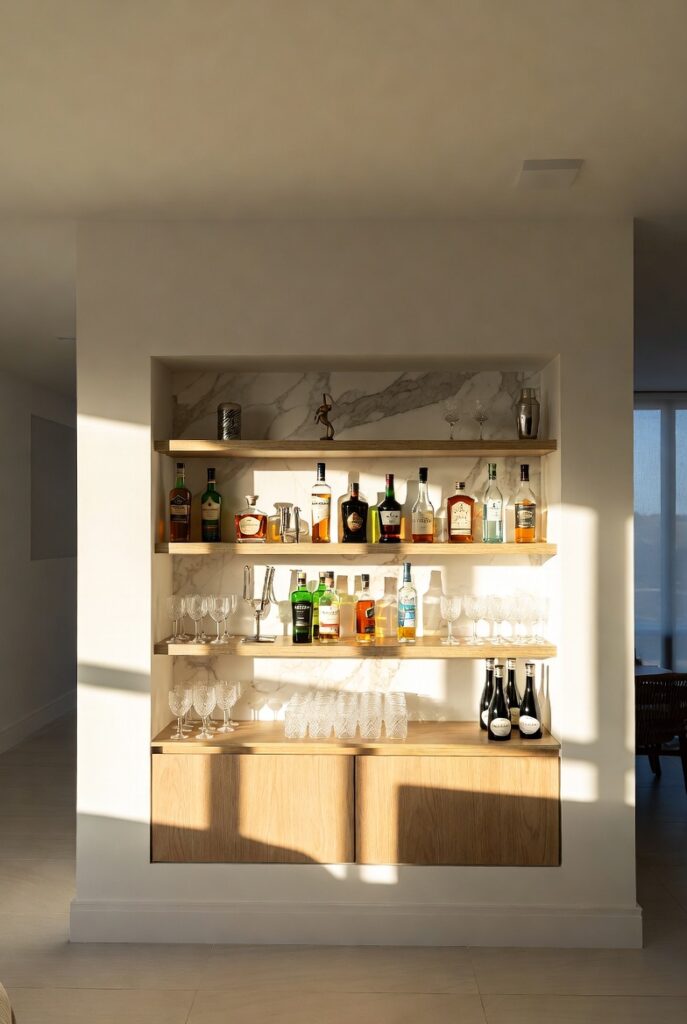
Best for: Living rooms and dining rooms — a niche drinks station creates an elegant, integrated entertaining feature
A drinks station niche — a recessed opening with glass shelving, a small wine rack, and elegant lighting — converts a section of living room wall into an integrated bar that suits the room’s design rather than looking like furniture added to it. The niche contains all the elements of entertaining preparation — glasses, bottles, a drinks tray — in a defined, visible display that functions as a room feature.
Glass shelves in an illuminated niche are the most effective display approach for a drinks station — the light passing through glass shelves creates a luminous, translucent quality that flat timber or melamine shelves can’t replicate, and the glasses and bottles displayed on them catch and refract the light attractively.
Smart tip: Install a mirrored back wall in a drinks station niche. The mirror doubles the apparent depth of the niche, reflects the LED strip lighting to create a brighter, more glamorous effect, and reflects the glasses and bottles to create a fuller, more abundant display than the actual quantity of items. This approach is standard in commercial bar design for exactly these reasons.
Mistake to avoid: Creating a drinks station niche without adequate depth for the intended use. Bottles of spirits are typically 11 to 13 inches tall — a niche shallower than 10 inches can’t accommodate standing bottles and relegates the space to glasses only. A minimum depth of 12 to 14 inches allows both bottles and glasses to be displayed and accessed comfortably.
12. Bedroom Headboard Niche
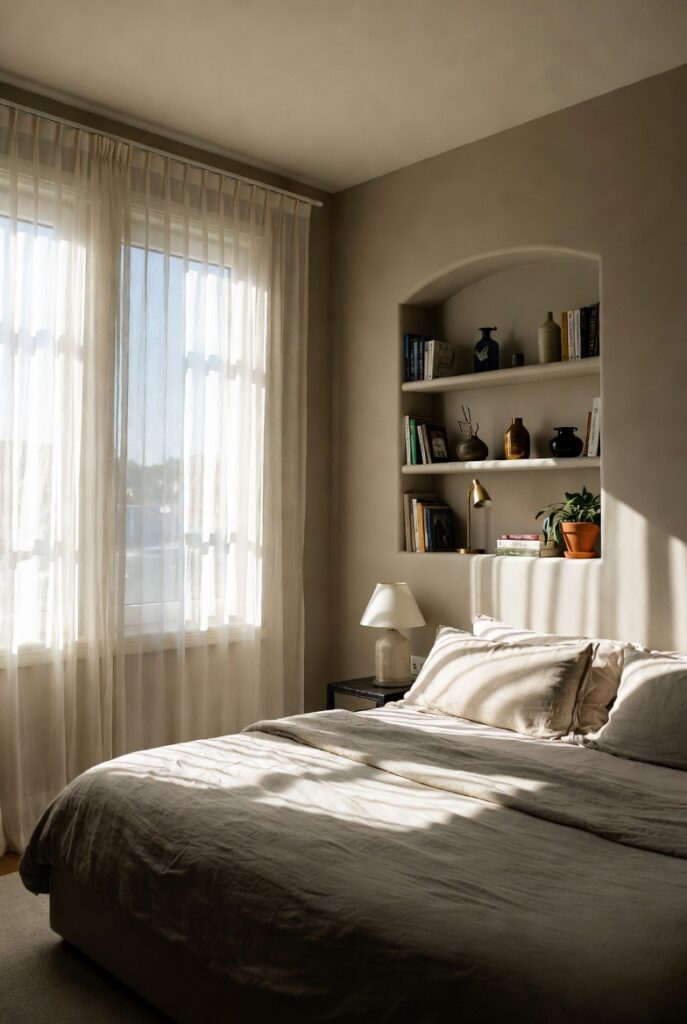
Best for: Master bedrooms where bedside tables are insufficient for the items used during the evening and night
A headboard niche — a recessed opening in the wall behind the bed head — provides integrated bedside storage that eliminates the cluttered bedside table. Books, a phone, a glass of water, a reading light, and personal items all find dedicated space in the niche without requiring a separate piece of furniture that takes up floor space and visually competes with the bed.
The headboard niche can run the full width of the bed head (creating a continuous recessed ledge above the pillows) or be positioned as two separate niches on either side (one per person in a shared bed), each with its own lighting, shelf, and perhaps a small cabinet door for concealing charging cables and personal items.
Smart tip: Install LED strip lighting or a small wall-mounted reading light within the headboard niche. A reading light that’s part of the niche rather than a separate table lamp or clip-on light contributes to the built-in quality of the whole composition and provides task lighting precisely where it’s needed — at reading level — rather than from a lamp that illuminates the whole bedside area.
Mistake to avoid: Building a headboard niche without any electrical provision. The most common items placed in a bedside niche — phone charger, reading lamp, clock, sleep tracker — all require power. Planning electrical outlets within the niche during construction costs a fraction of what retrofitting them afterward requires.
13. Tiled Statement Niche
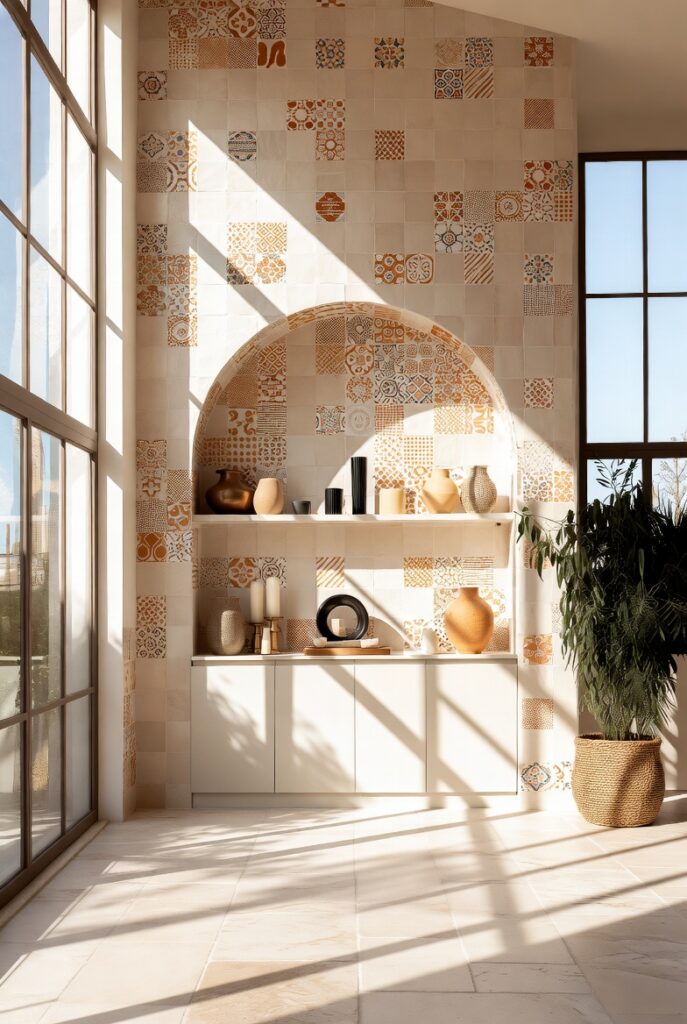
Best for: Bathrooms, kitchens, and entryways — any room where a bold material statement within a defined area is appropriate
A tiled niche — with the interior surfaces covered in a tile that contrasts with or complements the surrounding walls — uses the niche as a frame for a material statement. While the surrounding wall is plain painted plaster, the niche interior might be covered in handmade terracotta tiles, a graphic Moroccan pattern, a rich emerald green ceramic, or an intricate mosaic.
The contrast between the plain surrounding wall and the richly detailed niche interior creates a focal point of significant visual interest while limiting the bold material to a contained, defined area — making a pattern or color that would be overwhelming on a full wall entirely appropriate within the niche.
Smart tip: Use zellige (hand-made Moroccan clay tiles) or similar handcrafted tiles in a niche interior for a material quality that’s immediately apparent at close range. The slight irregularity and variation of handmade tiles catches light differently at different times of day and creates a surface richness that machine-made tiles can’t replicate at any scale.
Mistake to avoid: Using heavily textured or grouted tiles in a shower niche. Rough textures and numerous grout lines in a wet area create mold accumulation and cleaning difficulty. Shower niches benefit from smooth, large-format tiles with minimal grout lines — easy to wipe clean and less hospitable to mold growth.
14. Floor-to-Ceiling Vertical Niche
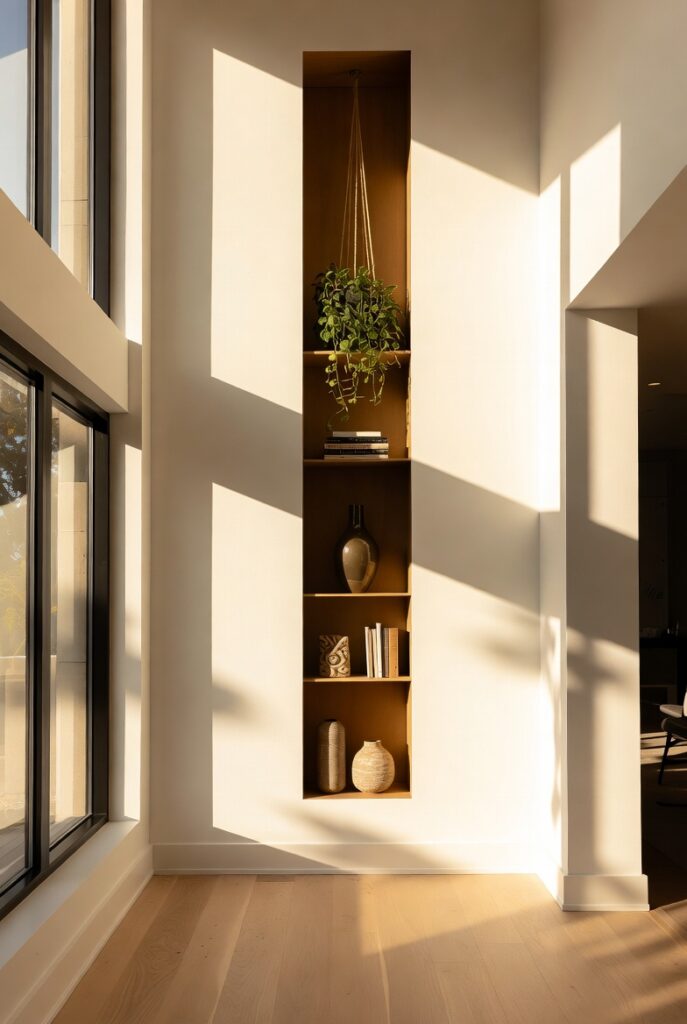
Best for: Rooms with high ceilings where a tall vertical element would draw the eye upward and make the room feel taller
A floor-to-ceiling vertical niche — a narrow, tall recessed opening that runs the full height of the wall — creates a strong vertical element that draws the eye upward, making the ceiling feel higher and the room feel more spacious. The tall niche functions as a scaled-up version of a single display niche, accommodating a tall sculptural piece, a floor-standing plant, or a series of objects at different heights.
The narrow width of a floor-to-ceiling vertical niche (typically 12 to 24 inches) concentrates the vertical emphasis and creates a bold architectural statement without requiring significant wall depth or construction.
Smart tip: A single tall plant — a bamboo palm, a fiddle-leaf fig, or a large bird of paradise — in a floor-to-ceiling niche creates one of the most impactful plant-as-design-feature arrangements available. The niche frames the plant’s height perfectly, the vertical niche proportions suit a tall plant better than a wide one, and the plant’s visual mass fills the niche naturally.
Mistake to avoid: Filling a floor-to-ceiling vertical niche with multiple small objects at various heights. The niche’s power comes from its vertical emphasis — fragmenting the space with many different items at different heights defeats the purpose. Either use one tall statement piece or a very limited, curated selection of objects that allow the niche’s height to read clearly.
15. Hallway Display Niche
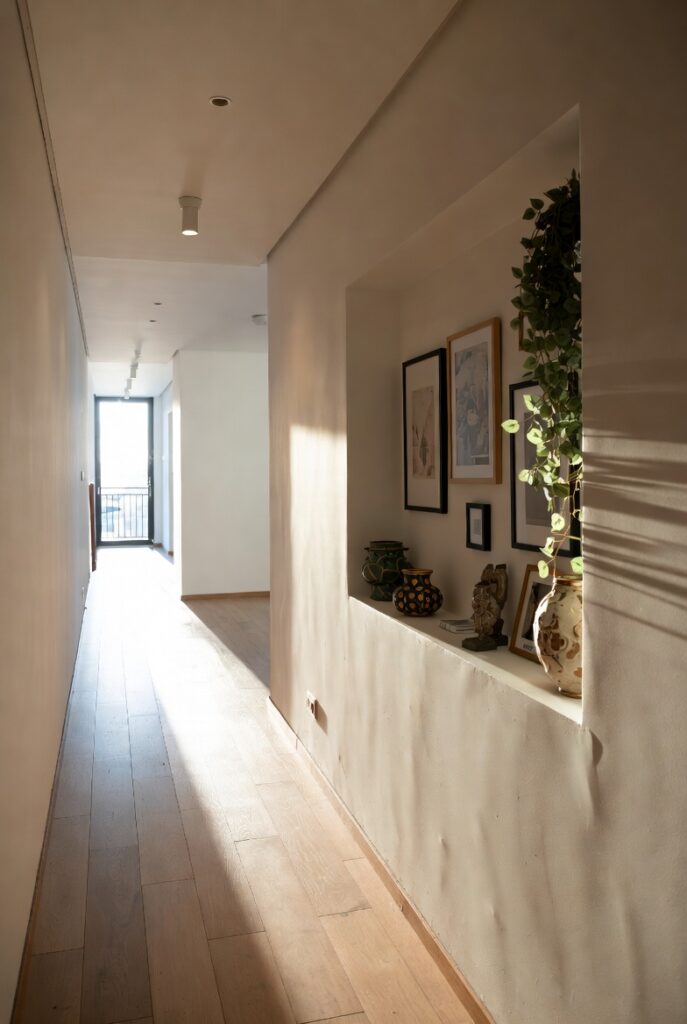
Best for: Hallways and corridors — typically narrow spaces with limited decorating options that benefit greatly from a built-in element
A hallway niche — a recessed display space built into a hallway wall — converts a transitional space that’s typically plain and purely functional into a designed space with character and interest. Hallways are viewed constantly as people move through the home, making them high-visibility locations where a well-designed niche has significant impact relative to its size.
The hallway niche works best when it contains items that relate to the home and the people who live there — a collection of framed photographs, a meaningful sculpture, an arrangement of objects that reflect personal interests. The niche frames these items as a deliberate display rather than items placed on a surface.
Smart tip: Light a hallway display niche with a recessed spotlight above it or an LED strip at the top of the niche interior. Lighting a hallway niche from above creates a pool of warm light in an otherwise dimly lit transitional space — improving both the practical illumination of the hallway and the visual quality of what’s displayed.
Mistake to avoid: Installing a hallway display niche at a height that’s only visible when standing directly in front of it. A niche positioned at the end of a hallway should be visible from the hallway entrance — at eye level and at the right scale to be appreciated from the hallway’s full length. A niche that’s only visible at close range misses the opportunity to create a designed view terminus at the end of the hall.
16. Minimalist Grid Niche Wall
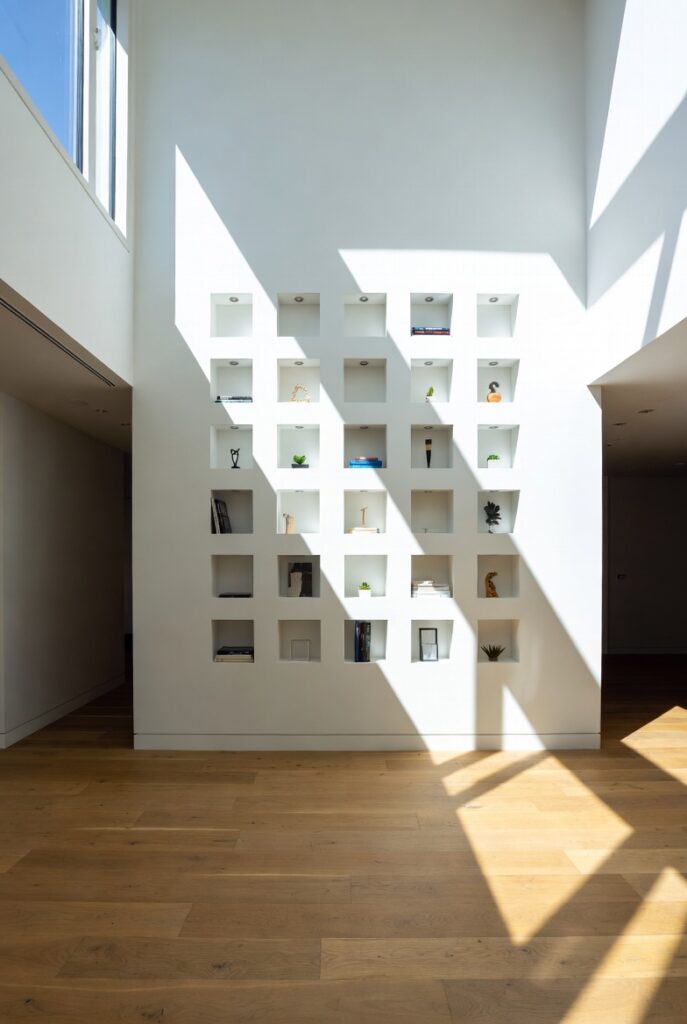
Best for: Contemporary homes, feature walls in modern living rooms — a grid of niches creates a geometric statement wall
A grid of multiple small niches — arranged in a regular pattern across a wall section — creates a geometric, architectural feature wall that reads as a single designed element rather than individual display shelves. Each niche in the grid can hold one object, a small group of related objects, or lighting that creates a constellation of warm glowing openings.
The most effective grid proportions: niches of equal size arranged with consistent spacing — the regularity of the grid is the design. Irregular sizes or irregular spacing create visual chaos rather than the ordered geometry that makes the grid wall compelling.
Smart tip: A grid niche wall works most powerfully when the objects in each niche are related — all candles, all small sculptures of similar material, all white ceramic pieces, all small plants. The repetition of related objects across the grid creates a considered, gallery-like quality. Mixed objects of different types and scales in each niche look like a storage wall rather than a designed one.
Mistake to avoid: Building a grid niche wall without accounting for the structural implications of removing multiple sections of wall material. Multiple niches in close proximity can significantly weaken a non-structural wall — each niche requires at minimum a header above its opening. Have a carpenter or builder assess the wall structure before cutting multiple openings.
17. Natural Texture Back Wall Niche

Best for: Any niche where the interior surface is currently plain plaster or paint — a textured back wall adds depth and material richness
Adding a natural material to the back wall of an existing or new niche — reclaimed wood, stone slabs, textured brick, handmade ceramic tile, or grasscloth wallpaper — creates a material contrast that adds depth and warmth to the niche interior. The surrounding wall reads as a plain background; the textured niche back wall creates a frame-within-a-frame that makes the interior feel like a different material world.
Reclaimed wood on the back wall of a niche adds warmth and character — the wood grain visible through the niche opening creates a visual connection to natural materials even when the rest of the room is contemporary. Stone or brick creates a raw, elemental quality. Textured wallpaper provides pattern and warmth at lower cost and installation complexity.
Smart tip: Keep the material on the niche back wall consistent with one other material element in the room — a timber floor, a stone fireplace surround, or a brick feature wall. The visual connection between the niche back wall material and another room element creates cohesion; an isolated material with no other reference in the room can look imported rather than considered.
Mistake to avoid: Using moisture-sensitive natural materials in bathroom or kitchen niches. Natural wood, grasscloth, and similar organic materials are inappropriate in wet or high-humidity environments — they absorb moisture, swell, discolor, and eventually develop mold. Bathrooms and kitchens require materials specifically rated for wet or humid conditions: ceramic tile, stone, sealed timber, or specialist bathroom wallpaper.
18. Home Office Niche Desk
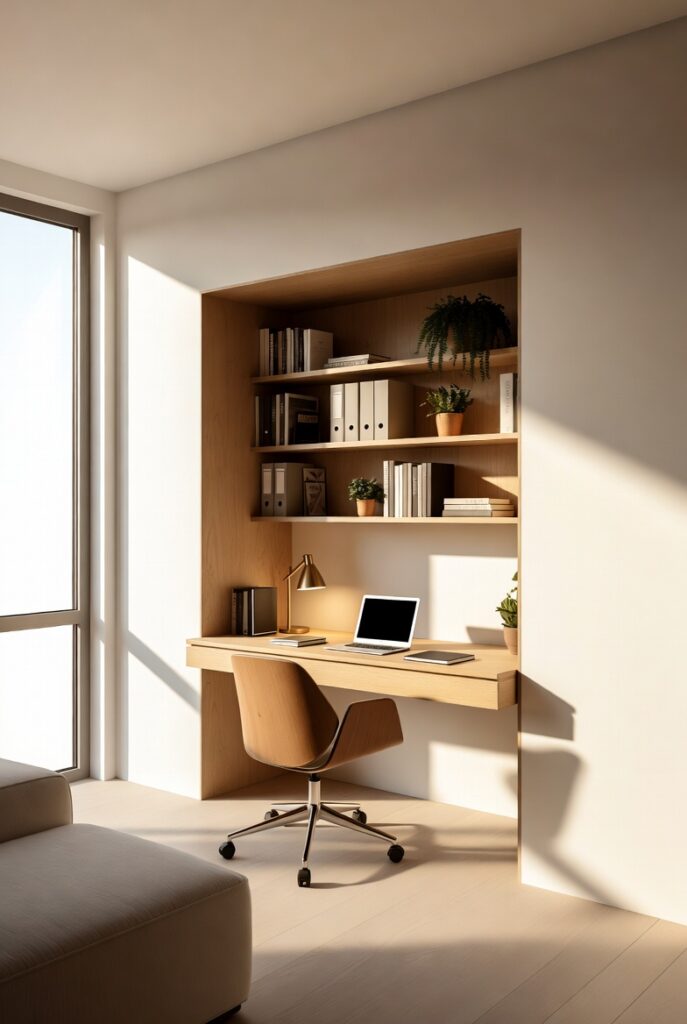
Best for: Homes without a dedicated office room — a niche desk creates a defined work area within a larger room
A desk built into a niche — a work surface spanning the niche width with shelving above and perhaps a small cabinet below — creates a dedicated work space that can be visually separated from the surrounding room and, in some configurations, closed off at the end of the working day. The niche provides the three sides of enclosure that create the focused quality of a dedicated room within an open-plan space.
The minimum niche dimensions for a functional desk: 36 inches wide (comfortable for a single monitor and keyboard), 20 to 24 inches deep (adequate for most desk work), and 60 to 72 inches tall (allowing shelving above the desk without feeling cramped).
Smart tip: Install a curtain, sliding panel, or pair of doors across the niche opening to allow the desk area to be concealed at the end of the working day. The ability to close the office at day’s end has significant psychological benefit for work-life separation in homes where the office is in a shared living space — a benefit that’s impossible with a freestanding desk in the same position.
Mistake to avoid: Building a desk niche without electrical provision. A work desk without power outlets within the niche requires extension cords — an untidy solution that defeats the clean, integrated quality that the niche approach is supposed to provide. Plan electrical outlets in the niche wall at desk height before any construction begins.
19. Corner Curved Niche
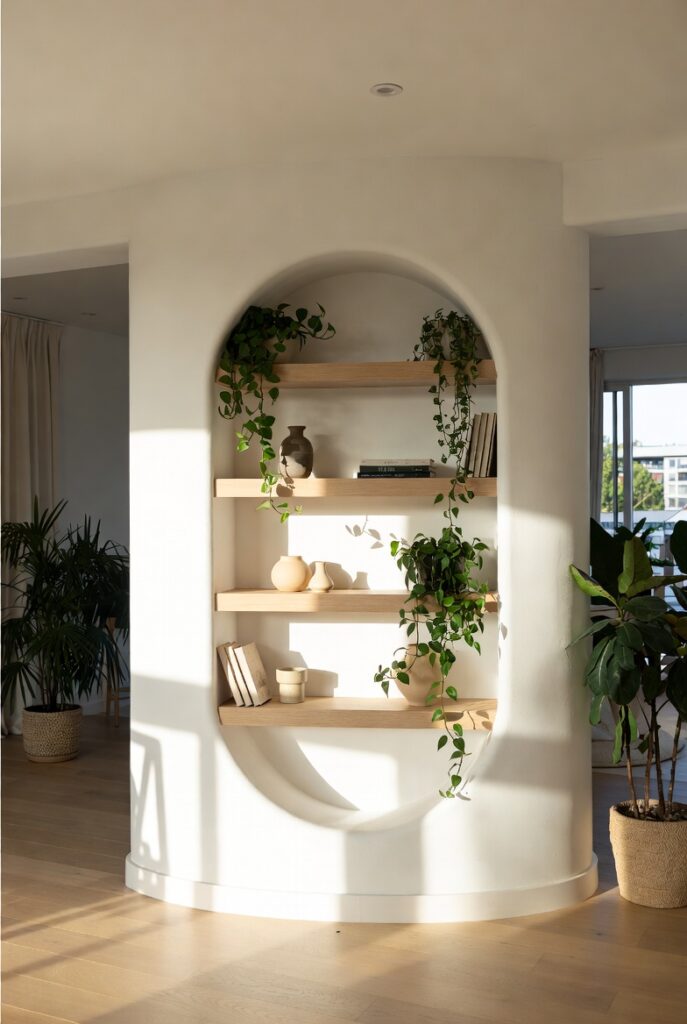
Best for: Corners that are difficult to furnish — curved niches transform awkward corners into deliberate design features
A curved corner niche — a rounded recess built into the junction of two walls — converts a corner that’s typically left empty or furnished with a plant stand into a designed architectural feature. The curve softens the corner geometry and creates a display space that’s visible from multiple angles in the room.
Corner niches suit decorative display more than functional storage — the curved geometry and multi-angle visibility make them ideal for sculptures, a single statement plant, a candle grouping, or a piece of ceramics that benefits from being seen in the round.
Smart tip: Light a corner niche with a recessed spotlight directly above the niche opening — positioned to cast light straight down into the curved space. The curved back wall of the niche reflects and distributes the light in all directions, creating a glow that’s visible from throughout the room rather than a single directional spotlight effect.
Mistake to avoid: Filling a corner niche with flat items — framed artwork, flat tiles, a photograph. Corner niches are three-dimensional — their curved back wall and visible depth suit three-dimensional objects (sculptures, vases, plants) far better than flat items that would be more effectively displayed on a flat wall surface.
20. How to Plan and Build a Wall Niche
Best for: Anyone considering adding a wall niche — planning prevents the most common and most costly niche installation mistakes
A wall niche looks simple but requires careful planning before any cutting begins. The wall’s contents — electrical wiring, plumbing, structural elements — must be identified and avoided. The niche depth must be planned around the wall’s construction. And the finishing — how the niche integrates with the surrounding wall surface — determines whether it looks built-in or afterthought.
The planning process: use a stud finder to locate wall studs; use a wire and pipe detector to identify any services within the wall; confirm the wall is non-load-bearing (or consult a structural engineer if uncertain); determine the available depth between the wall faces (typically 3.5 inches in a standard timber-framed wall, 5.5 inches in a 2×6 framed wall); and decide whether the niche will be built between existing studs or whether additional framing will be required.
Smart tip: For a niche that’s wider than one stud bay (wider than 16 inches), a structural header must be installed above the niche opening to carry the load of the studs removed. This is standard carpentry practice — not a major structural issue — but requires proper execution. Have a carpenter assess any niche wider than 16 inches before cutting.
Mistake to avoid: Cutting a niche into a wall without checking for electrical wiring first. Standard electrical practice routes wiring horizontally and vertically through walls to outlets and switches — wiring can be present in any wall, at any height. A stud finder with electrical detection, or a separate wire detector, identifies wiring before cutting and prevents the dangerous and expensive consequence of cutting through a live circuit.
Before You Start
- Check the wall structure before cutting anything. Use a stud finder, wire detector, and pipe locator. Services in walls are invisible until they’re damaged.
- Confirm the wall is non-load-bearing. Load-bearing walls require structural engineering assessment before any openings are cut. Interior partition walls are generally non-load-bearing; walls perpendicular to floor joists or supporting a beam above may be structural.
- Plan lighting from the start. Electrical wiring for niche lighting is straightforward during construction and difficult to retrofit. Decide on lighting before building begins.
- Consider depth carefully. Standard timber-framed walls provide 3.5 inches of cavity depth — adequate for a shallow display niche but insufficient for functional storage. Deeper niches may require building out or require specific wall construction.
- Match the finish to the room. The niche opening, shelving, and back wall should integrate with the surrounding wall surface — painted to match, tiled to complement, or trimmed to coordinate with existing joinery.
Conclusion
A well-designed wall niche improves a room in ways that freestanding furniture can’t: it adds depth to a flat wall, creates a display or storage element that’s part of the architecture rather than an addition to it, and — in rooms where floor space is at a premium — provides meaningful function without consuming any of it. The niche that works best is the one designed for the specific room, the specific wall, and the specific purpose — not the most visually elaborate version, but the most appropriate one. Plan carefully, build correctly, and the result is a feature that looks as though the room was always designed around it.