

A sloped yard doesn’t have to be a landscaping problem. With the right wood retaining wall, an unruly hillside becomes a structured, beautiful outdoor space that adds real value to your property. Wood is the most versatile, naturally warm, and cost-effective retaining wall material available — and when it’s designed well, it looks like it was always part of the landscape rather than an engineering solution added to it.
These 20 ideas cover every style, every slope, and every budget — from a simple single-course timber wall to a fully terraced garden system with integrated lighting, seating, and water features.
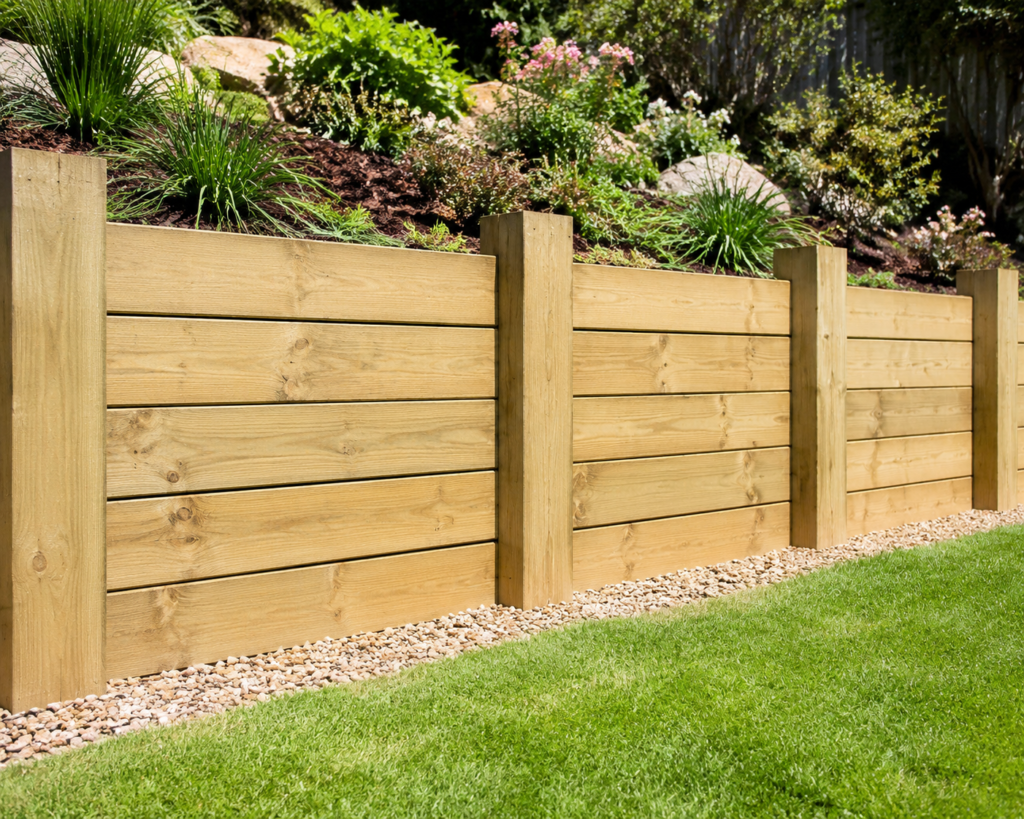
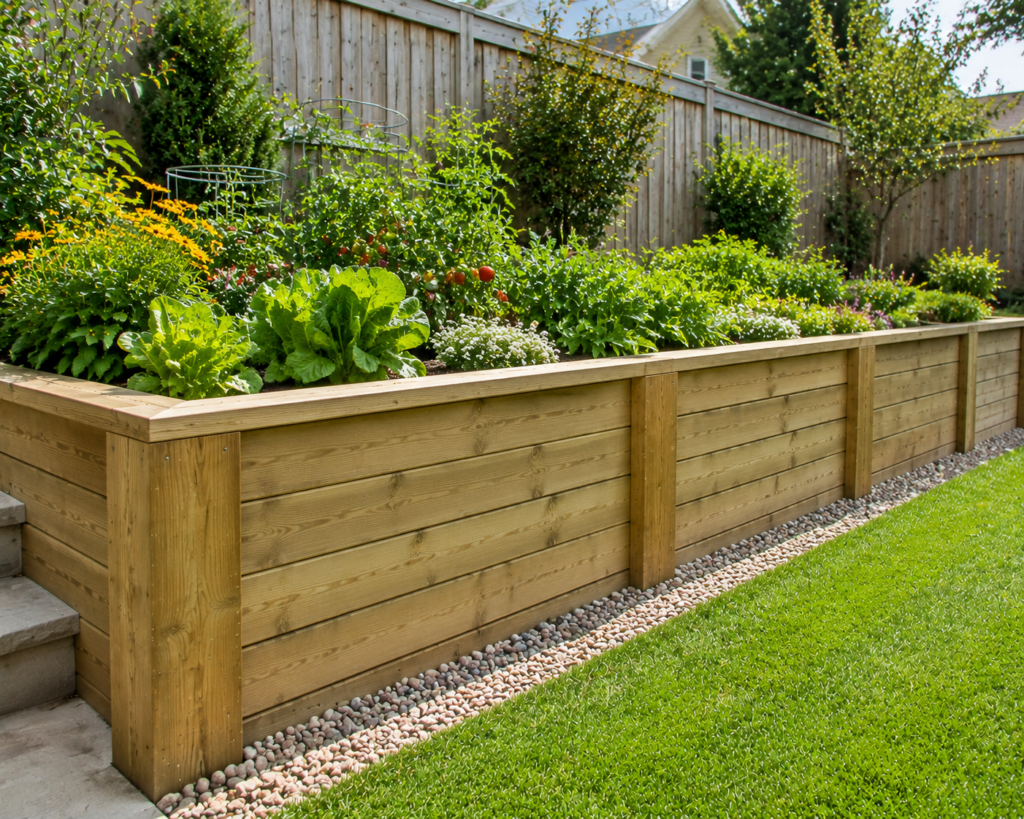
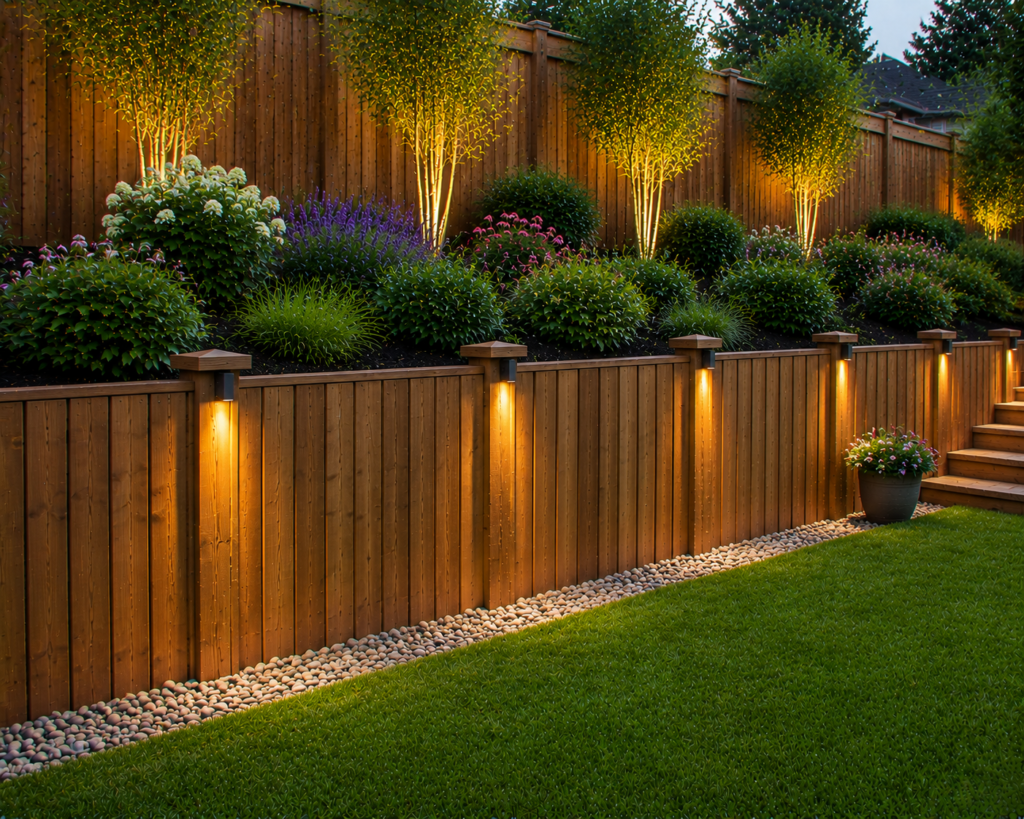
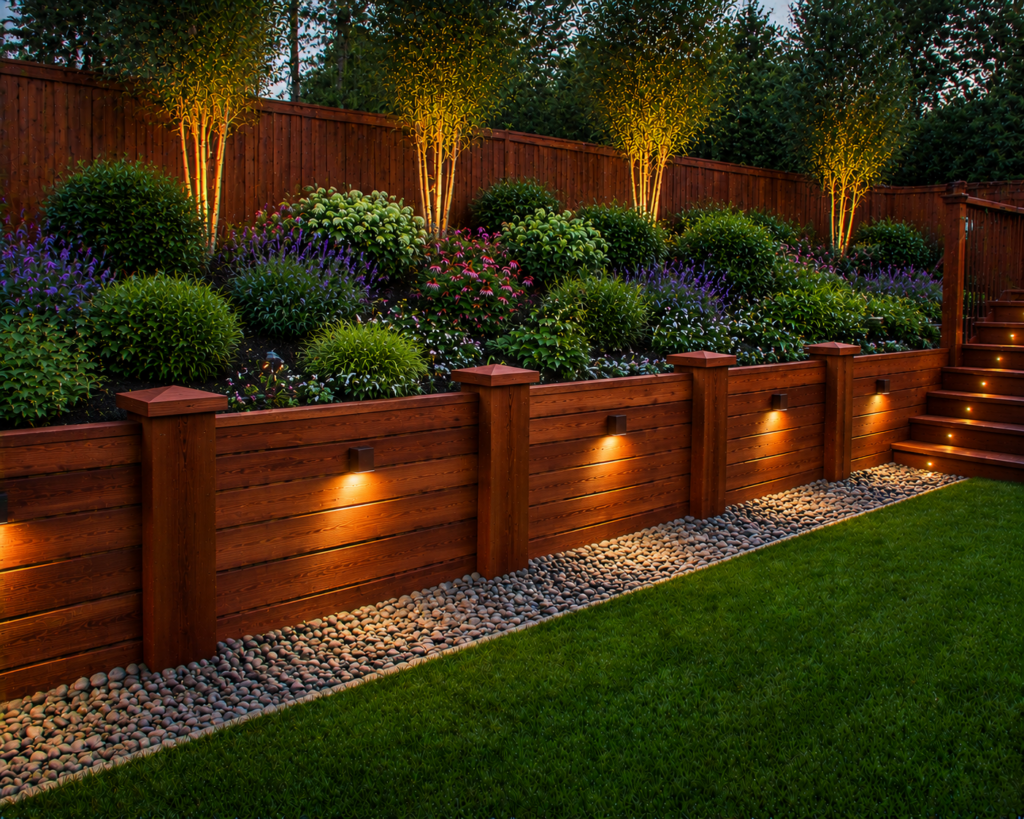
1. Classic Pressure-Treated Timber Wall
Best for: Most residential slopes — the most widely used and most affordable wood retaining wall approach
Pressure-treated landscape timbers are the standard choice for residential wood retaining walls because they combine low cost, wide availability, and adequate durability in one straightforward material. The chemical treatment process forces preservatives into the wood under pressure, protecting it against rot, fungal decay, and insect damage for 15 to 25 years in most conditions.
Stacked horizontally and secured with rebar or timber screws at each course, pressure-treated timber walls are also the most DIY-accessible retaining wall option — the construction process is straightforward and the tools required are standard.
Smart tip: Use Class 2 or UC4B rated pressure-treated timber specifically for ground-contact applications. Not all pressure-treated lumber is rated for soil contact — lighter treatments are designed for above-ground use only and will fail within a few years when buried. Check the end-tag of every piece before purchasing.
Mistake to avoid: Building a pressure-treated timber wall taller than 4 feet without engineering assessment. Walls over 4 feet experience significantly greater lateral soil pressure than shorter walls. At this height, the wall design, footing depth, and deadman anchor system all become structural considerations that require professional input to get right.
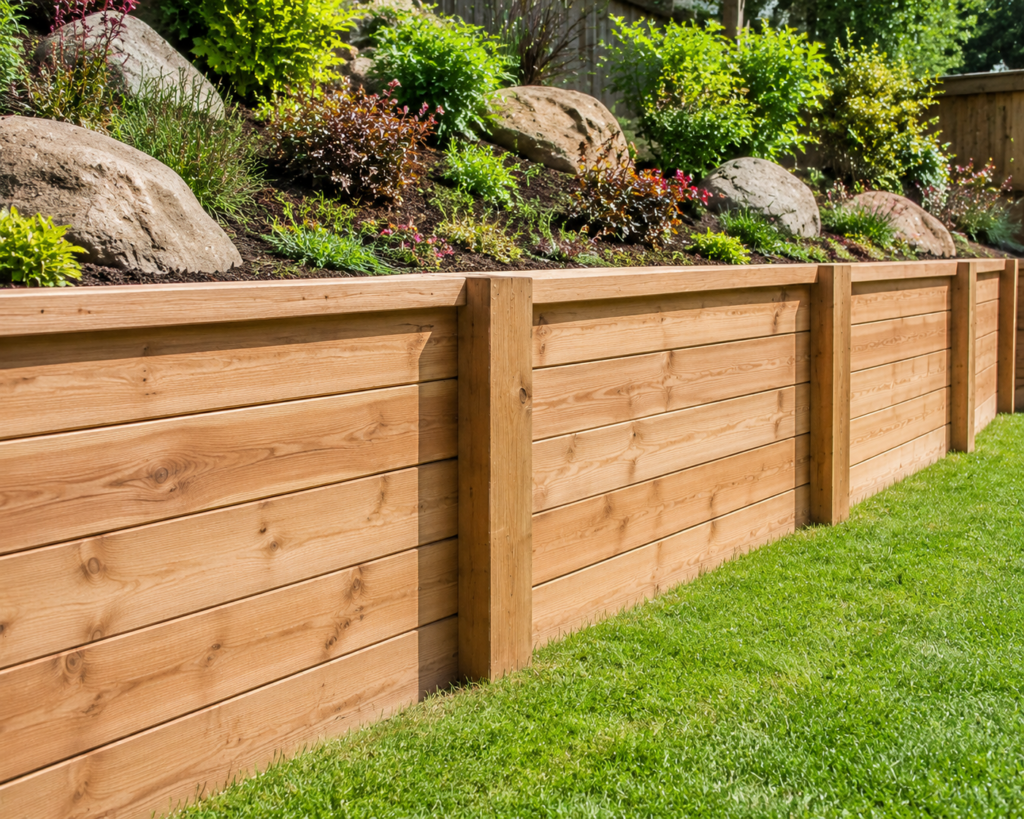
2. Cedar Retaining Wall
Best for: Homeowners prioritizing natural appearance and longevity without chemical treatment
Cedar contains natural oils that make it inherently resistant to rot and insect damage without chemical preservatives — making it the most environmentally appropriate wood retaining wall material and an excellent choice for walls adjacent to vegetable gardens or water features where chemical leaching is a concern.
Over time, cedar weathers to a beautiful silvery-grey that blends seamlessly into the landscape. This natural aging process — unlike the grey weathering of other woods — reads as refined rather than neglected, improving the wall’s appearance with age rather than diminishing it.
Smart tip: Leave cedar untreated if the silver-grey weathered finish suits your landscape aesthetic. Staining or sealing cedar walls requires reapplication every two to three years — the maintenance cost and effort over time exceeds the benefit for most homeowners. Natural cedar in its silver-grey weathered state requires almost no maintenance.
Mistake to avoid: Using cedar in direct soil contact without selecting heartwood specifically. Cedar’s rot resistance is primarily in the heartwood — the darker inner wood of the tree. The lighter-colored sapwood has significantly less natural rot resistance. When ordering cedar for retaining wall use, specify heartwood or all-heart cedar.
3. Tiered Terraced Wall System
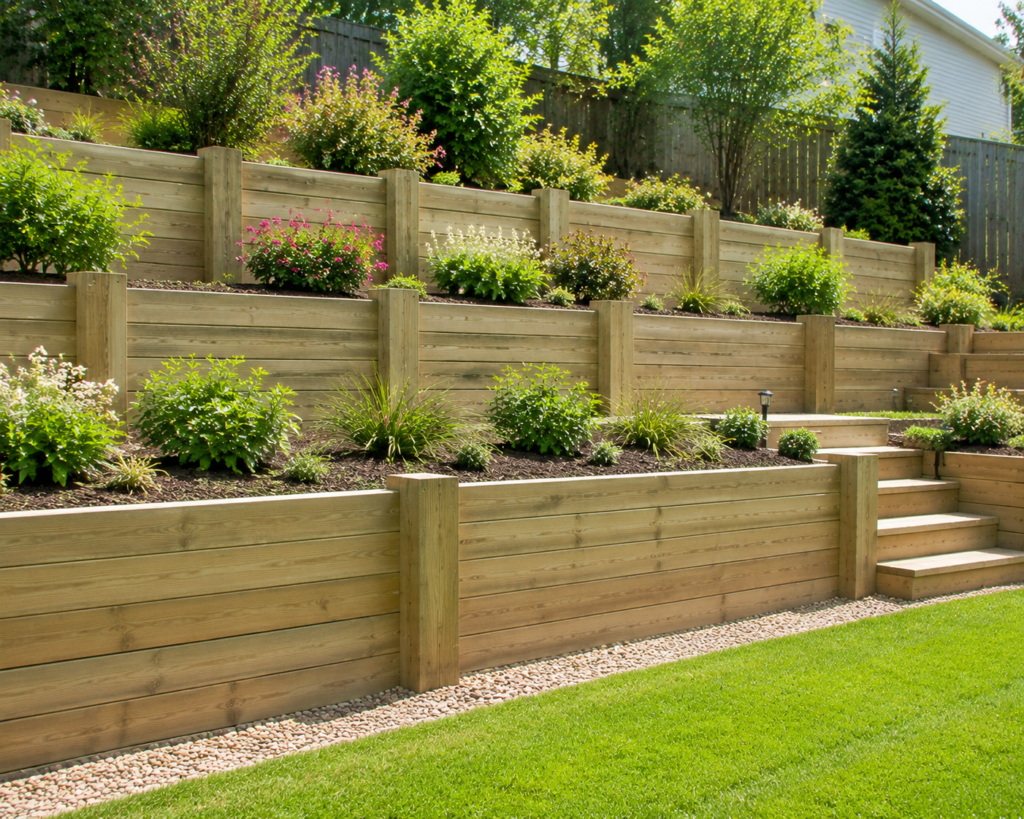
Best for: Steep slopes — the most practical and visually dramatic solution for significant grade changes
A tiered retaining wall system — multiple shorter walls at different elevations creating a series of level terraces — solves steep slope problems more effectively and more safely than a single tall wall. Each shorter wall experiences a fraction of the lateral pressure that one tall wall would bear, making the overall system significantly more structurally stable.
The terraces created between walls become usable garden space — for planting, seating areas, pathways, or decorative gravel. A slope that was previously unusable becomes the most interesting part of the garden.
Smart tip: Set each terrace level back from the one below it by at least the height of the wall. A 3-foot wall should have at least 3 feet of flat terrace before the next wall begins. This setback reduces the pressure each wall bears and creates adequate planting space between levels.
Mistake to avoid: Making all tiers the same height and the same planting depth. Varying the tier heights slightly — and using different plants at each level — creates a more naturalistic terraced garden that looks designed rather than engineered. Uniform tiers with identical planting look more like a construction project than a garden feature.
4. Curved Serpentine Wood Wall
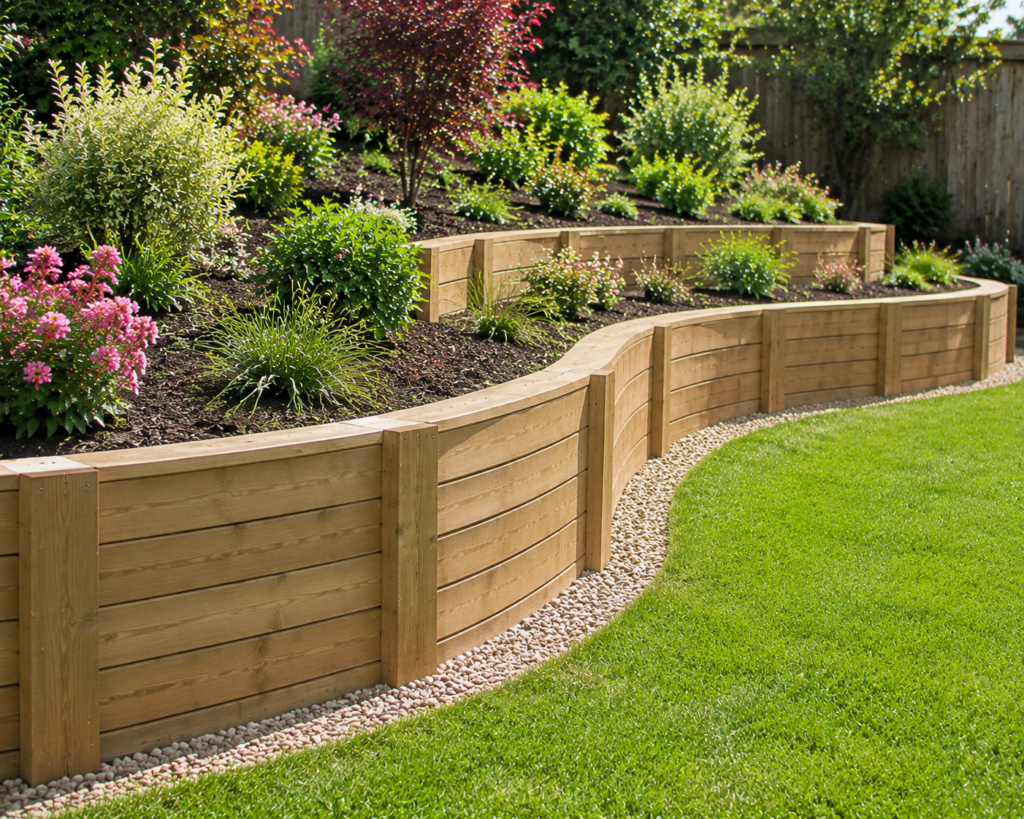
Best for: Gardens where organic, naturalistic form is the design priority
A curved or serpentine wood retaining wall introduces flowing lines into a landscape that would otherwise be defined by straight edges and right angles. The curves soften the visual impact of the wall, make it feel like part of the landscape rather than a structure imposed on it, and create planting pockets of varying depth along the wall’s length that suit different plant communities.
Building curves with timber requires shorter sections that follow the curve’s radius rather than long straight runs — the shorter pieces are easier to handle and the wall’s construction is more forgiving of imprecision than a straight wall.
Smart tip: Mark the curve on the ground with a garden hose before digging. A garden hose is flexible enough to create smooth, consistent curves and gives you a visual preview of the wall’s path before any soil is moved. Adjust the hose position until the curve looks right from all viewing angles, then mark it with spray paint.
Mistake to avoid: Attempting too tight a radius for the timber size being used. Long landscape timbers don’t bend — a curve with a small radius requires very short timber sections that create a faceted, angular appearance rather than a smooth curve. Plan curves with a minimum radius of about 5 feet for standard 8-foot timbers.
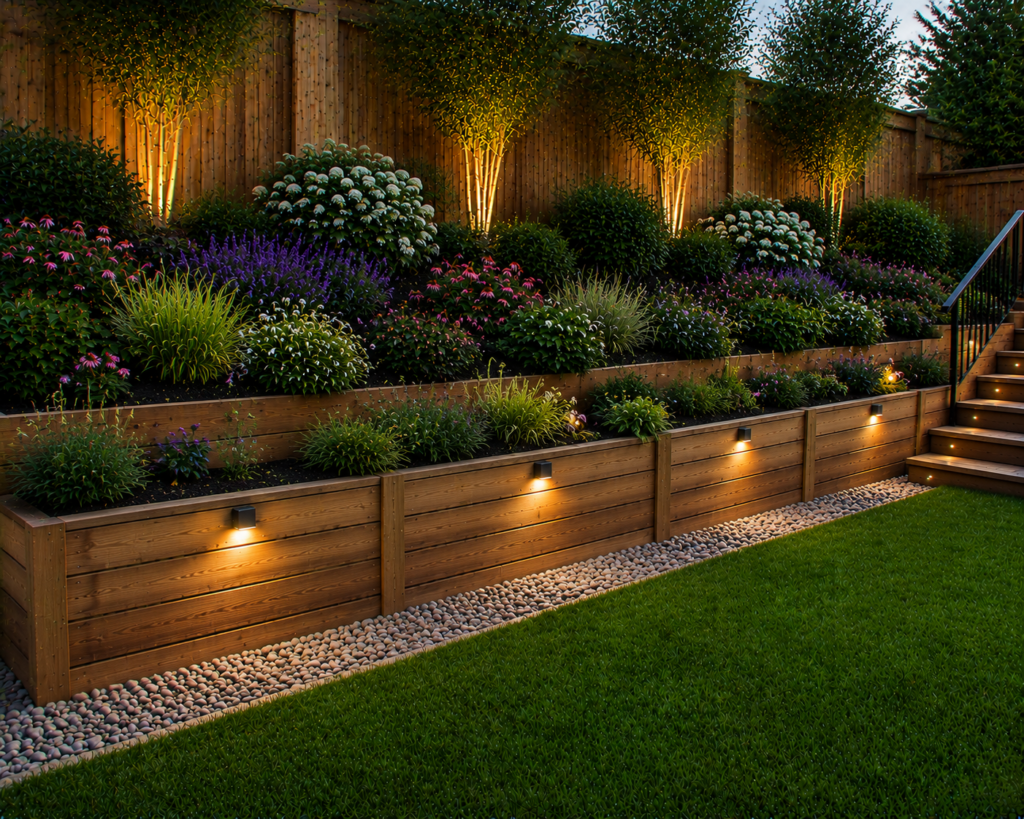
5. Raised Garden Bed Retaining Wall
Best for: Combining erosion control with productive gardening space — two problems solved with one installation
A wood retaining wall built to contain a raised garden bed serves dual functions simultaneously: it holds the slope and provides the contained, deep-soiled growing environment that raised bed gardening relies on. The raised bed wall is typically built from cedar or untreated hardwood rather than pressure-treated timber, since food-growing applications benefit from avoiding chemical preservatives in soil contact.
The combination of level growing space and contained deep soil allows vegetables, herbs, and flowers to grow more productively than in native sloped soil, while the wall itself solves the slope management problem completely.
Smart tip: Build raised bed retaining walls with removable front panels rather than fixed construction wherever possible. Removable panels allow you to access the full depth of the bed for soil amendment, replanting, and maintenance without the contortions required to reach over fixed walls into a deep raised bed.
Mistake to avoid: Using railway sleepers treated with creosote for raised food-growing beds. Creosote is a toxic preservative that leaches into soil readily — it’s appropriate for decorative walls but not for any bed where food will be grown. Use untreated cedar or food-safe treated timber specifically rated for edible garden use.
6. Wood Wall with Built-In Seating
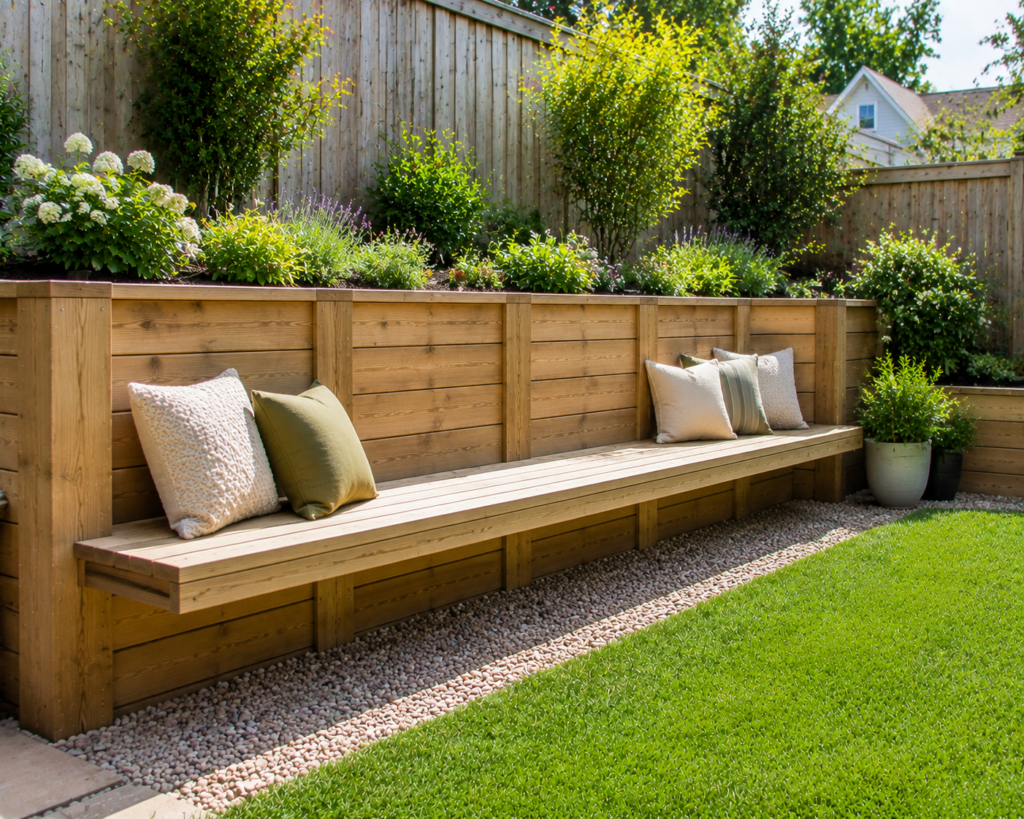
Best for: Walls adjacent to patios or outdoor living areas — combining structure with function
A wood retaining wall that incorporates a built-in bench along its top or face converts a purely structural element into an active outdoor living feature. The wall becomes a destination rather than a boundary. The bench can run the full length of the wall or be positioned at a specific point — at a corner, beside a fire pit, or overlooking a garden view.
Built-in seating also solves a common outdoor furniture problem — benches and chairs that move around or blow over in wind. A bench that’s structurally part of the wall is permanent, stable, and visually integrated with the landscape.
Smart tip: Cap the bench seat with hardwood or composite decking material rather than the same pressure-treated timber used for the wall body. The seat surface is handled and sat upon daily — a smoother, more refined material at this level improves the experience significantly without adding substantial cost.
Mistake to avoid: Setting the bench seat height at standard chair height (18 inches) without considering the people who’ll use it. Retaining wall benches are often set at the wall’s top — if the wall is 24 to 30 inches tall, the seat is at a comfortable height. If the wall is only 16 to 18 inches, the seat feels too low. Design the wall height with seating comfort in mind from the start.
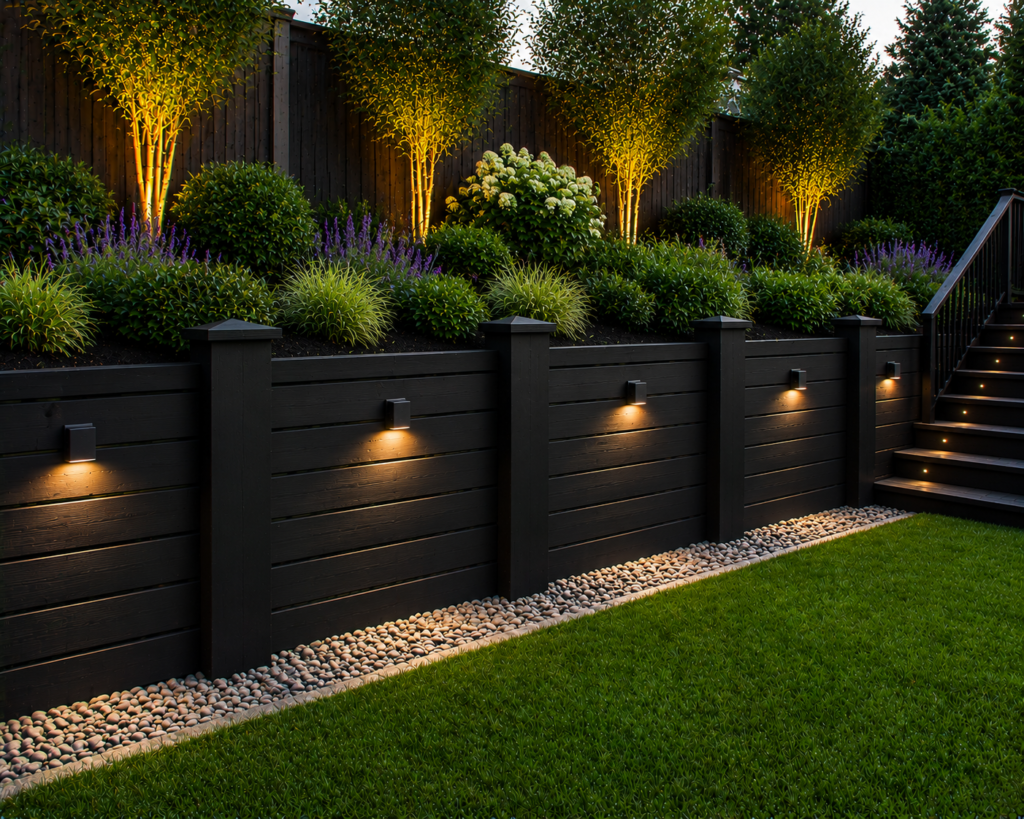
7. Dark Stained Wood Retaining Wall
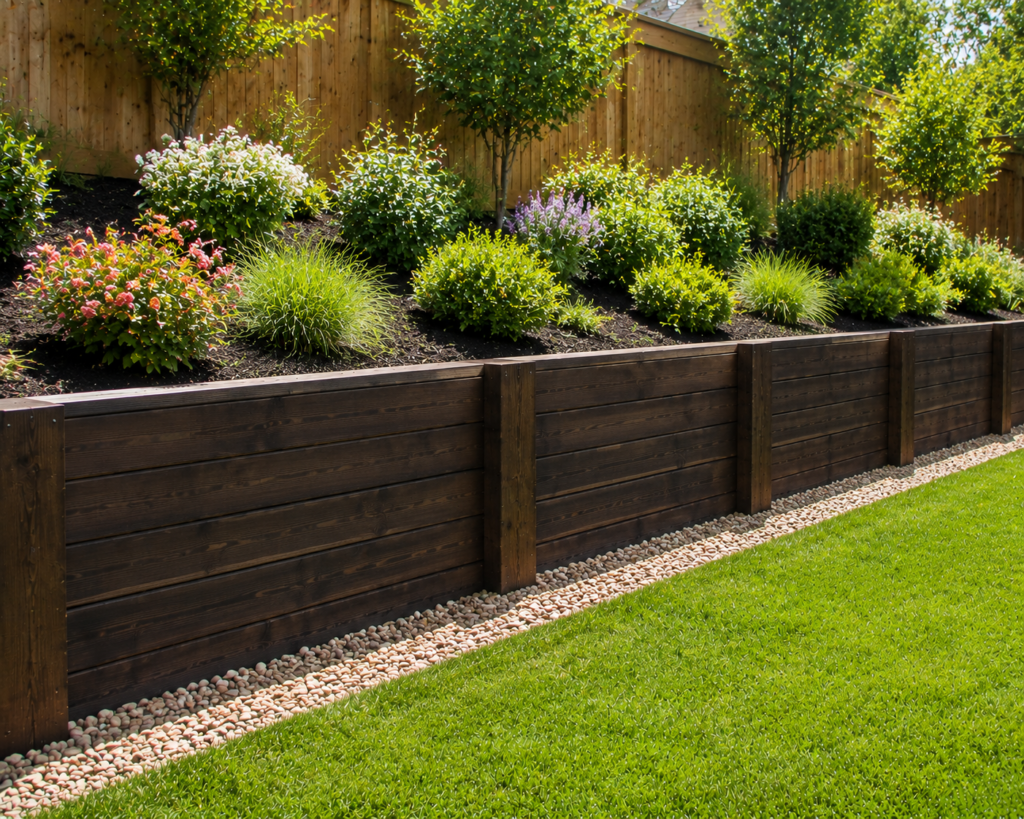
Best for: Modern and contemporary landscapes where a bold, design-forward look is the goal
A wood retaining wall stained in deep charcoal, espresso, or near-black creates a dramatically different visual impression from natural wood. The dark tone creates strong contrast against green plantings and soil, reads as sophisticated and intentional, and suits the clean geometric aesthetic of contemporary landscape design.
Dark staining also provides genuine protection — quality exterior wood stain seals the surface against moisture penetration and UV damage, extending the wall’s lifespan significantly compared to bare untreated wood.
Smart tip: Apply dark stain with a brush rather than a sprayer for wall applications. Brush application works the stain into the wood grain more thoroughly, creating better penetration and a more even finish than spray application on textured timber surfaces. Two brush-applied coats outperform three sprayed coats in both appearance and durability.
Mistake to avoid: Applying dark stain in direct hot sun. Heat causes stain to dry before it penetrates the wood surface properly — the result is a surface coating rather than a penetrating stain that dries quickly, peels faster, and doesn’t protect the wood as effectively. Apply stain in the morning or evening when the timber surface is cool.
8. Wood and Stone Combination Wall
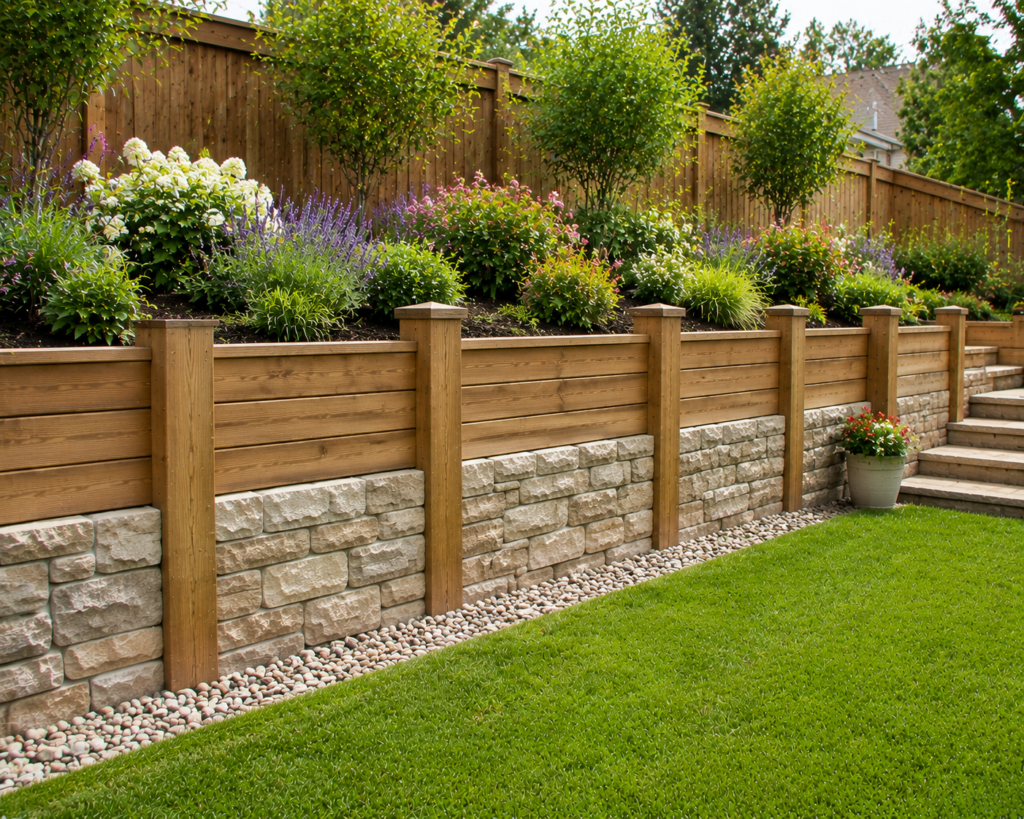
Best for: Any landscape where both materials are already present — the combination creates visual richness that neither material achieves alone
Using timber for the structural wall body with stone veneer on the face — or alternating sections of timber and stone — creates a material combination that references both natural woodland and garden wall traditions simultaneously. The warmth of wood and the permanence of stone complement each other in a way that suits a wide range of landscape styles.
The stone facing also significantly improves the wall’s durability — the timber structure behind is protected from direct weathering while the stone face provides the hardest possible exterior surface.
Smart tip: Choose stone that’s already present elsewhere in the landscape — in the existing hardscape, in the garden path, or in the house’s exterior materials. Repeating an existing stone type creates material coherence that makes the retaining wall feel like part of a considered design rather than an isolated installation.
Mistake to avoid: Using stone veneer that’s too thin for an outdoor application. Interior stone veneer tiles (6 to 10mm) are not appropriate for outdoor retaining wall use — they crack in freeze-thaw cycles and don’t adhere reliably to timber in wet conditions. Use minimum 25mm thick natural stone or specifically rated exterior stone veneer products.
9. Wood Wall with LED Lighting
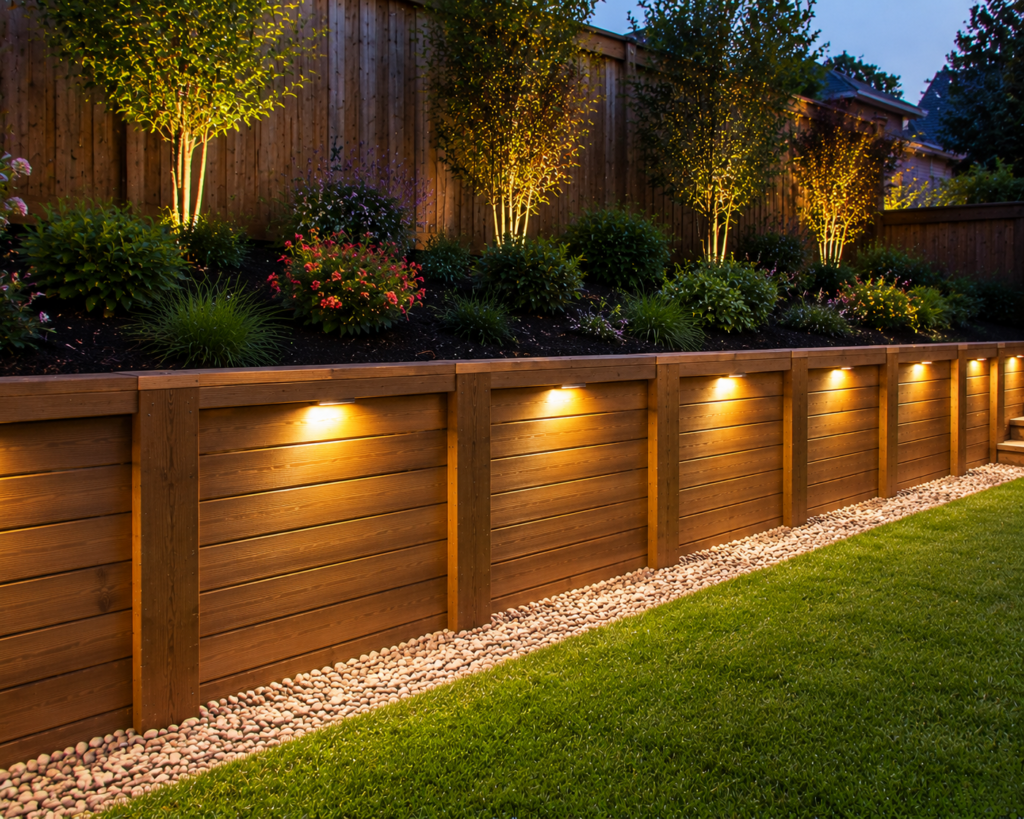
Best for: Any retaining wall visible from a patio or outdoor seating area — lighting transforms the wall after dark
Integrating LED lighting into a wood retaining wall converts a daytime landscape feature into a nighttime architectural element. Under-cap lights mounted beneath the top timber course cast a soft downward glow that highlights the wall’s texture. Step lights at any integrated stairs create safety and visual rhythm. LED strips along the wall’s face illuminate the planting above.
Modern outdoor LED systems are waterproof, energy-efficient, long-lasting, and increasingly controllable from a smartphone — allowing the wall’s lighting to be adjusted for different occasions and times of year.
Smart tip: Plan the lighting wiring before the wall is built rather than retrofitting afterward. Running conduit through the wall during construction takes minutes. Retrofitting electrical conduit through a finished timber wall takes hours and often requires partial disassembly. Include a conduit sleeve in the wall’s construction even if the lights aren’t installed immediately.
Mistake to avoid: Using indoor LED strips in an outdoor retaining wall application. Indoor LED strips are not waterproof and will fail within weeks of exposure to rain, dew, and soil moisture. Specify IP65 or IP67 rated outdoor LED strips specifically for any landscape lighting application.
10. Integrated Trellis Retaining Wall
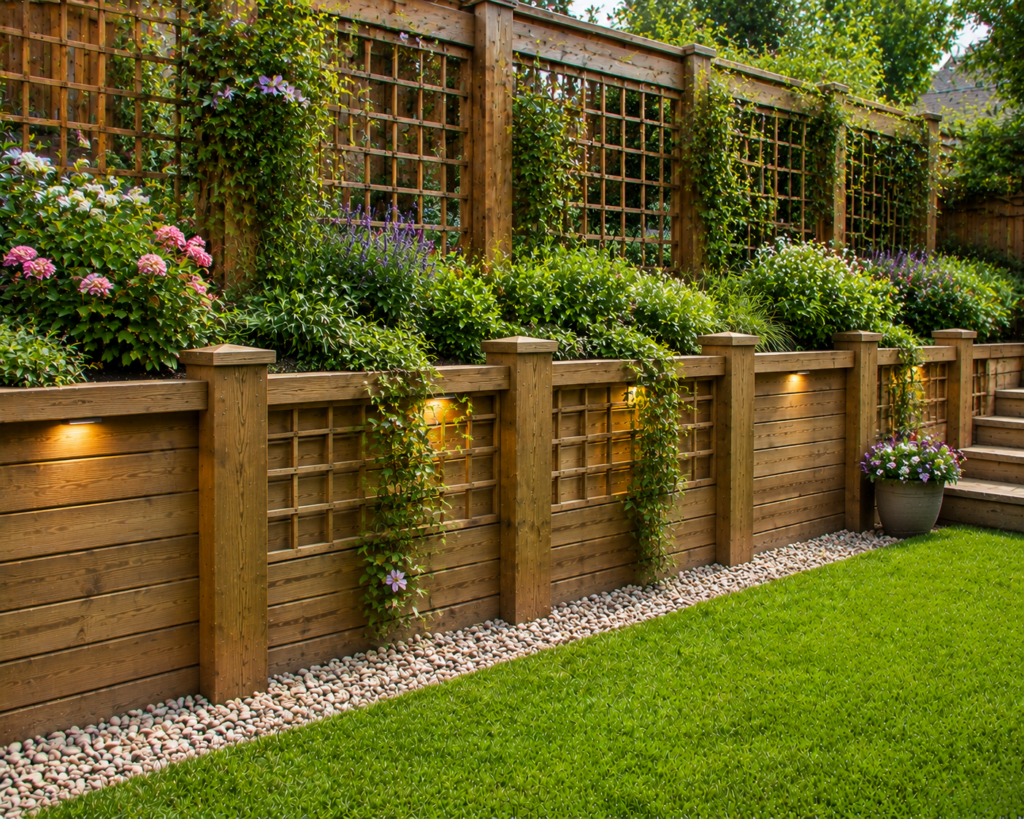
Best for: Garden boundaries where both soil retention and vertical planting are needed
A retaining wall with an integrated trellis above it — the lower section holding soil while the upper section provides a lattice framework for climbing plants — creates a wall that contributes to the landscape at two levels simultaneously. Roses, clematis, jasmine, and climbing hydrangea all use the trellis effectively and eventually cover it in seasonal color and foliage.
The combined height of wall and trellis also provides significantly more privacy screening than the wall alone, creating an enclosed garden feeling that suits smaller outdoor spaces particularly well.
Smart tip: Build the trellis section from cedar or untreated hardwood even if the wall body is pressure-treated timber. The trellis is in contact with climbing plant stems — some climbers are sensitive to the chemicals in pressure-treated wood. Cedar provides natural rot resistance without this concern.
Mistake to avoid: Installing a trellis above a retaining wall without considering the wind load. A trellis covered in dense climbing plant growth acts as a sail in strong wind — the combined wind load on a full trellis can be substantial. Ensure the wall’s posts and the trellis mounting system are designed for this additional load.
11. Railroad Tie Retaining Wall
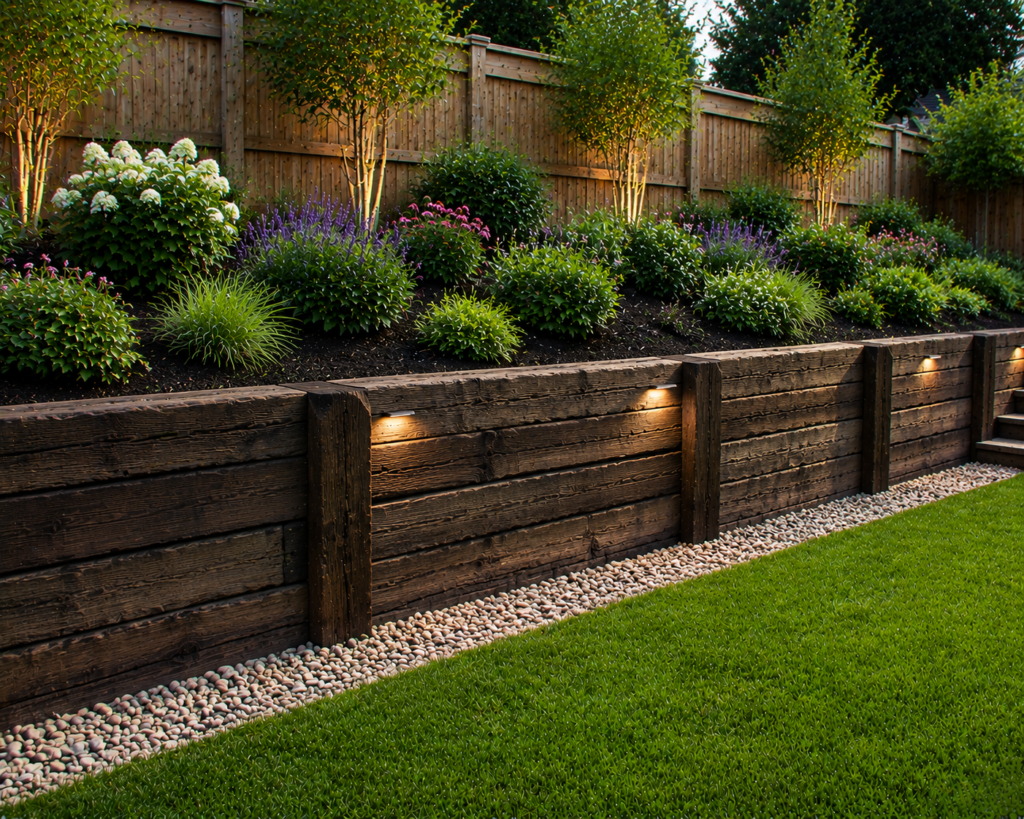
Best for: Rustic and country-style landscapes — the heavy timber aesthetic has genuine character
Traditional railroad ties — heavy hardwood timbers originally used for rail track — create retaining walls with a robust, industrial character that suits large-scale landscape applications. Their substantial weight provides inherent stability, and their weathered surface develops rich grey tones over time that suit naturalistic landscapes well.
Modern concrete railroad tie alternatives — precast blocks designed to look like timber — provide similar aesthetics with significantly greater longevity and without any concerns about chemical content from historic railway treatments.
Smart tip: Use new untreated hardwood landscape sleepers rather than reclaimed railway ties where the wall will be adjacent to food gardens or where children play. Historic railway ties were treated with creosote — a preservative that can leach from old ties in warm weather. New landscape sleepers look similar and provide the same aesthetic without this concern.
Mistake to avoid: Using reclaimed railway ties without checking them for creosote. Creosote-treated ties are identifiable by their strong tar-like smell in warm weather and by black oily staining on the surface. Avoid any ties that show these characteristics for applications near food gardens, seating areas, or children’s play spaces.
12. Wood Wall with Water Feature
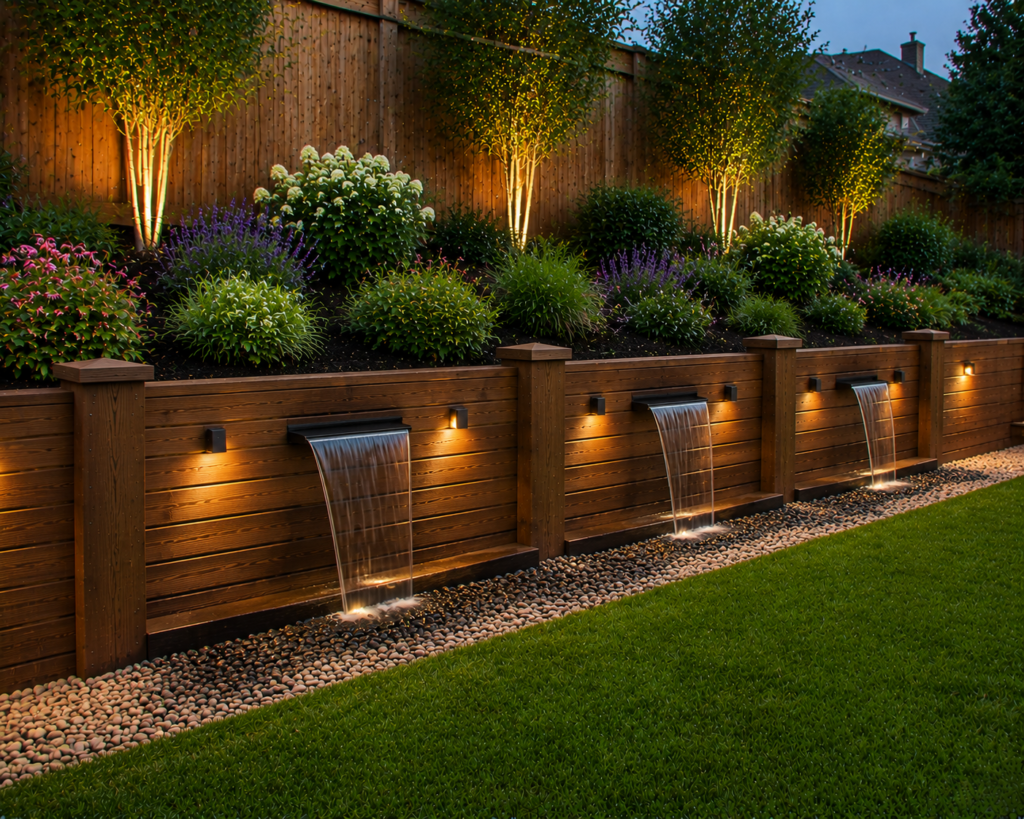
Best for: Creating a premium outdoor feature — the combination of timber and water is among the most evocative landscape pairings
A water feature integrated into a wood retaining wall — a small spout that flows from the wall face into a basin below, or a cascading waterfall that runs down a tiered timber wall — creates a sensory outdoor experience that transforms the wall from a structural element into a destination. The sound of water, the movement of the surface, and the reflective quality of still water in a basin combine in a way that no purely visual feature can replicate.
The timber wall provides the backdrop that makes the water feature visible and audible while the water adds life and movement to what would otherwise be a static structure.
Smart tip: Direct the water from weep holes in the wall into the water feature basin rather than letting drainage run loose across the landscape. This practical drainage solution becomes a designed water feature — every rainfall contributes to the feature’s flow rather than creating drainage problems elsewhere in the yard.
Mistake to avoid: Building a water feature into a timber wall without planning the electrical supply for the pump during wall construction. A pump requires power — running conduit through the wall during construction is straightforward. Retrofitting electrical supply to a finished timber wall is significantly more difficult and expensive.
13. Vertical Plank Wood Wall
Best for: Contemporary landscapes where a modern, fence-like aesthetic suits the design direction
Rather than the horizontal stacked timber construction of most retaining walls, a vertical plank wall uses boards set vertically against a structural post-and-beam framework. The vertical orientation creates a visual texture similar to board-and-batten fencing, reads as more contemporary than horizontal timber construction, and allows for interesting design variations like alternating plank widths or deliberately spaced gaps between planks.
Gaps between vertical planks also provide natural drainage — water passes freely through the gaps rather than building pressure behind the wall face.
Smart tip: Set vertical planks on a gravel base rather than embedding them directly in soil. Plank ends in direct soil contact are the most vulnerable point for rot initiation — even pressure-treated timber fails faster at points of direct soil contact than at points above ground. A gravel base at the plank bottom improves drainage and significantly extends the wall’s lifespan.
Mistake to avoid: Using vertical plank construction for walls holding significant soil depth without adequate structural posts. The vertical planks themselves provide limited lateral resistance — the structural work is done by the posts set in concrete footings behind or within the wall. Underspecifying the post size or post depth for the soil load the wall must retain is the most common structural failure in vertical plank retaining walls.
14. Composite Timber Retaining Wall
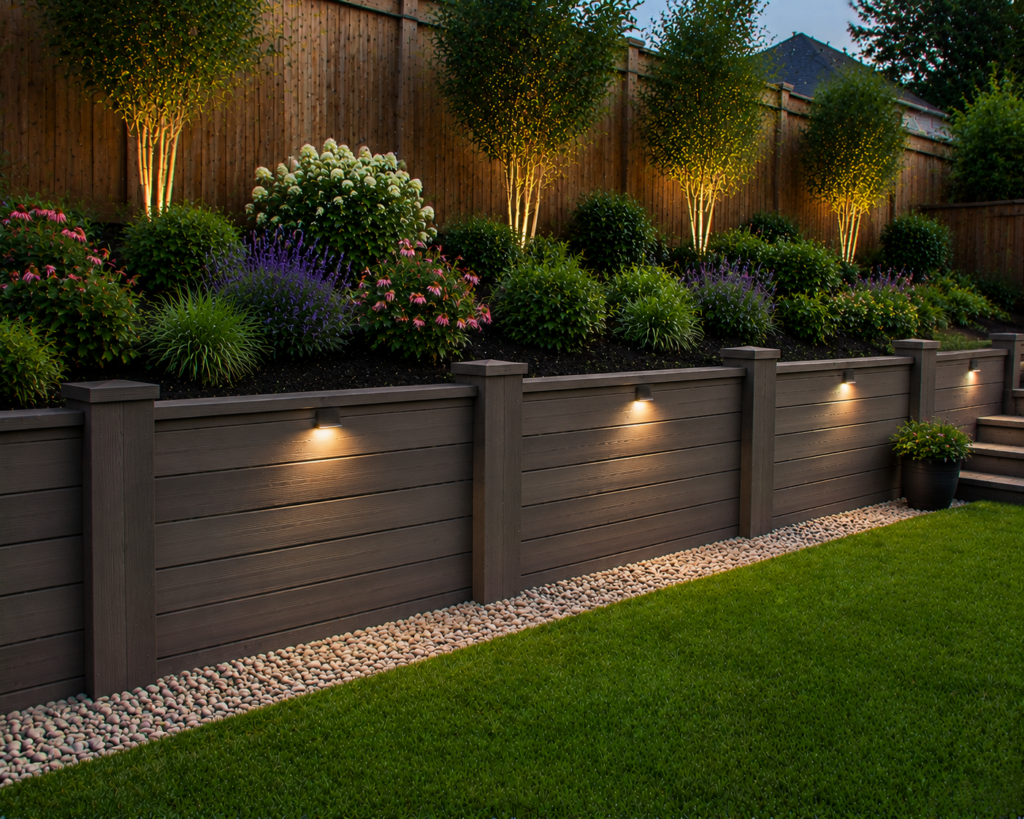
Best for: Anyone who wants the wood aesthetic permanently without maintenance — composite lasts indefinitely
Composite timber — manufactured from a combination of recycled wood fiber and plastic — looks convincingly like real timber, resists rot and insect damage completely, doesn’t require staining or sealing, and lasts significantly longer than natural wood in soil contact. For homeowners who want the warmth of a wood retaining wall without the maintenance commitment, composite is the most practical available option.
The initial cost is higher than pressure-treated timber, but the absence of maintenance costs and the extended lifespan mean the total cost over 20 years is typically lower than natural wood.
Smart tip: Choose composite timber specifically rated for ground-contact retaining wall use rather than composite decking repurposed for this application. Composite decking is designed for above-ground horizontal use — the structural requirements and moisture exposure of a retaining wall are different. Ground-contact composite retaining wall products are available from specialist suppliers.
Mistake to avoid: Expecting composite timber to behave exactly like natural wood during installation. Composite expands and contracts more than natural wood with temperature changes — installation must account for this movement with appropriate gap spacing. Check the manufacturer’s guidelines for thermal expansion allowances before cutting and installing any composite retaining wall system.
15. Wood Wall with Dry Creek Drainage
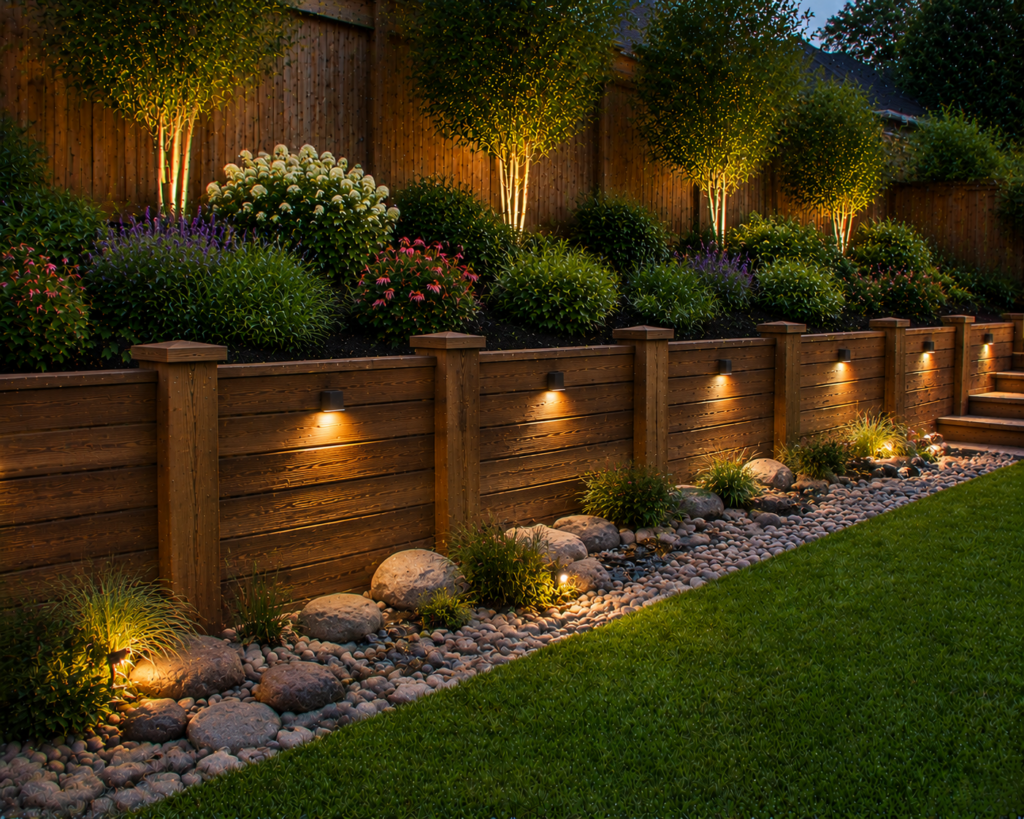
Best for: Any retaining wall where drainage is a significant concern — this combination solves both issues beautifully
A dry creek bed running along the base of a retaining wall — smooth river stones in a defined channel directing water away from the wall — converts a drainage necessity into a landscape feature. Every retaining wall needs drainage management to prevent hydrostatic pressure building behind it. A dry creek provides this drainage while creating a naturalistic garden element that looks deliberate and attractive.
The river stones of the dry creek complement the timber wall material — the combination of wood and stone references natural stream bank environments in a way that reads as genuinely landscape-appropriate.
Smart tip: Size the dry creek bed for the maximum expected water flow during heavy rainfall — not just typical conditions. A creek bed that’s adequate for normal drainage but overwhelmed during heavy rain causes the very erosion and saturation problems the retaining wall is designed to prevent. Make it generously sized from the beginning.
Mistake to avoid: Using decorative white or very light-colored stone in a dry creek adjacent to a retaining wall. Light stones stain rapidly with soil and organic matter runoff — they look attractive when new and require constant cleaning to maintain. Use naturally dark river stone that doesn’t show staining and improves in appearance as it weathers.
16. Wood and Metal Combination Wall
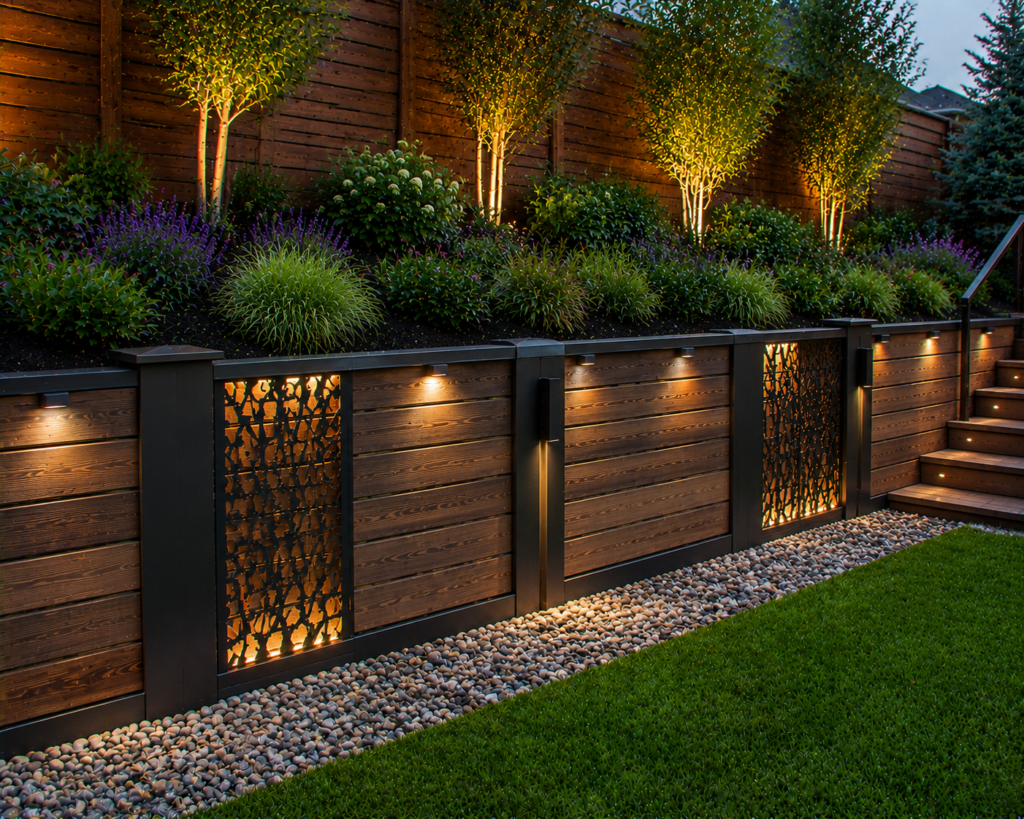
Best for: Contemporary and industrial aesthetic landscapes — the material contrast is striking and sophisticated
Combining timber wall panels with steel or Corten steel frame elements creates a hybrid wall with the warmth of wood and the structural authority of metal. Corten steel in particular — which weathers to a rich rust-brown patina — creates a color combination with cedar or dark-stained timber that looks genuinely designed and suits modern residential landscapes exceptionally well.
The metal elements also solve one of wood’s structural limitations: steel posts set in concrete footings provide the lateral resistance that timber alone struggles to provide in taller wall applications, allowing wood panels to be used at heights where an all-timber wall would be structurally marginal.
Smart tip: Allow Corten steel to weather to its full patina before placing it adjacent to light-colored hardscape or stone. Corten steel “bleeds” rust-colored water during its initial weathering period — typically the first two to three years — that stains adjacent concrete, pale stone, and timber. Position it where this initial runoff stains only soil or dark surfaces.
Mistake to avoid: Using standard mild steel rather than Corten or stainless steel for metal elements in a wood retaining wall. Mild steel rusts rapidly in outdoor conditions and the rust spreads aggressively to adjacent timber, staining it irreversibly orange. Only use metals specified for outdoor exposed use — Corten, stainless steel, galvanized steel, or powder-coated aluminum.
17. Painted Black Timber Wall
Best for: Transforming an existing tired timber wall — the most cost-effective retaining wall improvement available
Painting an existing timber retaining wall in matte black exterior paint converts a weathered, faded structure into a contemporary feature that looks intentionally designed. The transformation is dramatic and immediate — the same wall that looked worn and dated before painting reads as a bold design choice after it.
Black paint also creates the strongest possible contrast backdrop for planting — every flower color, every leaf texture, every garden ornament reads more vividly against black than against bare grey timber.
Smart tip: Use exterior masonry or timber paint specifically rated for ground-level outdoor use rather than standard fence paint. Ground-level timber walls get splashed with soil and water continuously — the paint needs genuine moisture and UV resistance to last more than one season. Apply two coats and expect to repaint every three to five years.
Mistake to avoid: Painting a timber wall that has active rot or structural problems. Paint covers the visual evidence of rot but doesn’t stop it — the rot continues beneath the painted surface, and a painted wall that fails structurally requires complete reconstruction. Inspect and repair any rot before painting, not after.
18. Wood Planter Box Retaining Wall
Best for: Small-scale slopes where retaining and planting can be combined in a single elegant structure
A retaining wall built as a series of connected planter boxes — each box holding soil above it and retaining the slope behind it — creates a productive, layered planting display that would otherwise require separate planting structures. The boxes can contain different plant communities at different heights: ground-level boxes with perennials and bulbs, mid-height boxes with herbs and compact shrubs, upper boxes with trailing plants that cascade over the box faces.
Smart tip: Line the interior of each planter box with a root barrier membrane before filling with growing medium. Without a barrier, the plants’ roots eventually penetrate into the structural soil behind the wall, making future maintenance and replanting significantly more difficult. The barrier keeps the growing medium and the structural fill separate permanently.
Mistake to avoid: Making planter box retaining walls too deep from front to back. A depth of 18 to 24 inches is sufficient for most ornamental plants and herbs — deeper boxes require more fill material, weigh more, and don’t improve plant performance for most species. Reserve deeper construction for boxes intended for large shrubs or fruit production.
19. Redwood Retaining Wall
Best for: Premium applications where appearance is the primary consideration — redwood is the most beautiful structural timber available
Redwood’s rich reddish-brown color, tight grain, and extraordinary natural rot resistance make it the premium choice for wood retaining walls where appearance matters as much as function. Its natural oils provide protection against rot and insect damage comparable to cedar — and like cedar, it doesn’t require chemical treatment for the protection it provides.
A redwood retaining wall ages with genuine grace — the initial vivid reddish-brown mellows over time to a warm honey tone before eventually silver-greying, each stage attractive in its own right.
Smart tip: Apply a clear UV-blocking sealer to redwood if you want to preserve its initial reddish-brown color. Without UV protection, redwood greying happens within the first season of sun exposure. A clear sealer with UV inhibitors slows this process significantly — reapply every two to three years to maintain the original color.
Mistake to avoid: Purchasing redwood without verifying it’s FSC certified from sustainably managed forests. Redwood forests are a sensitive ecosystem — purchasing certified sustainable redwood ensures your beautiful wall isn’t contributing to old-growth forest depletion. FSC certification is visible on the timber end-tag at the supplier.
20. How to Build and Maintain a Wood Retaining Wall
Best for: Anyone planning a wood retaining wall — these fundamentals prevent the most common and most costly mistakes
Understanding the structural principles behind a wood retaining wall determines whether it stands for 25 years or fails within 5. The fundamentals are consistent regardless of wood type or wall style.
Drainage is the most critical structural factor. Hydrostatic pressure — water pressure building up behind the wall — is responsible for more retaining wall failures than any other cause. Every wood retaining wall needs drainage: gravel backfill directly behind the wall, perforated drain pipe at the wall’s base, and weep holes through the wall face at regular intervals. Neglecting drainage turns a structurally sound wall into one that fails under water pressure. Footing depth matters enormously. The base course of timber must be buried below the frost line in cold climates — shallow footings heave with the freeze-thaw cycle and destroy the wall’s alignment within a few seasons. In most northern climates, this means burying the base course 12 to 24 inches below grade. Maintenance schedule: inspect annually for rot, check that drainage is functioning, reapply stain or sealant every 2 to 3 years for stained walls, and address any movement or settling immediately before it progresses.
Smart tip: Install a perforated drain pipe (French drain) in a gravel bed at the base of the wall during construction. This single addition provides active drainage that prevents hydrostatic pressure from building behind the wall regardless of rainfall intensity. It’s the most important structural investment in any retaining wall project and takes only a few hours to install during construction.
Mistake to avoid: Building a retaining wall over 4 feet tall without checking local permit requirements. Most jurisdictions require permits and engineered drawings for retaining walls exceeding 3 to 4 feet in height. Building without permits creates liability issues and can require costly demolition and reconstruction if discovered. Check with your local building department before breaking ground on any significant retaining wall project.
Before You Start
- Check permit requirements first. Walls over 3 to 4 feet typically require permits and sometimes engineering sign-off. This varies by location — check before you dig.
- Plan drainage from the beginning. Every retaining wall needs drainage — gravel backfill, drain pipe, and weep holes. Drainage planned from the start costs almost nothing. Drainage retrofitted after construction is expensive and disruptive.
- Choose wood appropriate to the application. Pressure-treated for most applications, cedar or redwood where chemical-free is preferred, composite where maintenance-free longevity is the priority.
- Assess the slope honestly. Slopes steeper than 2:1 (rising 2 feet for every 1 foot of horizontal distance) are beyond DIY territory for anything but very short walls. Professional assessment is worthwhile before committing to construction.
Conclusion
A wood retaining wall solves a slope problem and creates a landscape feature simultaneously — when it’s designed well, it looks like the yard was always this way. The material warmth of timber, its compatibility with planting, and its design flexibility make it the right choice for most residential applications. Get the drainage right, use appropriate materials for the application, and plan the wall with the landscape around it rather than as an isolated structure — and a wood retaining wall will serve and look beautiful for decades.