The entryway is the most underinvested room in most homes — and the most important. It sets the tone for every room that follows, it shapes the first impression every visitor forms, and it is the last thing you see when you leave and the first thing you see when you come home. Getting it right costs less than almost any other room renovation, because entryways are small — but the impact is disproportionate to the investment.
These 20 entryway ideas cover every aspect of making this transitional space as functional, welcoming, and beautifully designed as it deserves to be.
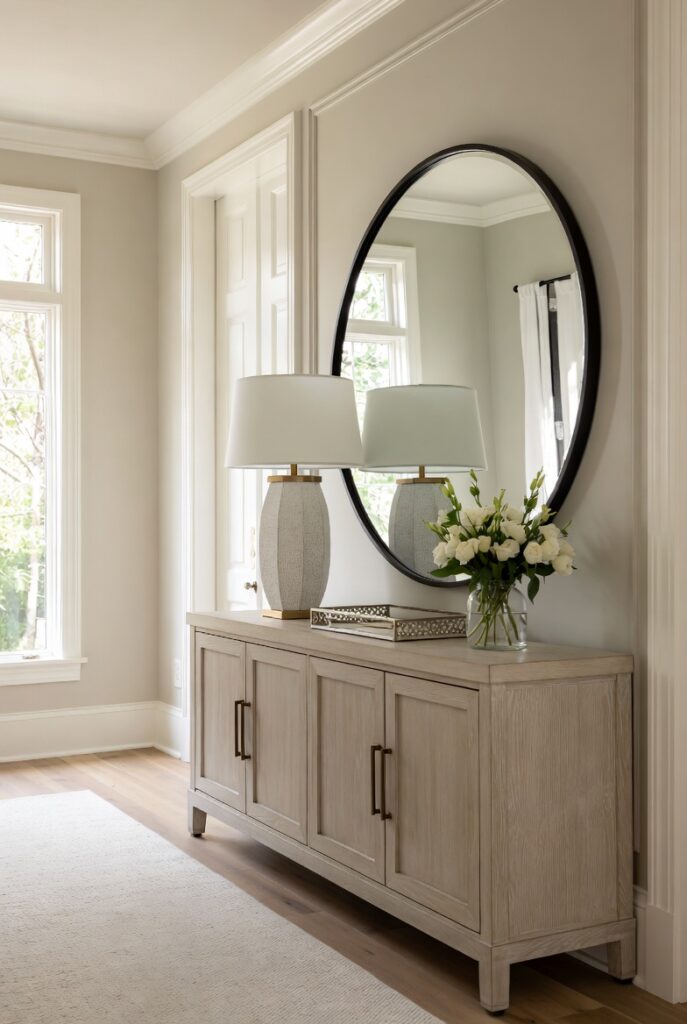
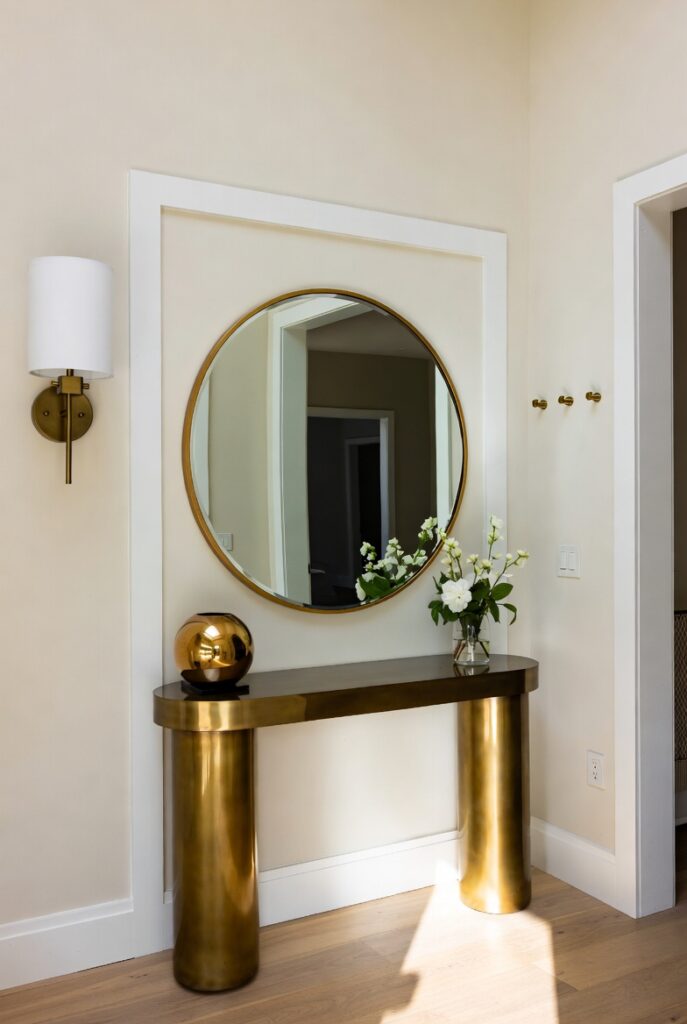
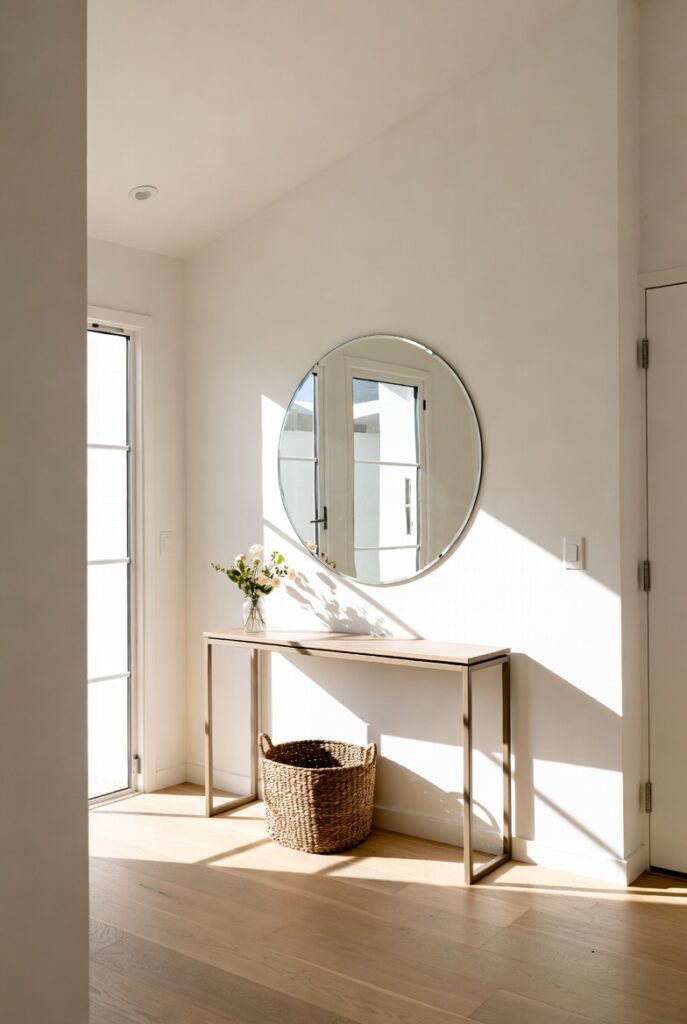
1. Add a Console Table as the Anchor Piece
Best for: Any entryway with enough width to accommodate a narrow table without blocking the passage
A console table is the foundational piece of entryway furniture — it provides a surface for keys, mail, and objects arriving and leaving with you, a base for decorative display, and a visual anchor that gives the entry its sense of being a designed space rather than simply a corridor. Without it, most entryways feel like a transition; with it, they feel like a room.
Choose a console proportional to the wall — roughly two-thirds of the wall’s width is the ideal console length. The standard console height of 75 to 80cm aligns naturally with the lower edge of most mirrors and works well with decorative objects at various heights above.
Smart tip: Style the console surface with the rule of three — one tall element (a lamp, a vase with branches, or a framed print), one medium element (a bowl, a stack of books, or a small plant), and one small element (a candle, a small ceramic, or a decorative object). This three-height arrangement creates natural visual rhythm on any surface.
Mistake to avoid: Choosing a console table so deep that it narrows the entryway passage uncomfortably. Entryways need clear passage — a console deeper than 35 to 40 centimeters in a standard-width hallway creates an obstacle rather than a welcoming feature. Choose a genuinely narrow console for tight spaces.
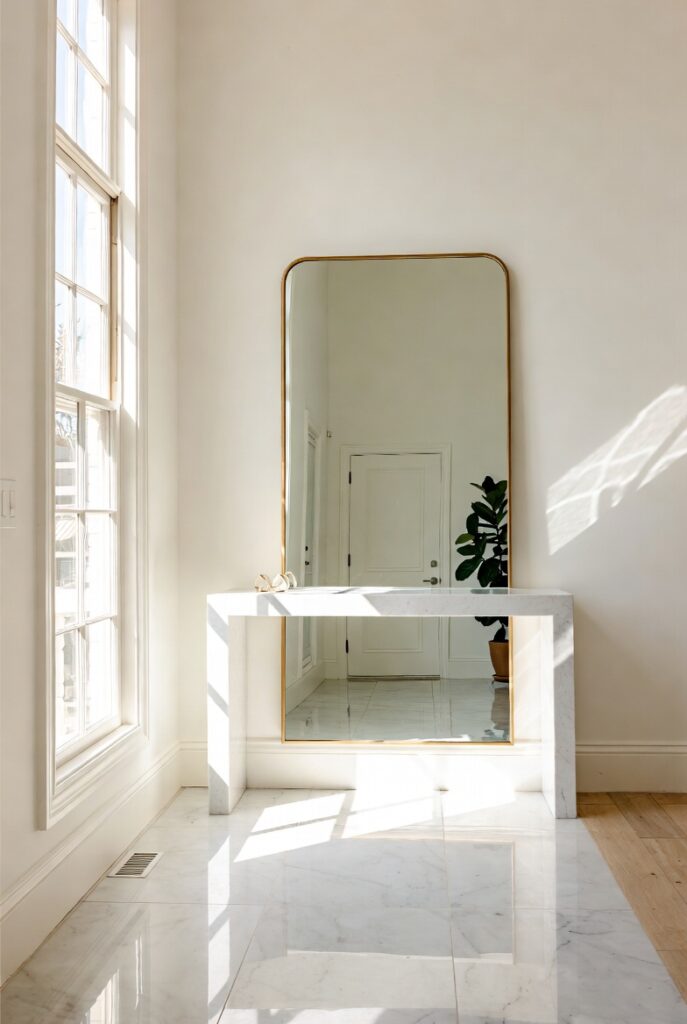
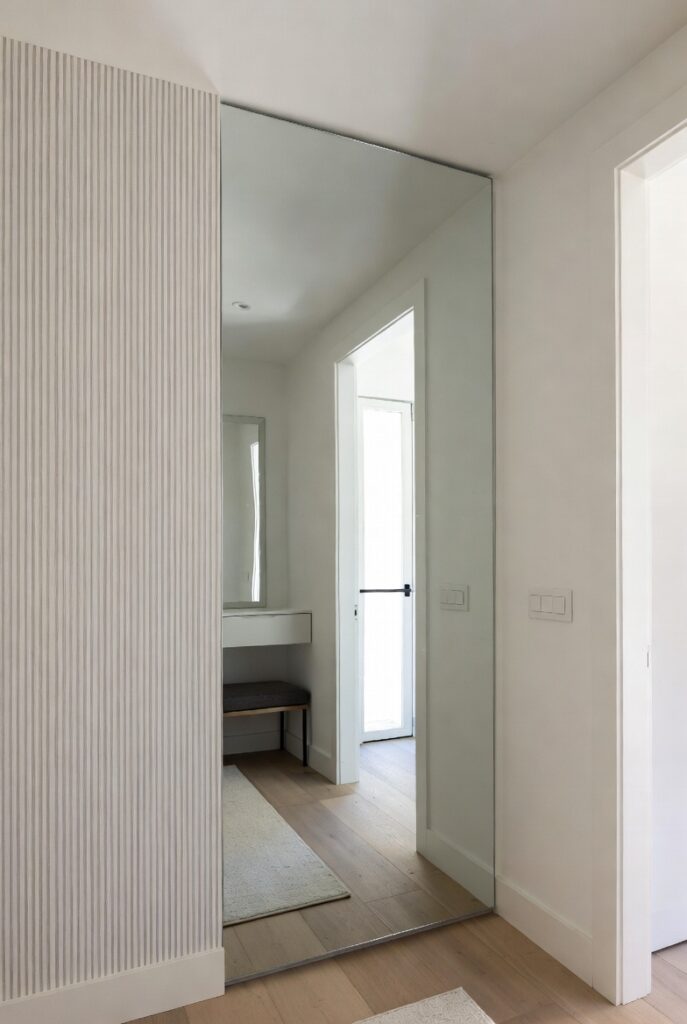
2. Hang a Large Statement Mirror
Best for: Every entryway — a mirror is the single most functional and most impactful entryway addition available
A large mirror in the entryway serves multiple purposes simultaneously: it reflects light and makes the space feel larger, it provides a last-look surface before leaving the house, it doubles the perceived depth of the entry, and it creates a focal point that gives the space a sense of deliberate design. An entryway without a mirror is missing its most important element.
The mirror should be scaled generously — in most entryways, larger is better. A full-length mirror leaned against the wall suits contemporary spaces; a large framed mirror hung at eye level suits more traditional interiors. The frame style and finish should relate to the other metallic or material elements in the entry.
Smart tip: Position the mirror to reflect something attractive — a window, a plant, or a well-styled console table. A mirror that reflects the entry’s best feature doubles it; one that reflects a cluttered corner or a blank wall doubles the problem. Mirror placement is a deliberate compositional decision.
Mistake to avoid: Hanging the mirror too high. A mirror hung with its center at standard picture height — 145 to 150cm from the floor — is too high for most people to see their full reflection. For a full-length or large entryway mirror, hang it lower so the lower edge is at approximately 30 to 40cm from the floor.
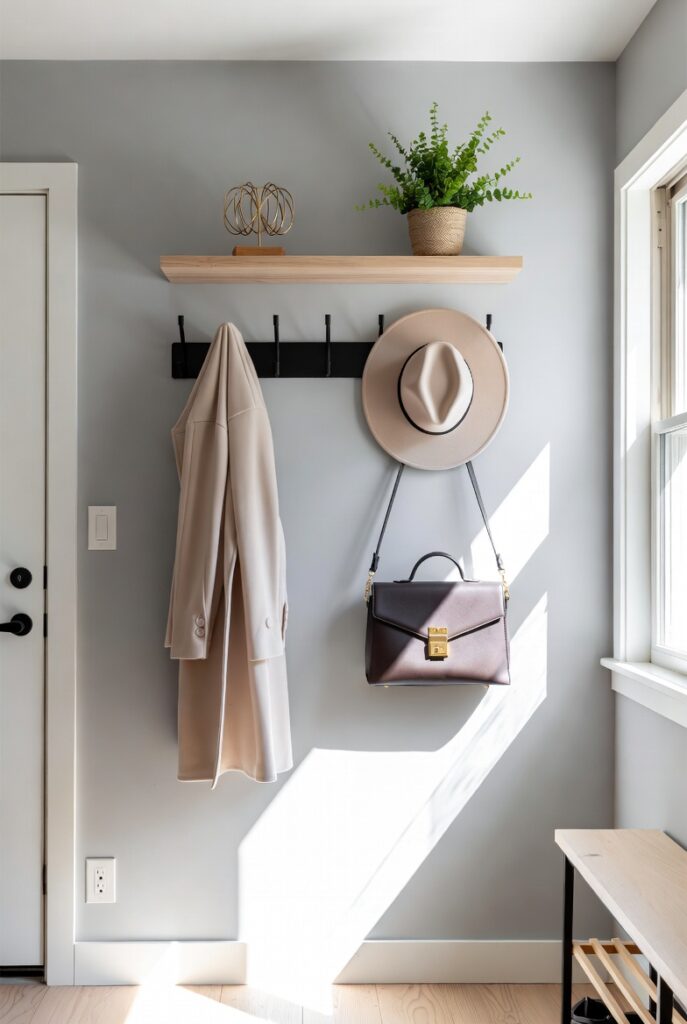
3. Install a Practical Wall Hook System
Best for: Any entryway used by a family or multiple people — hooks are the most practical storage solution available
Wall hooks are the highest-use item in most entryways — coats, bags, keys, and umbrellas need a home the moment you enter, and hooks provide it instantly. A well-designed hook system at the right height, with enough hooks for the household’s actual daily needs, prevents the pile-up of coats on stairs, bags on floors, and keys lost in the general disorder that results from inadequate hook provision.
Install hooks at two heights — upper hooks at 170 to 180cm for adult coats and bags, lower hooks at 90 to 110cm for children’s items — to make the system usable for all household members. Distribute hooks generously: one hook per household member plus two spare is the practical minimum.
Smart tip: Choose hooks that are both functional and attractive — hooks are visible every day and deserve the same design attention as other hardware in the home. Brass or black iron hooks with architectural detailing cost minimally more than plain utilitarian versions and look significantly better on the wall.
Mistake to avoid: Installing hooks without adequate wall fixings. A coat hook bearing the weight of a heavy winter coat, a bag, and perhaps an umbrella exerts significant force on the wall fixing — particularly with lever-arm loads. Always fix hooks into wall studs or use appropriate heavy-duty wall anchors, and space fixings according to the hook manufacturer’s guidance.
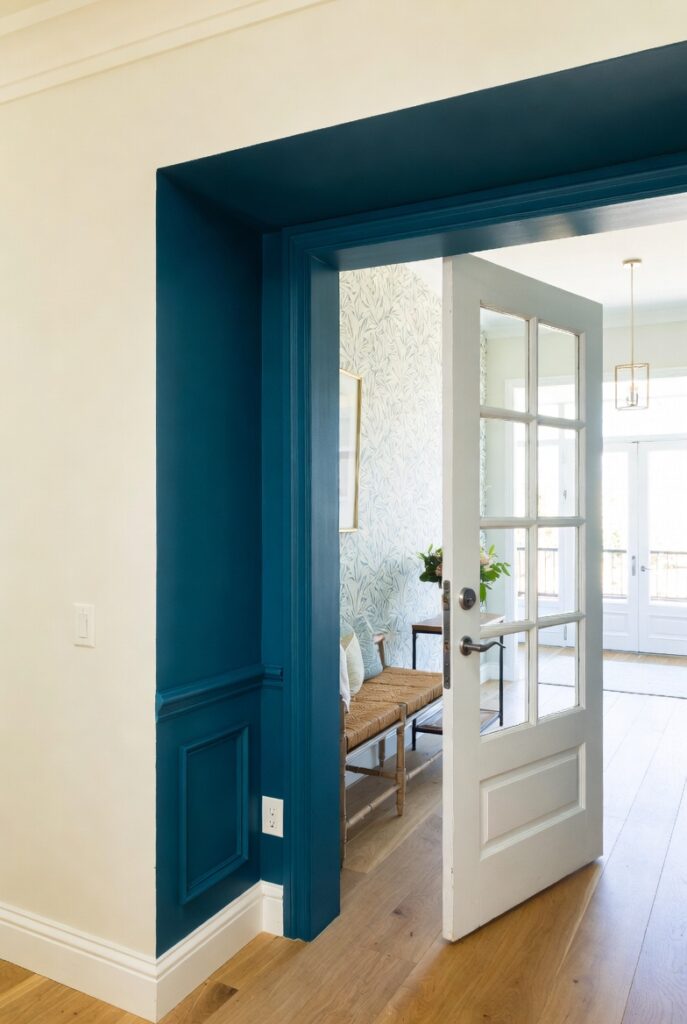
4. Use a Bold Paint Color or Wallpaper
Best for: Entryways where the rest of the home is more neutral — the entry can carry a color commitment that would be too strong in a larger room
The entryway is the ideal room for a bold decorating decision — a deep, rich paint color, a dramatic wallpaper, or a confident color statement that might feel overwhelming in a living room but works perfectly in a small transitional space. Because entryways are small and people move through them quickly rather than spending extended time in them, bolder choices are more sustainable here than in rooms of continuous occupation.
Deep navy, forest green, terracotta, charcoal, or a bold botanical wallpaper all suit entryways beautifully — they create atmosphere, announce the design personality of the house, and set a memorable tone from the moment the door opens.
Smart tip: Color drench the entryway — paint the walls, ceiling, and woodwork in the same deep color or closely related tones. In a small entryway, color drenching removes the visual fragmentation of multiple surfaces and creates an enveloping, considered quality that makes even a tiny hall feel like a designed space.
Mistake to avoid: Choosing a bold entryway color without considering its visual relationship to the adjacent room. An entryway that opens directly into a living room needs a color that transitions naturally — either sharing an undertone family with the living room palette or being clearly separated by an architectural threshold. A jarring color clash at the threshold between entry and living room undermines both spaces.
5. Place a Welcoming Plant or Greenery
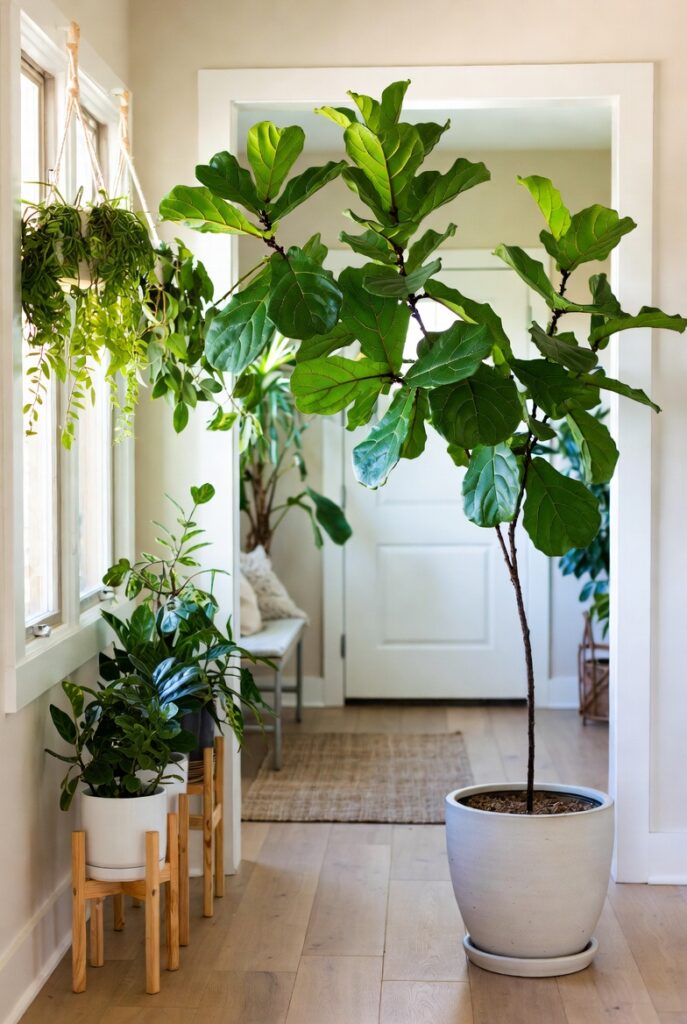
Best for: Any entryway — a plant is the single most welcoming and most life-affirming entryway addition
A plant in the entryway introduces living quality that no decorative object can replicate — it signals care, warmth, and an inhabiting human presence that transforms a transitional space into something genuinely welcoming. The first sight of a healthy, thriving plant as you enter a home creates a positive impression that lasts through the entire visit.
Choose plants suited to the entryway’s specific light conditions — many entryways receive limited natural light and need shade-tolerant species. Cast iron plant, ZZ plant, pothos, peace lily, and snake plant all tolerate low light conditions and suit entryway positions well.
Smart tip: Use one significantly sized plant rather than several small ones. A single large fiddle leaf fig, bird of paradise, or monstera in the entryway corner creates genuine architectural presence — it contributes to the room’s structure rather than simply decorating it. Small plants in an entryway tend to get lost visually and look like afterthoughts.
Mistake to avoid: Choosing a plant primarily for its appearance without assessing whether it will genuinely thrive in the entryway’s conditions. A beautiful plant that declines and drops leaves in an unsuitable position looks far worse than no plant at all. Match the species to the actual light, temperature, and humidity the entryway provides.
6. Add a Bench or Ottoman for Seating
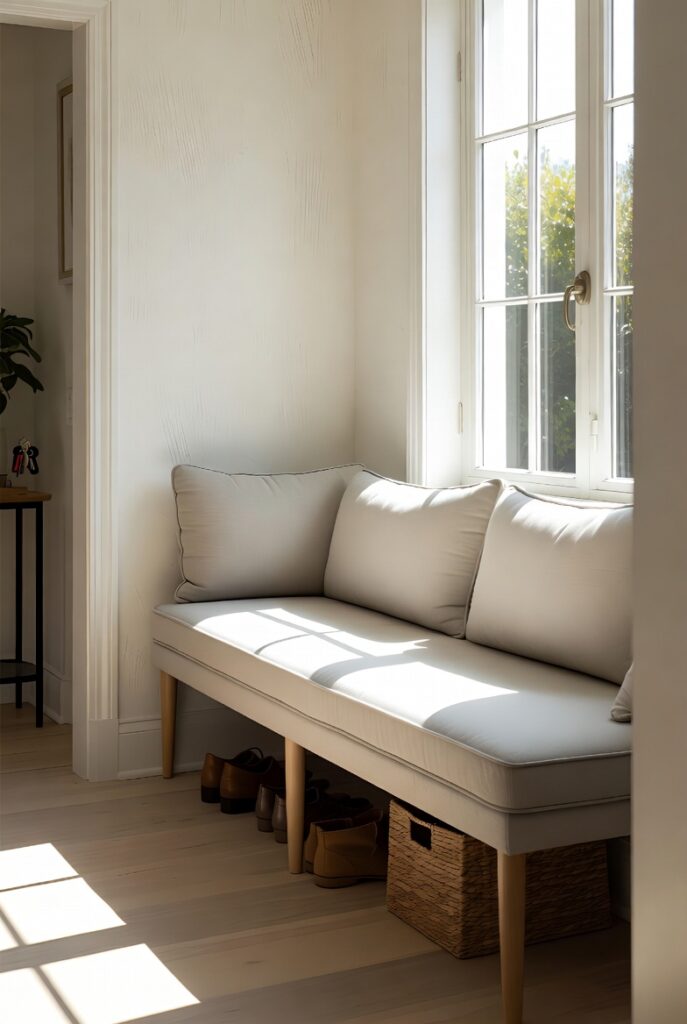
Best for: Entryways wide enough to accommodate seating — typically 1.2m or wider — where sitting to put on and remove shoes is a daily need
A bench or small ottoman in the entryway solves one of the most practically significant daily friction points in most homes — the need to sit when putting on shoes. A well-positioned bench with storage beneath (for shoes, umbrellas, or bags) and coat hooks above creates a fully functional entry system in a single wall zone.
Upholstered benches add warmth and comfort but require outdoor-rated or easily cleanable fabric — entryways are high-traffic zones where fabrics receive more wear and contact than those in other rooms. A natural timber bench is more durable and easier to maintain; an upholstered bench creates more visual warmth.
Smart tip: Size the bench to leave a minimum of 90cm of clear passage alongside it. A bench that narrows the entry to less than 90cm creates a bottleneck that makes the space feel cramped every time it’s used. In narrow entryways, a fold-down bench that collapses against the wall when not in use provides the functionality without the permanent space cost.
Mistake to avoid: Using the entryway bench as secondary storage for everything that doesn’t have another home. A bench buried under coats, bags, and miscellaneous objects defeats its primary purpose — sitting — and makes the entryway look cluttered. Keep the bench surface clear for its intended use.
7. Install Smart Shoe Storage
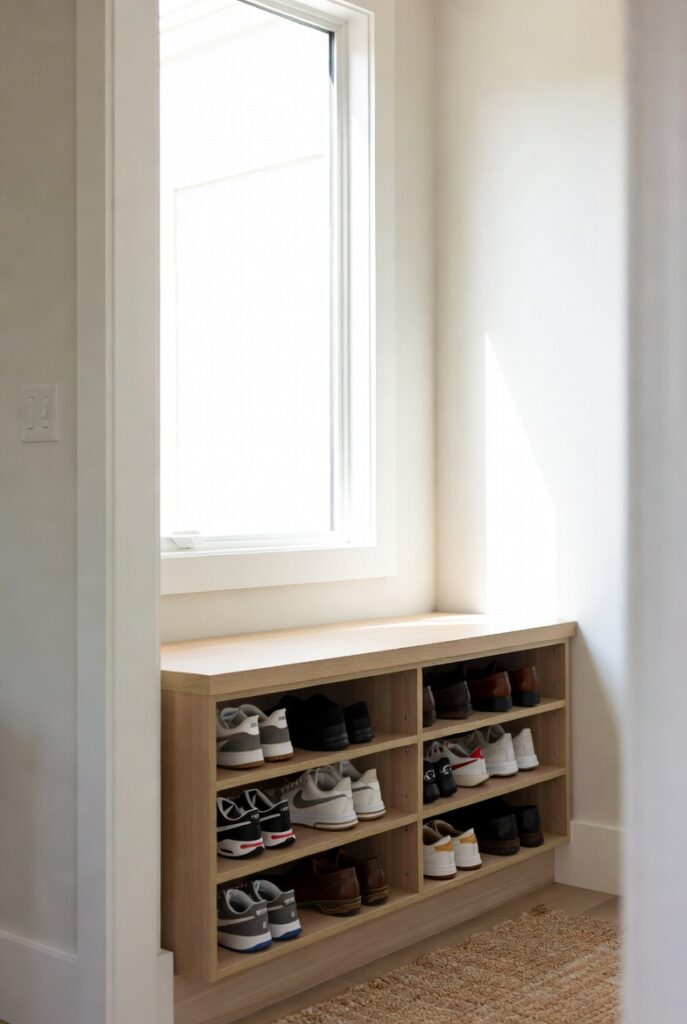
Best for: Any household — shoes are the most common source of entryway clutter
Shoes left at the door are the most persistent entryway organization challenge in most homes — and the most solvable one. A dedicated shoe storage system, sized appropriately for the household’s actual number of shoes in daily use, removes the visual clutter that undermines even the most beautifully designed entryway.
Options range from simple open shelving (visible and accessible but requires tidiness), to cabinet-style enclosed storage (conceals shoes completely), to bench seating with shoe drawers beneath (combines function with comfort). Choose based on the household’s discipline level — open storage requires consistent tidying; closed storage is more forgiving.
Smart tip: Store only the shoes in current seasonal rotation in the entryway — out-of-season shoes stored elsewhere keeps the entryway system from becoming overwhelmed. A household of four realistically needs storage for 8 to 12 pairs of regularly worn shoes — more than this indicates out-of-season or rarely-worn shoes that belong in a bedroom or storage room.
Mistake to avoid: Under-specifying shoe storage capacity. A shoe cabinet that holds eight pairs for a household of four adults quickly overflows, creating the same visual clutter it was meant to solve. Always add at least 25% more capacity than the current minimum need — households tend to accumulate shoes over time.
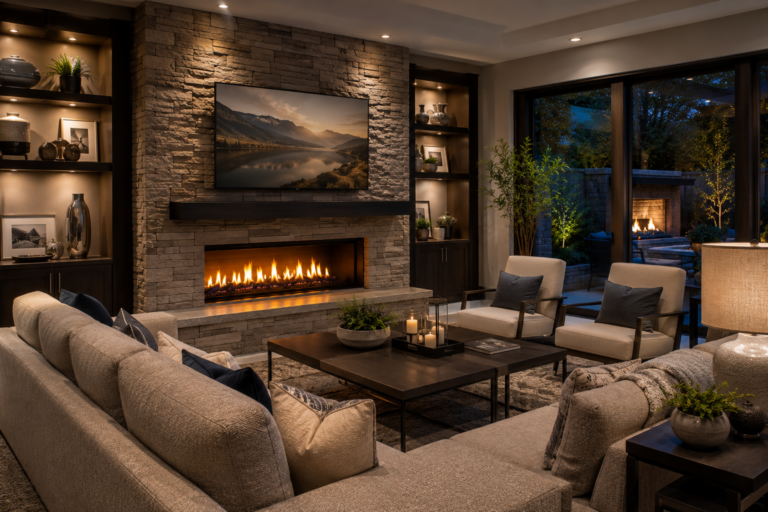
8. Layer Lighting for Warmth and Function
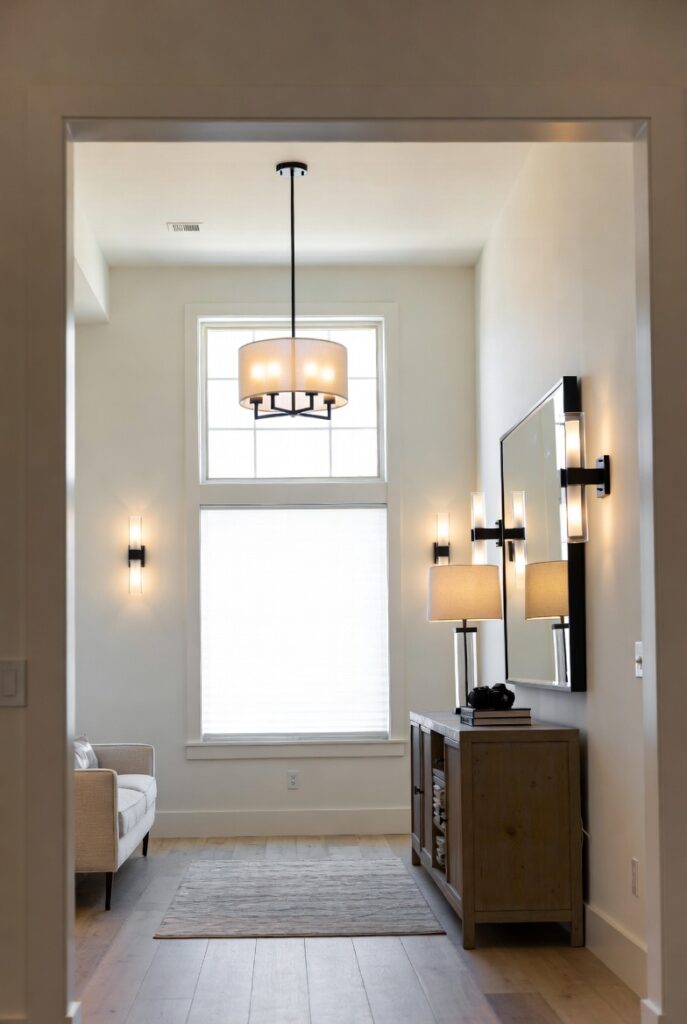
Best for: Every entryway — lighting is the most underinvested element in most entryways
Most entryways have a single overhead light — typically a standard pendant or flush fitting — that provides flat, directionless illumination with no warmth or atmosphere. Layering a table lamp on the console, a wall sconce beside the mirror, or a picture light above artwork adds warmth, depth, and the welcoming quality that a single overhead light cannot provide.
Warm light (2700K) is essential in the entryway — it makes the space feel immediately inviting as the door opens and ensures that the first experience of arriving home is one of warmth rather than clinical brightness.
Smart tip: Install a dimmer switch on the entryway overhead light. The ability to set the light level — brighter when you need to find things, dimmer for evening arrivals when you want warmth rather than brightness — significantly improves the quality of the entry experience at minimal cost.
Mistake to avoid: Relying on the overhead light alone for an entryway with art or decorative display. Overhead light illuminates floors and heads but not walls — a console vignette or piece of artwork requires a directed light source (a table lamp, a picture light, or a wall sconce) to be properly seen and appreciated.
9. Lay a Patterned or Textured Rug

Best for: Any entryway with hard flooring — a rug defines the entry zone, protects the floor, and reduces noise
An entryway rug does several things simultaneously: it defines the entry zone on an otherwise continuous floor, provides a surface for wiping shoes, reduces the echo that hard floors create in narrow spaces, and adds the first decorative layer of color and pattern that guests experience as they enter.
Choose a rug with enough pattern or texture to disguise the dirt and wear that entryways inevitably accumulate. Flat-weave, low-pile, or indoor-outdoor rugs in darker tones or patterns maintain their appearance better in high-traffic entry positions than light-colored or high-pile options.
Smart tip: Choose a rug runner sized to fill the full width of the entryway minus 10 to 15cm on each side. A runner that fills most of the floor width makes the entry feel more finished and more generously furnished than a narrow runner centered in the space with significant bare floor on either side.
Mistake to avoid: Using a rug that curls at the edges or slides on hard flooring. A curling or sliding rug in an entryway is a trip hazard for every person who uses it — use a quality non-slip underlay and choose a rug with a flat, stable construction that lies flat without needing to be constantly repositioned.
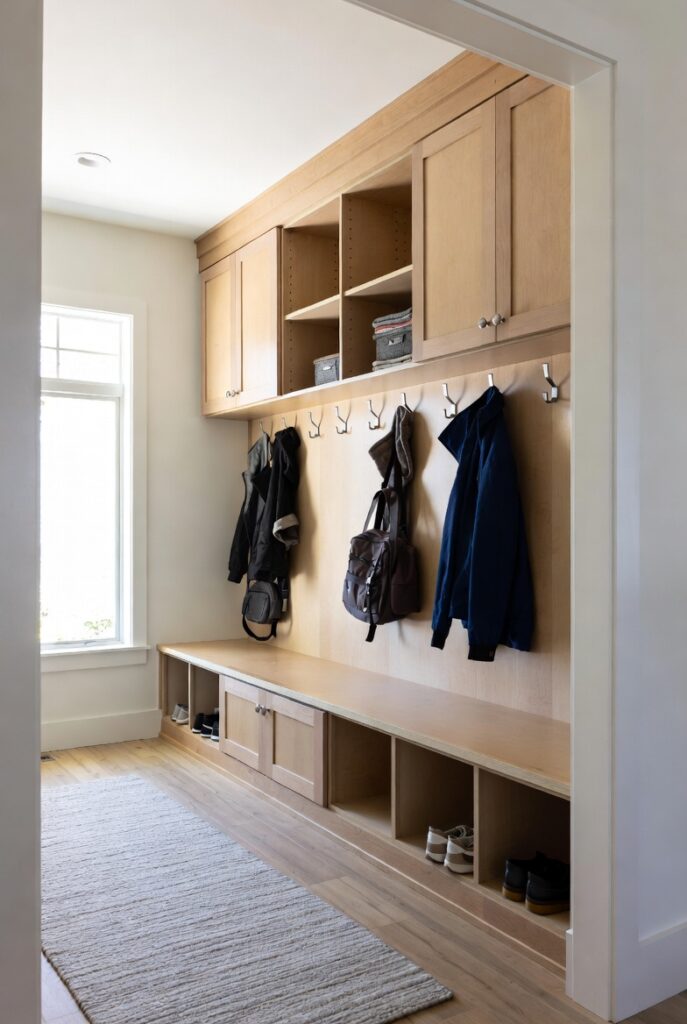
10. Create a Built-In Mudroom Wall
Best for: Family homes where the entryway serves as the daily transition zone for multiple people with coats, bags, sports equipment, and shoes
A built-in mudroom wall — combining hooks, cubbies, bench seating, and shoe storage in a single integrated unit across one entryway wall — is the most functional entryway transformation available for family homes. It contains the daily chaos of arrival and departure within a defined zone and makes the rest of the entryway feel orderly regardless of how heavily it’s used.
The most effective mudroom configurations include: individual cubbies for each household member (personalization increases the likelihood that the system is used consistently), a bench at seating height with under-bench drawers or baskets for shoes, hooks above the bench for coats and bags, and shelf space above the hooks for seasonal items and less-used accessories.
Smart tip: Label or color-code individual cubbies — particularly in families with children. A cubby that belongs specifically to one person, clearly identified, is used far more reliably than a shared, anonymous storage zone. Labels, name plaques, or simply consistent color-coding all work effectively.
Mistake to avoid: Building a mudroom unit that reaches the full ceiling height if the ceiling is low. Floor-to-ceiling storage in a low-ceilinged entryway creates a claustrophobic quality that makes the space feel oppressive. In rooms with standard ceiling heights, keep the unit at a comfortable maximum of 220cm to maintain breathing room above.
11. Display Art to Set the Tone
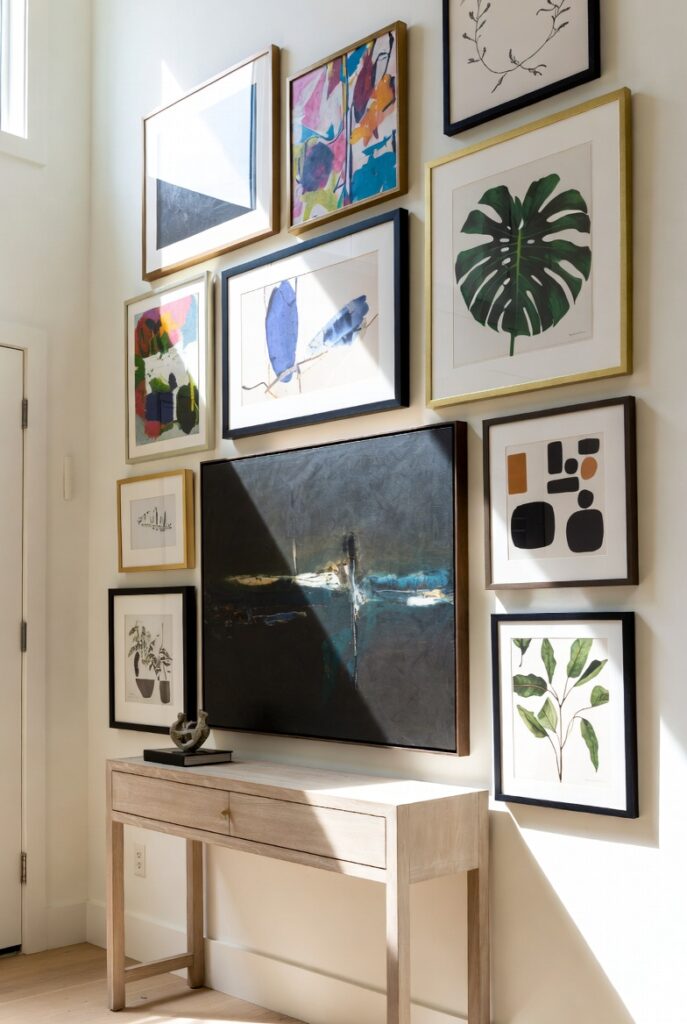
Best for: Any entryway — art communicates the home’s personality more immediately than any other decorative element
The artwork in an entryway is seen by every person who visits the home — it is the most publicly viewed art in the house. For this reason it deserves particular attention: it should be something that genuinely represents the household’s taste, creates a positive impression, and contributes to the atmosphere you want every arrival to experience.
A single large, bold piece of art makes more impact in an entryway than a group of smaller pieces — the entryway is typically seen quickly and in passing, so immediate impact matters more here than the layered interest of a gallery wall.
Smart tip: Change the entryway art seasonally — it is the most visible and most easily changed art in the house. A winter landscape in December, something more vibrant in spring — this small seasonal change refreshes the home’s first impression and signals that the house is actively cared for and curated.
Mistake to avoid: Hanging the entryway art without relating it to the console table below. Art floating on a wall above an empty surface lacks the grounded quality that art hung in relationship to a console or shelf possesses. The console creates a base for the art composition; without it, art in an entryway tends to look stranded.
12. Add Wainscoting or Wall Paneling
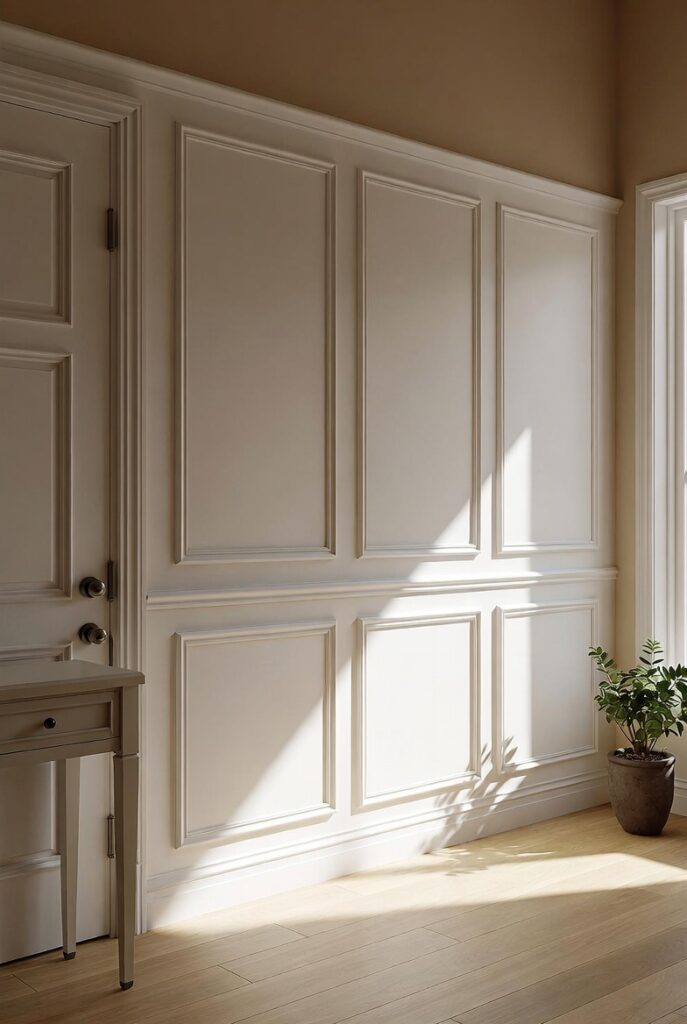
Best for: Entryways that feel plain, featureless, or lacking in architectural character
Wainscoting — timber paneling on the lower portion of the wall, typically capped with a chair rail at 90 to 100cm height — adds immediate architectural quality to any entryway. It creates visual interest, protects the lower wall from scuff marks and bag impacts, and gives the space a crafted, established quality that plain painted walls rarely achieve.
Board and batten paneling, shiplap, or traditional raised-panel wainscoting all suit entryways well. The paneling is typically painted — in the wall color, in a contrasting color, or in a deeper tone of the wall color for subtle definition.
Smart tip: Paint the wainscoting a slightly deeper tone than the walls above — the darker lower wall and lighter upper wall creates a visual grounding effect that makes the ceiling appear higher and gives the entryway a more proportioned, architectural quality than a uniform single color throughout.
Mistake to avoid: Adding wainscoting that is too tall for the ceiling height. Traditional wainscoting at one-third of the wall height is the standard proportion — in a room with a 240cm ceiling, wainscoting at 80cm height is appropriate. Taller paneling in a low-ceilinged entryway makes the space feel enclosed and the ceiling oppressively low.
13. Use Baskets for Organized Storage
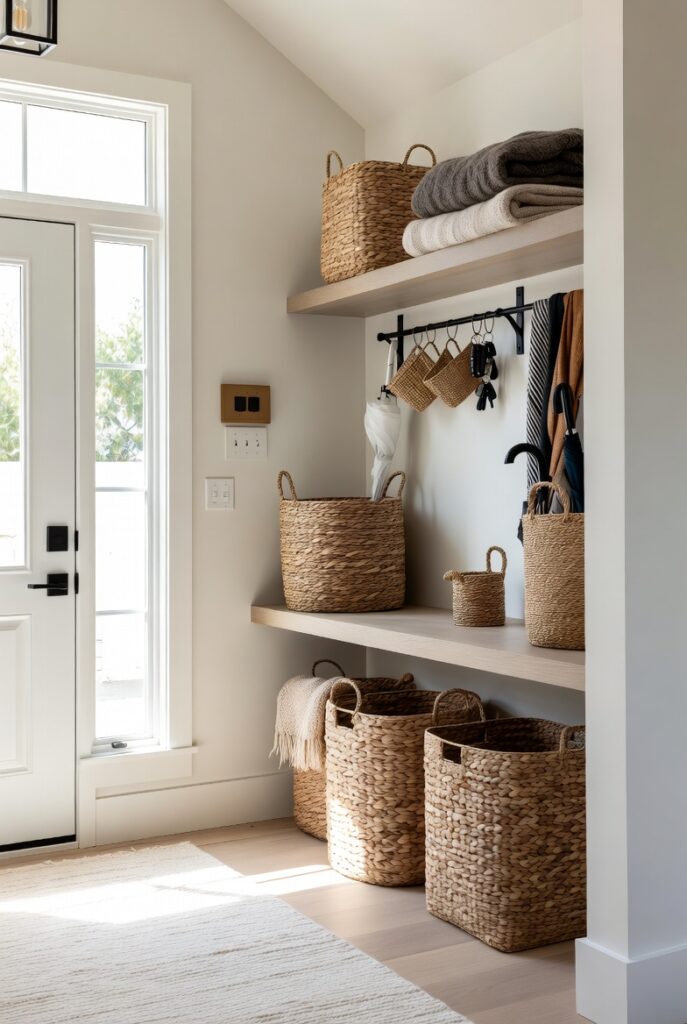
Best for: Any entryway needing additional storage without built-in solutions — baskets are the most flexible and most affordable storage addition
Woven baskets in an entryway provide practical storage for umbrellas, scarves, gloves, dog leads, and the miscellaneous items that accumulate at the point of arrival and departure — while looking decorative rather than purely functional. A grouping of different-sized baskets beneath a console table or on a shelf creates a warm, natural texture that complements almost any entryway style.
Natural materials — seagrass, rattan, water hyacinth, or jute — suit entryways particularly well because their organic texture creates warmth in what is often a hard-surfaced transitional space.
Smart tip: Assign each basket a specific category — one for dog accessories, one for reusable bags, one for umbrellas. Named or labeled baskets are used more reliably than generic storage, because every household member knows where things go and where to find them.
Mistake to avoid: Using baskets that are too small to hold their intended contents. An overfilled basket looks more cluttered than no basket at all — the contents spill over the edges and create exactly the visual disorder the basket was meant to contain. Choose baskets generously sized for their intended use.
14. Make a Small Entryway Feel Larger
Best for: Narrow hallways and compact entry areas that feel cramped regardless of how they’re furnished
Small entryways benefit from a specific set of visual strategies that create the illusion of more space without any structural change. Light colors on all surfaces (walls, ceiling, and floor) reflect maximum available light. A large mirror creates apparent depth. Furniture with visible legs reduces visual weight. Vertical lines (tall narrow artwork, floor-to-ceiling curtains, or vertical striping) draw the eye upward and increase apparent height.
The most effective single change in a small entryway is a large mirror — it literally doubles the apparent depth of the space by reflecting what is behind the viewer, making the entry appear twice as long as it actually is.
Smart tip: Choose a console table with a glass, mirrored, or open shelf surface rather than a solid top — a surface you can see through or beneath allows the floor to remain visible, which visually increases the perceived size of the entry more effectively than a solid console that sits on the floor.
Mistake to avoid: Hanging art on both walls of a narrow hallway. Art on opposing walls in a narrow entry creates visual compression — the eye is drawn to both sides simultaneously, which makes the space feel narrower. Concentrate art and decorative elements on one side only, leaving the opposite wall clean.
15. Add Scent with a Candle or Diffuser
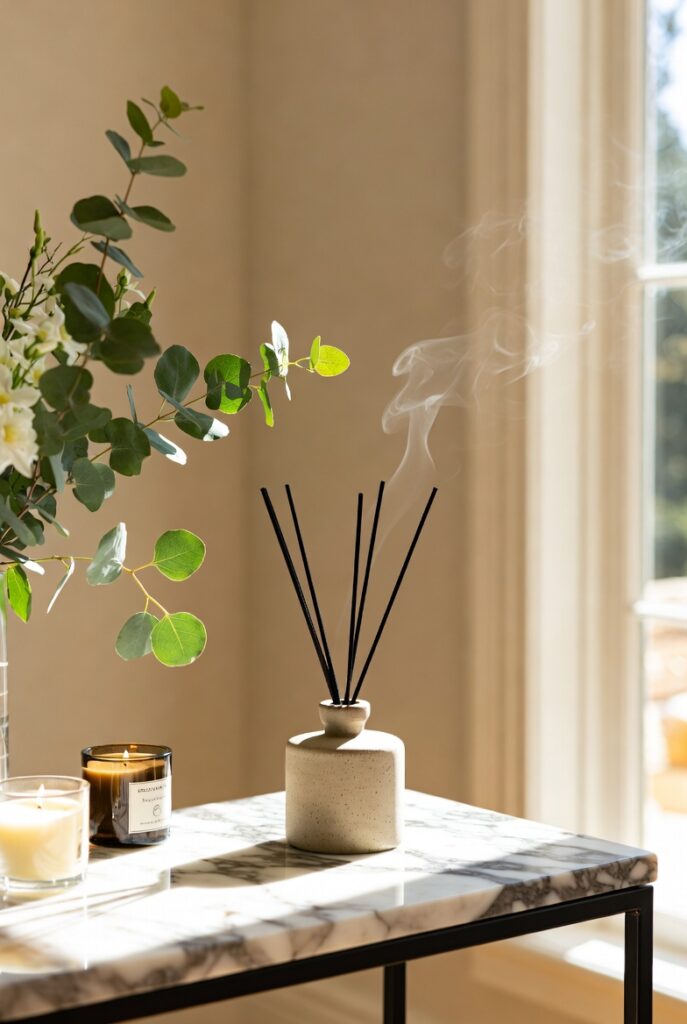
Best for: Every entryway — scent is the most immediate and most emotionally powerful first impression a home can make
The sense of smell is the most directly connected to memory and emotion of all the senses — a home that smells welcoming creates a positive impression before a single visual element has been assessed. A candle, reed diffuser, or fresh flowers in the entryway creates a scent experience that shapes every visitor’s impression of the home from the moment they cross the threshold.
Choose a scent that is welcoming and clean without being heavy or cloying — fresh linen, light citrus, soft jasmine, or subtle cedar all work well in entryways. Avoid very strong or complex fragrances that overwhelm the small space.
Smart tip: Use a consistent signature scent in the entryway — the same fragrance every time. Visitors and household members will come to associate that specific scent with arriving home, creating a powerful emotional anchor that makes the home feel familiar and welcoming in a way that changing fragrances cannot achieve.
Mistake to avoid: Using multiple competing scents simultaneously. A candle, a diffuser, and fresh flowers all producing different fragrances in the same small space creates an olfactory confusion that registers as unpleasant even when each individual scent is appealing alone. Choose one scent source and use it consistently.
16. Install Floating Shelves for Display
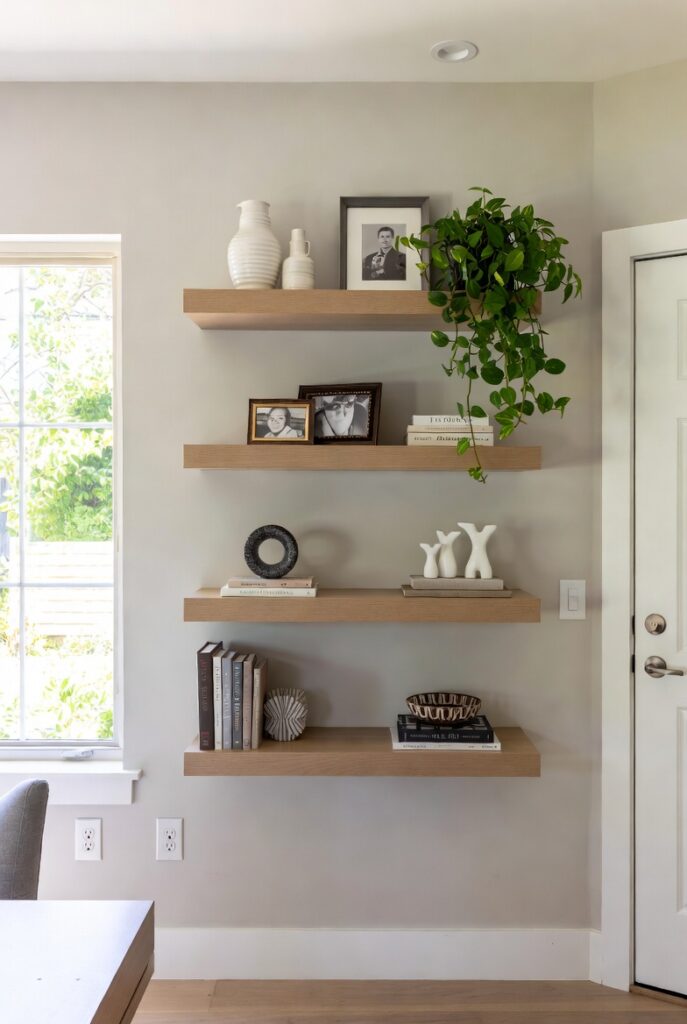
Best for: Entryways without enough floor space for a console table — floating shelves provide display and storage without using floor area
Floating shelves mounted at console-table height (approximately 80cm from the floor) provide the display surface of a console table without its footprint — valuable in narrow entryways where every centimeter of floor clearance matters. A shelf 25 to 30cm deep provides enough surface for a lamp, a small plant, keys, and decorative objects.
Floating shelves also offer the opportunity to add a second shelf above — one at 80cm for practical use and one at 150cm for display — creating a vertical arrangement that fills the wall effectively and provides both function and decoration.
Smart tip: Install shelves with concealed brackets rather than visible shelf supports — concealed brackets create a cleaner, more minimal appearance and give floating shelves their characteristic apparently weightless quality. Visible brackets are functional but create a more utilitarian appearance that can make the entry look improvised.
Mistake to avoid: Overloading floating shelves beyond their rated capacity. Entryway shelves accumulate items quickly — keys multiply, mail accumulates, objects appear. Install shelves into wall studs or use appropriate anchors rated for the total load the shelves will carry, and periodically edit the contents to prevent the shelves from becoming cluttered.
17. Choose a Durable and Stylish Floor
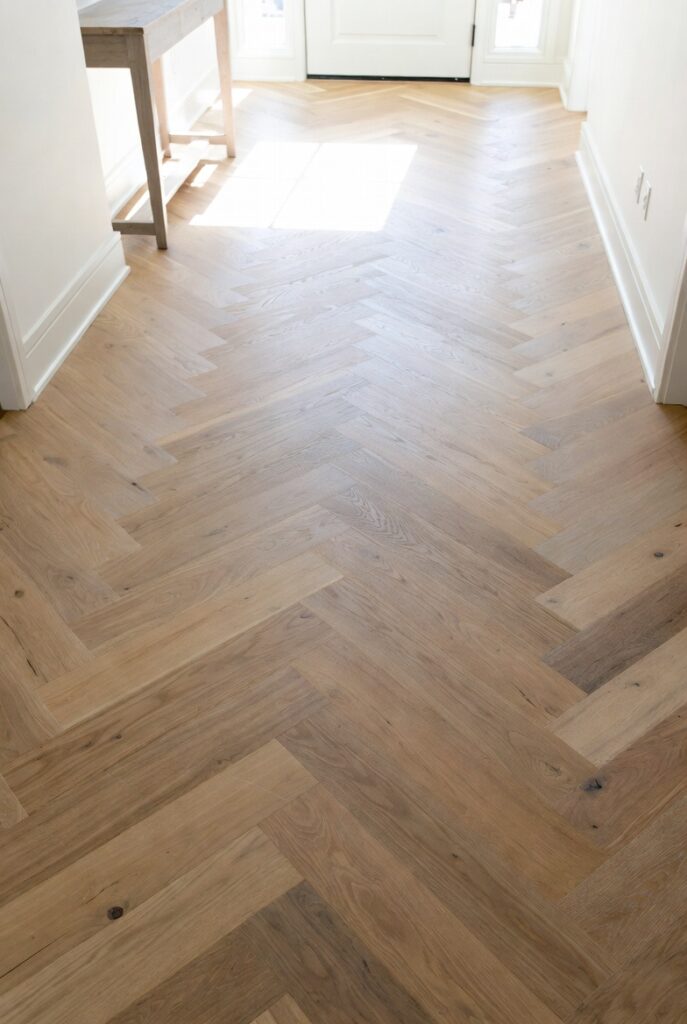
Best for: Entryway renovation projects — the floor is the highest-impact permanent decision in any entryway
The entryway floor receives more footfall, more moisture from wet shoes, and more physical abuse than any other floor in the home — and it is the first floor surface every visitor and household member encounters. It needs to be both genuinely durable and genuinely attractive, because it influences the perceived quality of everything above it.
The best entryway flooring options: porcelain tile (extremely durable, moisture-resistant, wide design range), natural stone (beautiful, requires sealing, cold underfoot), engineered hardwood (warmer than tile, more moisture-resistant than solid timber), or quality luxury vinyl tile (practical, comfortable, increasingly attractive in design).
Smart tip: Choose an entryway floor that contrasts gently with the adjacent room flooring — a slight change in material or tone at the threshold creates a natural visual definition between the entry zone and the living space beyond. A complete contrast (stone entry into timber living room) is more effective than a near-identical match that fails to clearly define the transition.
Mistake to avoid: Using polished or high-gloss flooring in the entryway. Glossy surfaces show every footprint, every scuff mark, and every drop of moisture — making them among the most maintenance-intensive floor choices available. Choose textured, matte, or natural finishes that age gracefully and don’t reveal every contact.
18. Use Metallic Accents for Polish
Best for: Any entryway needing a sense of refinement and finish — metallics add luxury at small scale
Metallic accents in the entryway — brass hooks, a gold-framed mirror, brushed nickel light fittings, or a copper-toned vase on the console — add the final layer of polish that transforms a well-decorated entryway into one that feels genuinely luxurious. Metallics catch light and reflect it, creating warmth and visual interest at every scale from tiny hardware to significant mirror frames.
Warm metallics — brass, aged gold, bronze, and copper — suit the warm, welcoming atmosphere an entryway should project. Cool metallics — chrome and polished silver — suit more contemporary, minimal entryways where a sharper aesthetic is the goal.
Smart tip: Maintain metallic consistency throughout the entryway — choose one metallic family (all brass, all black, or all brushed nickel) and use it across all hardware, frames, and fixtures. A consistent metallic thread creates the sense of a designed space; mixed metallics create a collected appearance that can feel unresolved.
Mistake to avoid: Using too many metallic elements simultaneously. Metallics are most effective as accents against matte, natural, or painted surfaces — when every element is metallic, nothing catches the eye as a special detail. Reserve metallics for the elements that most benefit from their reflective quality: hooks, mirror frames, lamp bases, and door hardware.
19. Keep It Clutter-Free with Smart Editing
Best for: Any entryway — decluttering is the highest-return, lowest-cost improvement available to any entry space
The most beautiful entryway furnishings cannot overcome persistent clutter — piles of mail, accumulated shoes, stray bags, and the general overflow of daily life entering and leaving the home. The most powerful entryway improvement is not a new piece of furniture or a fresh coat of paint — it is a genuine, repeated commitment to editing the space back to its essential elements.
Establish a simple daily routine: shoes in the storage, coats on hooks, mail in a designated tray, bags in their place. This takes less than two minutes and is the difference between an entryway that functions and one that accumulates.
Smart tip: Apply the one-in-one-out rule to entryway storage — every item that gains a permanent home in the entry means something else leaves. This prevents the gradual accumulation that makes storage systems overflow within a few months of installation and keeps the entry visually clean without requiring major periodic decluttering sessions.
Mistake to avoid: Creating storage that is too inconvenient to use consistently. A shoe cabinet that requires bending and a two-handed operation for every pair of shoes will be ignored in favor of leaving shoes on the floor. Storage systems that are used are always better than storage systems that are ideal — prioritize accessibility and ease of use over visual perfection.
20. How to Design an Entryway That Works
Best for: Anyone starting from scratch or refreshing a neglected entryway — the right sequence makes the design process straightforward
Designing a successful entryway begins with its two core requirements: it must function as a practical transition zone, and it must create a genuinely welcoming first impression. These two requirements — function and welcome — should guide every decision from the floor upward.
Start with the practical elements: define the storage the household actually needs (shoes, coats, keys, bags, umbrellas — in that order of daily frequency) and design storage solutions for each. Only after the practical requirements are met does the decorative layer — console, mirror, art, plants, lighting — get added. Building decoration on top of insufficient storage creates beautiful chaos.
The welcoming layer comes from four sources: warm lighting, a significant mirror, at least one living plant, and a deliberately styled console or surface. These four elements — present in virtually every beautifully designed entryway — create the impression of care and intention that makes a home feel genuinely welcoming from the first step inside.
Smart tip: Photograph your entryway from outside the front door looking in — this is the angle every visitor experiences and the one most revealing of how the space actually reads. Most people never assess their entryway from this position and are surprised by what the photograph reveals about the space’s strengths and weaknesses.
Mistake to avoid: Treating the entryway as a leftover space that receives whatever furniture and decoration is surplus from elsewhere in the house. The entryway is the most publicly visible room in the home — it deserves intentional design choices made specifically for it, not the pieces that didn’t fit anywhere else.
Before You Start
- Measure accurately. Entryways are small and proportional errors are immediately visible. Measure wall widths, ceiling heights, and passage clearances before purchasing any furniture.
- Assess the light. Many entryways have limited or no natural light — this should guide color choices (warmer, lighter tones in dark entries) and lighting investments (layered artificial lighting is essential in naturally dark spaces).
- Prioritize function first. An entryway that is beautiful but doesn’t work — insufficient hooks, no surface for keys, nowhere to sit — will become cluttered and frustrating within weeks of completion.
- Consider what’s visible from adjacent rooms. In open-plan homes, the entryway is often visible from the living room or kitchen — its palette and style need to relate to these adjacent spaces.
Conclusion
The entryway is a small room with outsized influence — it shapes every first impression, it frames every arrival home, and it sets the emotional tone for the entire house. The investment required to get it right is modest: a console table, a mirror, good hooks, smart storage, a plant, and warm lighting. These six elements, chosen with care and arranged with intention, create an entry that makes everyone who walks through the front door feel genuinely welcomed.
home decor ideas • home entrance decor • home organization • living room ideas • interior design • small space storage • wall storage ideas