
20 Wood Retaining Wall Ideas for a Stunning Landscape
A sloped yard without a retaining wall is a yard working against itself — soil washing downhill, planting areas eroding, usable flat space lost to gradient. A wood retaining wall solves all three problems simultaneously and does so with a warmth and naturalness that concrete block and stone can’t replicate at the same cost. Wood walls suit gardens that want structure without the formality of stone, and they’re the most accessible retaining wall option for DIY construction. These 20 ideas cover every application from a simple garden border to a full terraced slope, with specific guidance on materials, construction, and the mistakes that cause wood retaining walls to fail prematurely.
1. Pressure-Treated Timber Wall
Best for: General garden use, any application where longevity and affordability are the priorities
Pressure-treated timber is the most widely used material for wood retaining walls because it combines affordability with meaningful rot resistance. The treatment process forces preservative chemicals deep into the wood fibers, inhibiting the fungal and bacterial activity that causes untreated wood to decay in soil contact.
Ground-contact rated pressure-treated lumber (typically marked UC4A or UC4B in the US, C4 in the UK) is specifically formulated for direct soil contact. Standard above-ground treatment grades are not adequate for retaining wall applications and will fail significantly faster.
Smart tip: When cutting pressure-treated timber, coat all cut ends immediately with end-grain preservative. The cut ends expose untreated wood fiber and are the most vulnerable points for rot entry. This single step significantly extends wall life.
Mistake to avoid: Using above-ground rated timber for in-ground applications. The difference in treatment level is significant — ground-contact rated timber lasts 20 to 40 years in soil; above-ground rated timber in the same position may fail within 5 to 10 years.
2. Cedar Retaining Wall
Best for: Gardens where natural rot resistance and attractive appearance are both priorities
Western red cedar is naturally rot-resistant due to its high oil content, which inhibits the microorganisms that cause wood decay. A cedar retaining wall built with quality timber requires no chemical treatment and lasts 15 to 25 years in ground contact depending on soil moisture and drainage conditions.
Cedar’s appearance is a significant advantage over pressure-treated lumber. The warm reddish-brown color weathers to a distinguished silver-grey over several seasons — a patina that many gardeners find more attractive than the original color. It suits naturalistic and cottage garden aesthetics particularly well.
Smart tip: Cedar is lighter than pressure-treated pine of equivalent dimensions — easier to handle on a DIY project and less structural load on the soil beneath the wall. For large walls, this makes the construction process significantly more manageable.
Mistake to avoid: Assuming all cedar is equally rot-resistant. Western red cedar (Thuja plicata) has excellent natural rot resistance. Eastern white cedar and aromatic cedar have moderate resistance. Generic “cedar” without species specification may be considerably less durable. Check the species before purchasing.
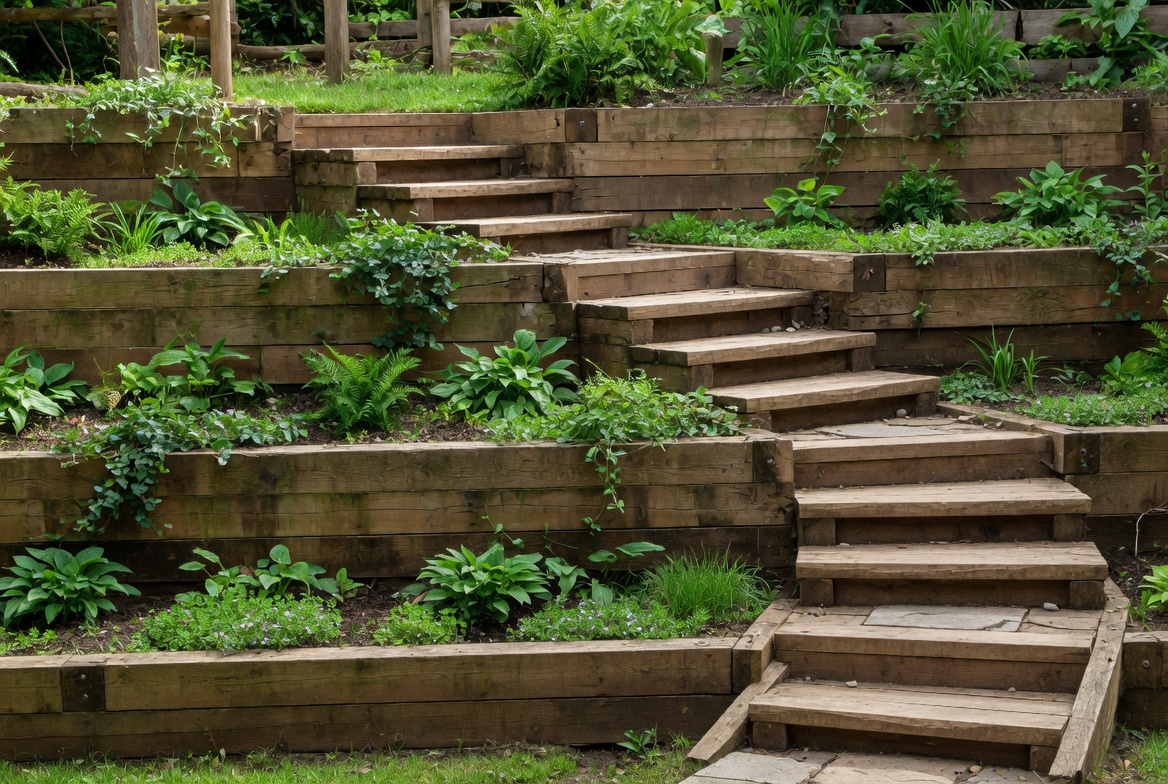
3. Terraced Multi-Level Design
Best for: Steep slopes where a single tall wall would be structurally demanding or visually overwhelming
A terraced system — multiple shorter walls stepping up a slope rather than one tall wall — is almost always the better solution for significant grade changes. Each individual wall is shorter and therefore under less soil pressure, making each structurally simpler. The terraced form also creates multiple usable flat planting areas between walls.
The general rule: a wood retaining wall should not exceed 4 feet in height without engineering input. For slopes exceeding 4 feet of change, terracing — spacing multiple walls across the slope — distributes the load and keeps each wall within the safe range for timber construction.
Smart tip: Plant each terrace level with different plant communities — sun-lovers on the highest, most exposed terrace; moisture-lovers in the shaded lower levels. The different microclimates created by terracing allow more plant diversity than a flat garden.
Mistake to avoid: Making terrace levels too narrow to be useful. A terrace less than 3 feet deep provides minimal growing space and is difficult to maintain. Plan terrace depth for the actual use — at least 3 feet for planting, at least 6 feet for a seating area.
4. Railroad Tie Retaining Wall
Best for: Rustic and informal garden styles, low-to-medium height walls (under 3 feet)
Railroad ties (railway sleepers) are heavy, substantial timbers that bring an authentic, aged quality to garden walls. Their weight is both an advantage (they resist movement without extensive anchoring) and a disadvantage (handling them requires significant effort or machinery for larger projects).
New railway sleepers use hardwood (typically oak or tropical hardwood) and are untreated — their natural density and oils provide significant rot resistance. Old reclaimed sleepers are treated with creosote and should not be used where children or food plants will be in contact.
Smart tip: Stagger the joints between sleepers on multi-course walls — like bricklaying, overlapping joints creates a much stronger structure than stacking sleepers with joints aligned vertically. The overlapping timbers lock together and resist the lateral pressure of retained soil more effectively.
Mistake to avoid: Using old creosote-treated railway sleepers near edible plants or where children play. Creosote is a coal-tar derivative containing compounds harmful to human health and toxic to plant roots. Specify new untreated hardwood sleepers for any application near food growing or play areas.
5. Curved Wood Retaining Wall
Best for: Informal and naturalistic garden styles, areas where rigid straight lines would look too formal
A curved retaining wall softens the typically hard geometry of landscape structures and creates a more organic relationship with surrounding planting. The visual effect is of a wall that has settled naturally into the landscape rather than been imposed on it.
Achieving curves with timber requires either thin planks that can be bent into curve (typically 1-inch thick boards bent around stakes), laminated layers (multiple thin boards glued together in a curved form), or the use of short sections of straight timber cut on a slight angle to approximate a curve.
Smart tip: The tighter the radius of the curve, the thinner the timber needs to be to bend without splitting. For gentle curves (radius over 6 feet), standard 2-inch boards often bend adequately with soaking and slow bending over several days. For tight curves, use 1-inch boards and laminate multiple layers.
Mistake to avoid: Attempting sharp curves with standard dimensional timber. Wood bent beyond its natural flexibility cracks along the grain, creating structural failure points in the wall. Know the minimum bend radius for the specific timber you’re using before planning tight curves.
6. Reclaimed Wood Wall
Best for: Gardens with a rustic, sustainable, or character-driven aesthetic
Reclaimed timber — old barn boards, salvaged structural beams, reclaimed scaffold boards — brings a quality of age and character to a retaining wall that new timber cannot replicate regardless of how it’s finished. The weathered surface, nail holes, and patina of genuinely aged wood tells a story.
The practical consideration: reclaimed timber varies enormously in its remaining rot resistance. Wood that spent decades in a dry barn has different durability in ground contact than timber that was already partially weathered. Assess each source carefully.
Smart tip: Line the soil-contact face of reclaimed wood walls with heavy-duty landscape fabric before backfilling. This barrier slows moisture transfer from the soil to the timber, significantly extending the life of wood whose remaining preservative qualities are uncertain.
Mistake to avoid: Using reclaimed timber without identifying what it was previously treated with. Some old timber was treated with compounds (arsenic-based preservatives, creosote) that are now restricted or banned due to health concerns. Research the timber’s history before using it in a garden context.
7. Raised Garden Bed Wall
Best for: Vegetable gardens, decorative garden beds, any application where the wall creates a planting area rather than simply retaining a slope
A retaining wall that creates a raised planting bed combines two garden elements into one — the structural wall and the growing space it defines. The result is a raised bed with more visual presence and permanence than a freestanding planter, and more planting depth than a low garden border.
The wall height determines the bed depth — a 2-foot wall creates a 2-foot deep planting bed that suits almost all vegetables and perennials. The bed can be backfilled with improved soil mix regardless of what the native soil is like, making it an excellent solution for gardens with poor ground conditions.
Smart tip: Install a landscape fabric liner between the timber wall and the soil in raised garden bed applications. The fabric allows drainage while preventing soil from being washed out between timber gaps, keeps weed roots from penetrating from below, and slows moisture contact with the timber.
Mistake to avoid: Using timber treated with biocides that can leach into food-growing soil. For vegetable garden applications, specify food-safe timber — untreated cedar, redwood, or hardwood rather than pressure-treated pine. The chemical compounds in some pressure treatments are not approved for food-contact applications.
8. Horizontal Plank Style Wall
Best for: Contemporary and modern garden designs, walls where a clean, designed aesthetic is important
A horizontal plank retaining wall — boards laid flat and horizontal, secured to vertical posts — has a cleaner, more contemporary aesthetic than the stacked timber or railroad tie styles. The uniform horizontal lines suit modern landscapes and house styles where clean geometry is the design language.
The construction logic: vertical posts are set into the ground at regular intervals (typically 4 to 6 feet apart), with the horizontal planks attached to the face of the posts. The posts absorb the soil pressure; the planks primarily define the face of the wall.
Smart tip: Leave small gaps (5 to 10mm) between horizontal planks to allow drainage and air circulation. Boards in continuous contact with each other trap moisture between them, accelerating rot at the contact points. Gapped boards also allow minor soil movement without cracking.
Mistake to avoid: Spacing posts too far apart for the wall height. As wall height increases, the soil pressure at the base increases significantly. Posts for a 3-foot wall can be spaced at 6 feet; a 4-foot wall requires posts at 4 feet or closer. Insufficient post frequency leads to bowing between posts.
9. Wood and Stone Combination
Best for: Gardens with existing stone features, landscapes where material variety adds richness
Combining timber and stone in a retaining wall creates visual interest through material contrast — the warmth and grain of wood against the cool solidity of stone. The two materials can be used in defined sections (timber wall with stone columns or piers), alternating courses, or as stone-capped timber walls.
Stone piers or columns at regular intervals within a timber wall serve both a structural and aesthetic function — they anchor the wall at intervals while creating a rhythm of vertical elements that breaks up the horizontal run of timber.
Smart tip: Use the same stone that appears elsewhere in the garden — in paths, steps, or existing walls — for any stone elements in a combination retaining wall. Consistent stone throughout the garden creates visual coherence; introducing a different stone type in the retaining wall reads as an inconsistency.
Mistake to avoid: Combining materials with very different maintenance requirements and expecting both to age consistently. Cedar and limestone, for example, age at different rates and in different directions — the cedar silvers while the limestone slowly weathers and darkens. Consider how both materials will look in 5 and 10 years, not just at installation.
10. Stepped Wall with Built-In Seating
Best for: Terraced gardens, social outdoor spaces, anywhere a retaining wall creates an opportunity for seating
A retaining wall built with a wide, flat top — typically a capping of smooth timber or stone — functions simultaneously as a structural garden element and as seating. A wall of 18 to 24 inches in height with a 12 to 15-inch wide, smooth-surfaced top is comfortable for seated adults and provides informal seating along the entire length of the wall.
This application is particularly effective in terraced garden designs where people naturally gather at transitions between levels.
Smart tip: Cap the wall top with a different, smoother material than the structural timber. Rough pressure-treated lumber is uncomfortable to sit on. A smooth hardwood cap (teak, oak, or cedar), a stone slab, or smooth composite decking board provides a comfortable seating surface and protects the structural timber below from direct weathering.
Mistake to avoid: Building the seating wall at the wrong height. The comfortable seated height is 17 to 19 inches from ground to seat surface. A wall that retains 24 inches of soil may end up with a seat surface at a different height depending on finished grade. Plan the seat height from the finished ground level, not from the base of the wall.
11. Redwood Retaining Wall
Best for: West Coast gardens (US) where redwood is locally available, high-end landscape installations
Coast redwood (Sequoia sempervirens) heartwood has exceptional natural rot resistance — in ideal conditions, redwood retaining walls can last 30 to 50 years without chemical treatment. The wood’s warm reddish-brown color and straight grain make it one of the most visually attractive timber options available for garden structures.
Redwood is increasingly expensive due to limited supply and slow growth rate, but its longevity per dollar invested compares favorably with less durable alternatives that require replacement more frequently.
Smart tip: Specify heartwood rather than sapwood when ordering redwood. The outer sapwood of a redwood tree has much less rot resistance than the dark inner heartwood. Heartwood is typically darker in color — this is the material that justifies the premium price.
Mistake to avoid: Painting or staining redwood retaining walls in an attempt to preserve them. Redwood’s natural oils resist paint adhesion — applied finishes peel and require constant maintenance. The natural wood surface, left unfinished, is both lower maintenance and more attractive over time.
12. Low Garden Border Wall
Best for: Defining planting beds, creating gentle grade transitions, front garden edging
A low wood retaining wall — 6 to 18 inches high — is the most accessible and DIY-friendly retaining wall application. At this height, the soil pressure is modest, the structural requirements are minimal, and the construction is straightforward for anyone comfortable with basic carpentry.
Low walls define the edges of garden beds with clean precision, separate lawn from planting areas, and create a subtle grade change that gives a flat garden visual interest without significant earthmoving.
Smart tip: For low border walls under 12 inches, a single course of 4×4 or 6×6 timbers staked into the ground is often sufficient. Install stakes on the downhill side of the timber — the soil pressure pushes toward the stakes, keeping the timber in place rather than allowing it to topple forward.
Mistake to avoid: Using untreated softwood for low garden border walls. Even a 6-inch wall has its base in direct soil contact, where moisture is consistently present. Untreated pine or similar softwoods in ground contact decay rapidly — often within 3 to 5 years. Use treated timber or naturally rot-resistant species for any in-ground application.
13. Wood Crib Retaining Wall
Best for: Large-scale slope retention, commercial and heavy-duty residential applications
A crib wall consists of interlocking horizontal and perpendicular timbers forming a three-dimensional grid structure that is then backfilled with coarse material (gravel, crushed stone). The mass of the fill provides the wall’s stability rather than the timber alone — making crib walls extremely stable for their height and suitable for significant slopes.
Crib walls allow planting in the cells of the grid, which softens the structure visually and adds root reinforcement to the overall stability over time.
Smart tip: Use coarse gravel (20mm crushed stone) rather than soil as crib wall fill. Gravel drains freely, doesn’t compact over time, and doesn’t support weed growth within the wall structure. Soil fill compacts and settles, creating voids that reduce stability and allow unwanted vegetation.
Mistake to avoid: Building a crib wall without adequate foundation. Crib walls are heavy — the combined weight of timber and fill is substantial. A foundation of compacted granular material or a concrete footing at the base prevents the wall from settling unevenly over time.
14. Driveway Retaining Wall
Best for: Properties where the driveway is at a different grade from the adjacent garden or lawn
A driveway retaining wall holds back soil on the uphill side of a driveway, prevents erosion onto the driveway surface, and defines the boundary between hardscaping and softscaping. In this application the wall needs to withstand occasional impact from vehicles brushing past it, which influences both the timber specification and the post anchoring depth.
Smart tip: Set posts for driveway retaining walls at least 40% of the post’s total length into the ground — deeper than standard garden walls. A 6-foot post should have at least 2.5 feet below grade. The vehicle proximity requires extra anchoring security.
Mistake to avoid: Installing driveway retaining walls without considering drainage. Water running off the driveway surface needs somewhere to go — a wall that traps water between the driveway and the retained slope creates a drainage problem that accelerates both the driveway deterioration and the wall’s rot.
15. Slope Erosion Control Wall
Best for: Steep banks prone to erosion, slopes where soil movement is an active problem
An erosion control retaining wall’s primary function is stopping soil movement rather than creating a flat surface or defining a space. This shifts the design priorities — drainage is the critical concern, the wall needs to be permeable enough to allow water through rather than building pressure behind it.
Smart tip: Install gravel backfill (at least 6 inches of 20mm crushed stone) directly behind an erosion control retaining wall before backfilling with soil. The gravel layer collects water draining down the slope and directs it through or under the wall rather than building hydrostatic pressure behind it.
Mistake to avoid: Building an erosion control wall without weep holes or drainage gaps. A retaining wall that blocks all water movement creates hydrostatic pressure — water pressure builds behind the wall after heavy rain and can topple even a well-constructed timber wall. Build in drainage at intervals of 4 to 6 feet along the wall base.
16. Wood and Metal Post Wall
Best for: Contemporary gardens, walls requiring greater structural stability than timber alone provides
Steel posts (galvanized square hollow section or H-section steel) combined with timber planking combines the structural efficiency of metal with the warmth and appearance of wood. The steel posts provide superior vertical stability — they don’t rot and resist lateral soil pressure more effectively than timber posts of equivalent size.
The timber planking is attached to the steel posts as a facing material — doing the aesthetic work while the steel does the structural work.
Smart tip: Use galvanized or powder-coated steel for posts in any timber-faced wall. Untreated mild steel rusts in ground contact, creating rust staining on adjacent timber and progressive structural degradation. The premium for galvanized or coated steel is modest relative to the total project cost.
Mistake to avoid: Allowing timber planks to sit in direct contact with steel posts without a drainage gap. Water trapped between timber and steel accelerates rust on the steel and rot on the timber simultaneously. Use spacers or brackets that create a small air gap between the two materials.
17. Backyard Privacy Retaining Wall
Best for: Sloped gardens where a retaining wall can double as a privacy structure
A retaining wall tall enough to provide privacy from adjacent properties — typically 5 to 6 feet — serves two functions simultaneously. In a garden where the ground level is below the neighbor’s view line, a retaining wall that raises the grade and provides privacy solves both problems in one structure.
At this height, structural requirements become more demanding — engineering input is appropriate for walls above 4 feet.
Smart tip: Plant the top of a privacy retaining wall with tall ornamental grasses, bamboo (in containers to prevent spreading), or shrubs that add another 2 to 3 feet of visual screening above the wall height. The combined wall and planting reaches effective privacy height with a shorter (and safer) structural wall.
Mistake to avoid: Building a privacy retaining wall to the property boundary without confirming the boundary position and any local regulations about boundary structures. Walls on or near property lines have specific requirements in most jurisdictions.
18. Lighting Integrated Wood Wall
Best for: Garden walls used in the evening, entertaining spaces, properties visible from the street at night
Low-voltage LED lighting integrated into or positioned alongside a wood retaining wall transforms it from a purely functional structure into a night-time landscape feature. The warm light grazing along the timber surface emphasizes wood grain texture and creates dramatic shadow effects.
Options: recessed step lights built into the wall face, surface-mounted bollard lights positioned at regular intervals along the wall, LED strip lights running along the wall top, or uplights positioned at the base pointing up the wall surface.
Smart tip: Use warm white LEDs (2700K to 3000K) for retaining wall lighting. Cool white or daylight LEDs on warm-toned timber create a color conflict — the blue-white light fights against the warm wood tones. Warm white enhances the natural character of the timber.
Mistake to avoid: Running electrical cables through the timber wall structure rather than in conduit alongside it. Cables embedded in timber are inaccessible for maintenance or replacement without dismantling the wall. Run all cables in conduit on the back face of the wall or in a buried conduit alongside.
19. Deadman Anchor System Wall
Best for: Walls over 3 feet high, any timber retaining wall where long-term stability is critical
A deadman anchor is a timber member running perpendicular from the wall face back into the retained soil — anchoring the wall against the tendency of taller walls to tilt forward under sustained soil pressure. Without deadman anchors, timber retaining walls over 3 feet high often develop a forward lean over several years.
The deadman runs at a right angle to the wall, buried in the retained soil. Its mass and the friction of the surrounding soil resist the forward movement that soil pressure continually applies to the wall face.
Smart tip: Install deadman anchors at every third or fourth course of timber as you build up, not just at the base. Multiple anchors at different heights distribute the anchoring load across the full height of the wall and provide redundancy if one anchor’s soil contact degrades.
Mistake to avoid: Skipping deadman anchors to simplify construction on walls over 3 feet. The extra work of installing deadmen during construction is modest. The cost of repairing or rebuilding a leaning wall that didn’t have them is substantial.
20. Choosing the Right Wood Type
Best for: Anyone at the planning stage — wood selection determines long-term performance more than any other decision
The choice of timber for a retaining wall determines how long it lasts, how it looks over time, what maintenance it requires, and whether it’s appropriate for the specific application (food garden, children’s area, high-visibility feature).
Summary by application: vegetable garden beds — untreated cedar, redwood, or hardwood; general garden walls — ground-contact rated pressure-treated timber; high-visibility feature walls — cedar or redwood for appearance; heavy-duty structural walls — pressure-treated posts with cedar or hardwood facing; budget-conscious DIY — pressure-treated pine throughout.
Smart tip: Buy timber from a supplier who can specify the treatment grade, species, and expected service life in ground contact. General hardware store timber often lacks this information. A timber merchant or specialist landscape supplier provides the specification you need to make an informed choice.
Mistake to avoid: Choosing timber based on appearance alone without considering ground-contact suitability. Attractive timber that’s not rated for ground contact will look beautiful for two seasons and begin decaying in the third. Always prioritize ground-contact rating for any timber that will be in direct soil contact.
Before You Start
- Check whether you need a permit. Retaining walls above a certain height — typically 3 to 4 feet depending on jurisdiction — often require building permits. Check local requirements before starting any substantial wall.
- Identify underground services. Before digging post holes, check for buried utilities — water pipes, gas lines, electrical cables. Call your local utility notification service before any digging.
- Assess the drainage situation. The main cause of retaining wall failure is water pressure buildup behind the wall. Plan drainage before building.
- Consider soil type. Clay soils exert significantly more lateral pressure than sandy or gravelly soils. Heavy clay sites may require engineering input for walls over 2 feet.
- Get the right timber specification. Ground-contact rated timber is not optional — it’s the minimum specification for any timber in direct soil contact.
Conclusion
A well-built wood retaining wall solves real landscape problems — erosion, unusable slope, grade transitions — while adding warmth and natural character that harder materials can’t match. The investment in correct timber specification, adequate drainage, and proper post anchoring pays back in decades of stable, attractive function rather than the premature repair or replacement that shortcuts inevitably produce. Plan the drainage first, choose the right timber for the application, and build the anchoring system as thoroughly as the visible face.