A walk-in closet should make every morning easier. When the system works — when everything has a specific place, when what you wear most is most accessible, when the layout matches how you actually use your wardrobe — getting dressed takes minutes and the room stays organized without constant maintenance. When it doesn’t work, the closet becomes a daily frustration: things pile up, specific items become impossible to find, and the space feels perpetually disorganized regardless of how often it’s tidied. Most walk-in closet problems aren’t space problems — they’re system problems. These 20 ideas address every dimension of walk-in closet design and organization, from the initial zoning decisions that determine how the space functions to the small details that determine whether it stays organized after the first week.
1. Plan Zones Before You Build
Best for: Any walk-in closet design or redesign — zoning is the foundation that everything else depends on
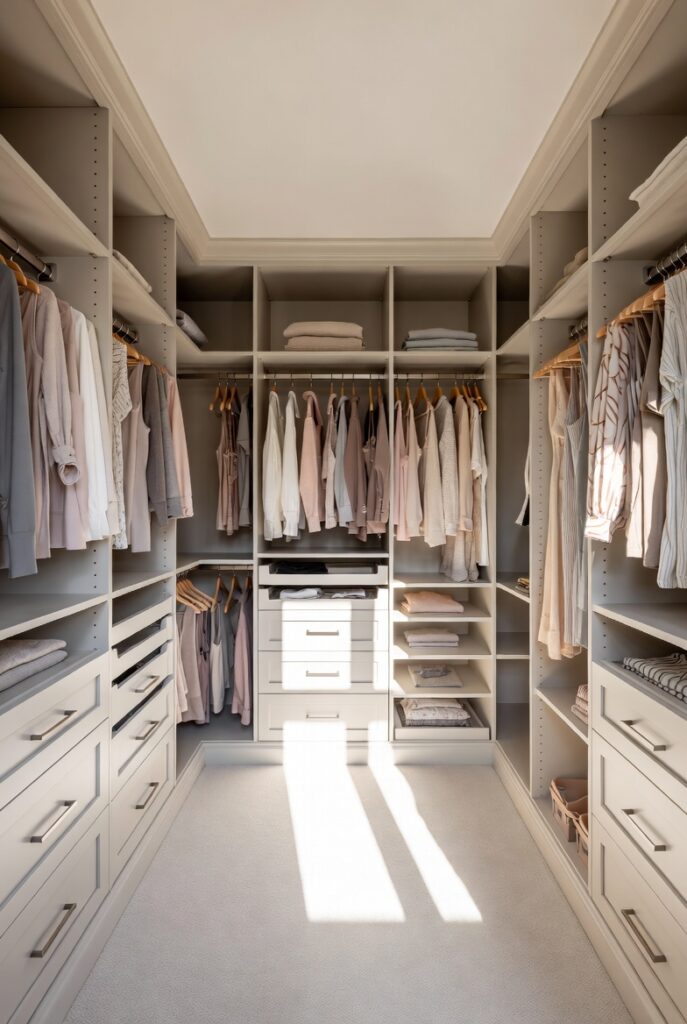
Zoning — dividing the closet into dedicated areas for different clothing categories — is the single most important design decision in a walk-in closet. Without zones, a closet becomes a general storage space where everything is technically accessible but nothing is easy to find. With zones, the closet functions like a well-organized retail store: each category has its place, and the entire wardrobe is immediately navigable.
The standard zones for a shared walk-in closet: long hanging (dresses, coats — requires a minimum of 60 to 70 inches of vertical clearance); short hanging (shirts, jackets, folded trousers — maximum 40 to 44 inches per zone, allowing double hang below); shelving (folded items, sweaters, jeans, accessories); drawers (underwear, socks, delicates); and shoe storage. Each zone’s size should be proportional to the actual wardrobe — not allocated equally.
Smart tip: Audit your wardrobe before designing the zones — count or estimate the number of long-hang items, short-hang items, folded items, pairs of shoes, and drawers needed. Design zone sizes based on this audit rather than assumptions. Most people significantly underestimate shoe storage and overestimate the hanging space needed for formal wear.
Mistake to avoid: Creating zones that reflect an ideal wardrobe rather than the actual wardrobe. A zone for formal wear that takes up 30% of the hanging space in a wardrobe where formal wear represents 5% of actual clothing wastes space for items worn rarely while making daily-use items cramped. Zone proportionally to actual use frequency.
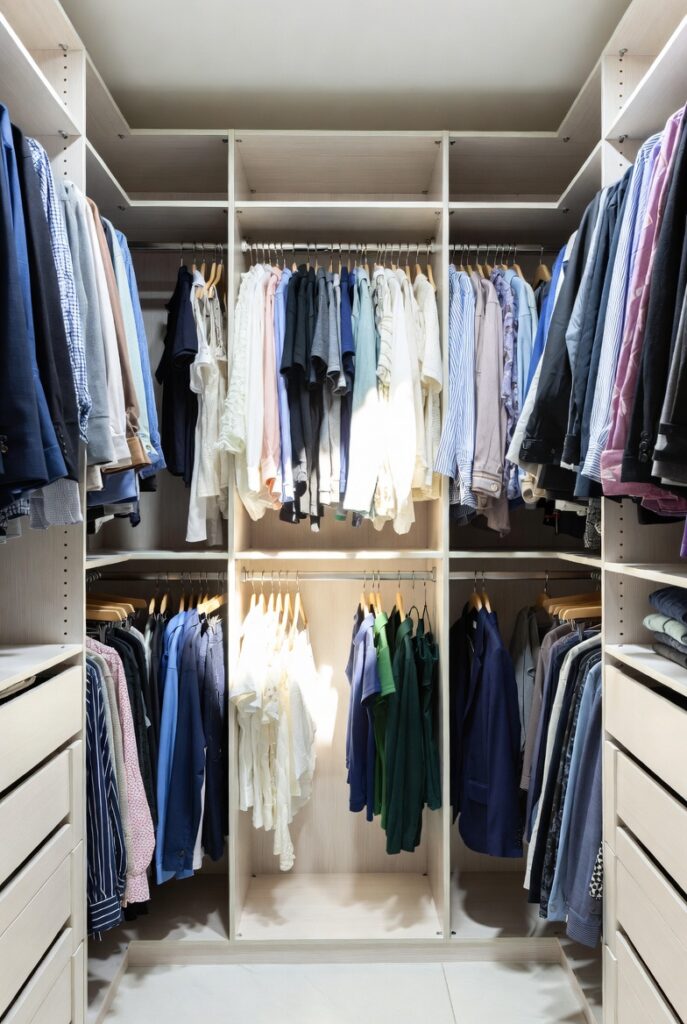
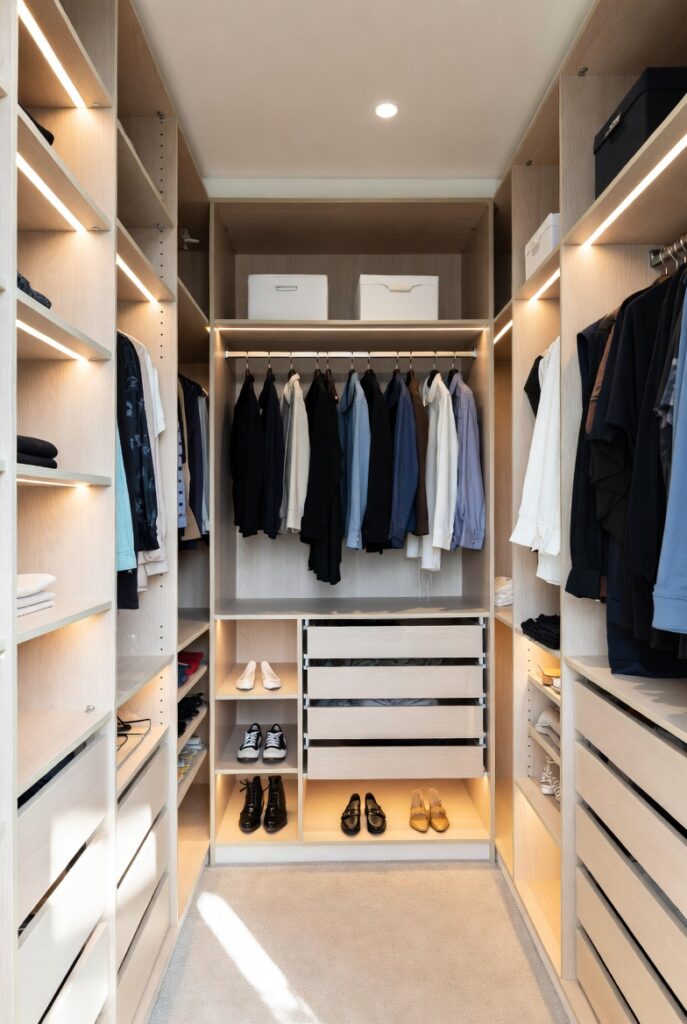
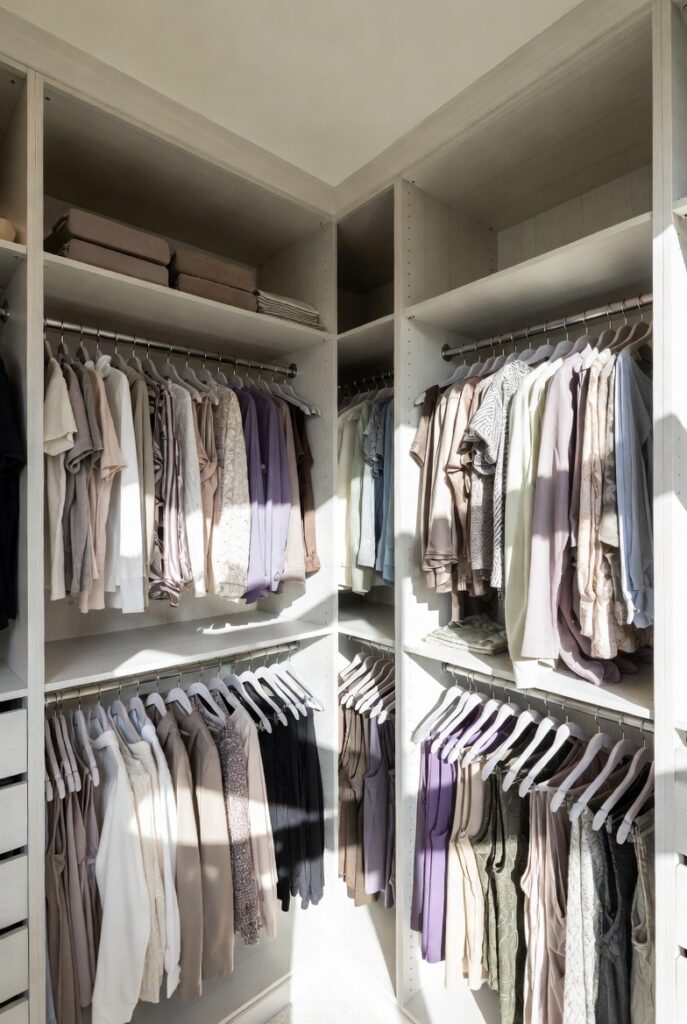
2. Double Hang Short Items
Best for: Any section of the closet storing shirts, jackets, folded trousers, or blazers — the most space-efficient hanging configuration available
Double hanging — two rails positioned one above the other within the same vertical space — approximately doubles the hanging capacity of any section storing items that don’t require full-length clearance. A standard 8-foot ceiling allows two hanging rods within the same vertical space that would otherwise accommodate one, creating 80 to 100% more hanging capacity in that section.
The upper rod sits at approximately 80 to 84 inches from the floor; the lower rod at 40 to 42 inches. This configuration accommodates shirts, jackets, folded trousers, blazers, and shorter dresses on the lower rod, and similar items on the upper. Items too short for the upper rod’s clearance above fall below into the lower rod’s space.
Smart tip: Reserve single-hang sections for items that genuinely require the full height — long dresses, full-length coats, and suits that hang without folding. Convert every other section to double hang. Most wardrobes have significantly more short-hang items than long-hang items, and single hanging those short items wastes the lower 40 inches of the closet section entirely.
Mistake to avoid: Installing the lower double-hang rod at the wrong height. A lower rod too close to the floor leaves insufficient clearance for items hanging from it — they bunch on the floor. A lower rod too high compresses the upper zone uncomfortably. Measure the longest item in the intended lower zone and set the lower rod so its hem clears the floor by at least 2 to 3 inches.
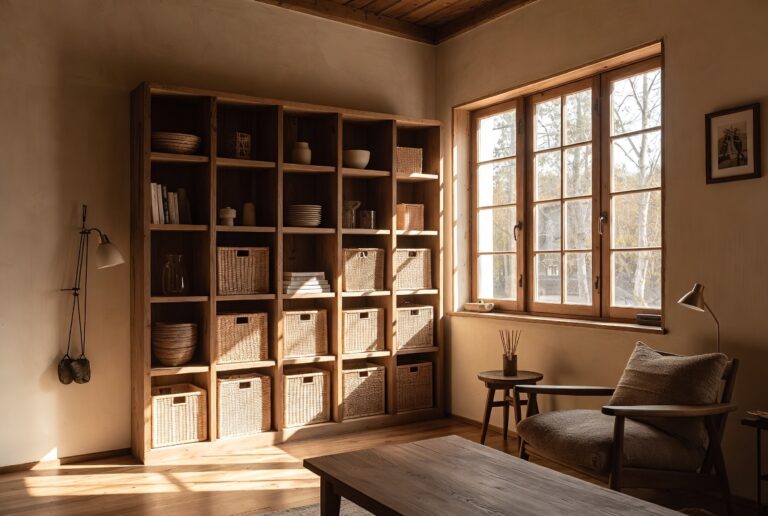
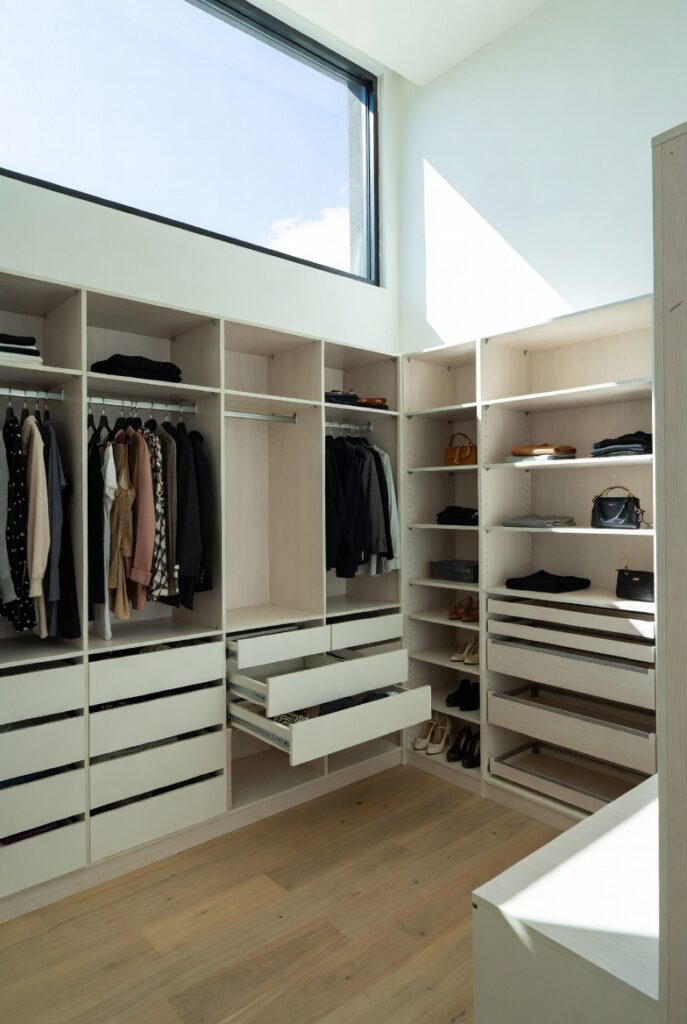
3. Install Adjustable Shelving
Best for: Any walk-in closet — adjustable shelving provides flexibility as wardrobe needs change over time
Fixed shelving built at standard heights rarely matches a real wardrobe’s actual storage needs. A shelf at 14 inches height suits folded T-shirts; the same shelf is too short for bulky sweaters and too tall for underwear. Adjustable shelving — mounted on track systems with moveable shelf pegs or standards — allows every shelf height to be set precisely for the items actually stored there, eliminating the wasted space above shorter items.
The most versatile adjustable closet system uses vertical standards (metal tracks fixed to the wall at 16-inch intervals) with shelf brackets that clip into any position. This system allows any shelf to be repositioned in minutes as wardrobe needs change.
Smart tip: Set adjustable shelves to match the actual height of the items they’ll store, with 2 to 3 inches of clearance above the highest item. A shelf with 6 inches of clearance above its contents wastes nearly as much space as the items themselves. Tightly set shelves — just enough clearance to remove items comfortably — maximize usable shelf capacity.
Mistake to avoid: Spacing adjustable shelves equally throughout the closet. Equal spacing is rarely correct for a mixed wardrobe. Sweater shelves need 12 to 16 inches; folded T-shirt shelves need 8 to 10 inches; underwear shelves need 6 to 8 inches. Set each shelf at the appropriate height for its contents rather than defaulting to an even distribution.
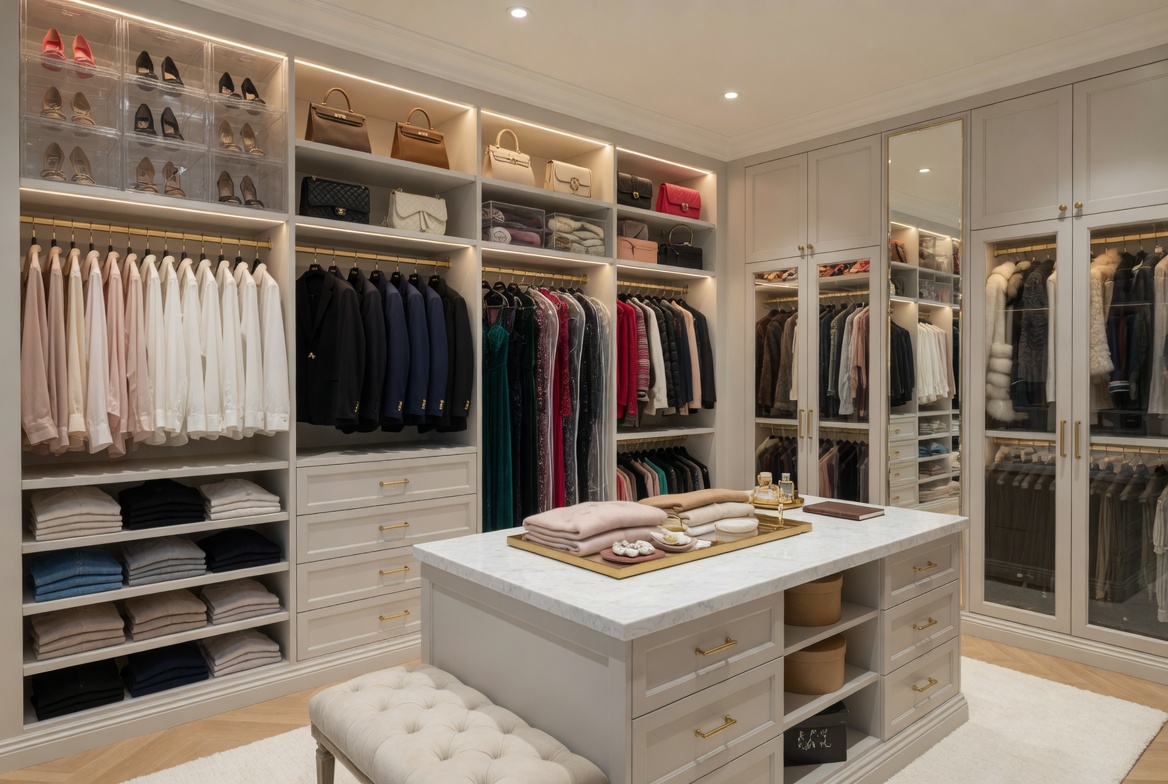
4. Add a Center Island
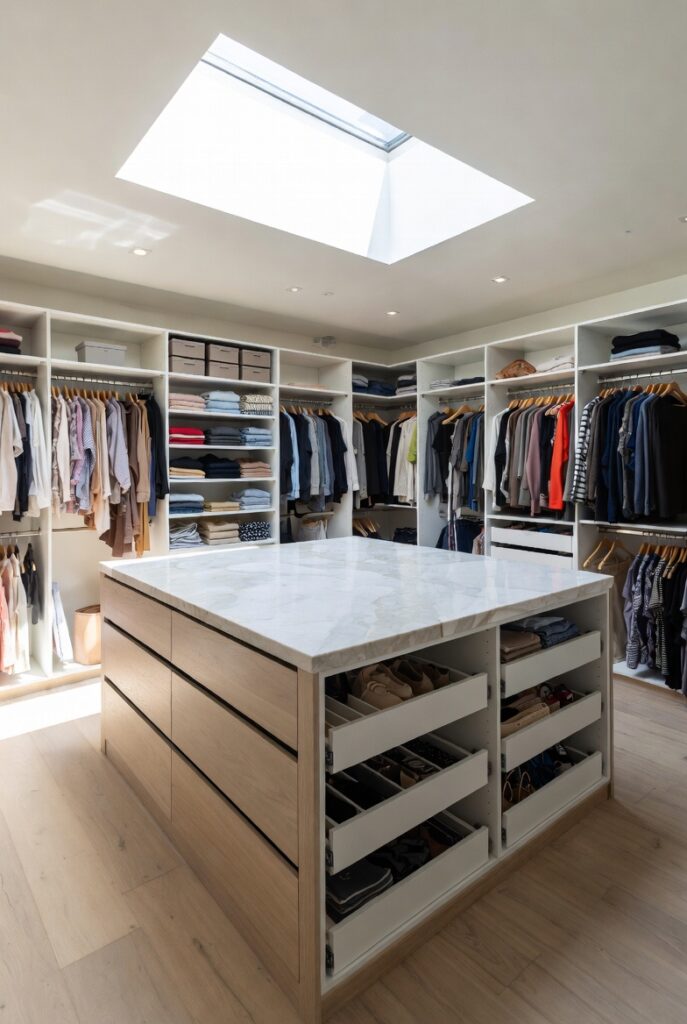
Best for: Walk-in closets with at least 10 feet of width — a center island is the highest-value addition to a large walk-in closet
A center island in a walk-in closet — a freestanding or built-in unit positioned in the middle of the floor space — provides additional drawer and surface storage without using wall space, and gives the closet the appearance and feel of a luxury boutique dressing room. The island’s flat top surface serves as a space for folding, laying out tomorrow’s outfit, and staging accessories.
The island’s height should match standard counter height (34 to 36 inches) for comfortable use while standing. Interior drawers work best with specific purposes: shallow top drawers for jewelry and small accessories, medium drawers for folded T-shirts and underwear, and deeper base drawers for jeans and heavier items.
Smart tip: A minimum of 36 inches of circulation space is needed on all sides of a center island for comfortable use. An island positioned with less than 36 inches on any side creates a passage that’s uncomfortable when drawers are open. Measure the available floor space carefully before committing to island dimensions.
Mistake to avoid: Installing a center island in a walk-in closet that’s too narrow for it. A closet with 8 feet of width minus two 24-inch-deep wall systems leaves only 48 inches of clear floor — insufficient for a functional island with adequate circulation. Islands require a minimum of 10 to 12 feet of closet width to work comfortably.
5. Design Dedicated Shoe Storage
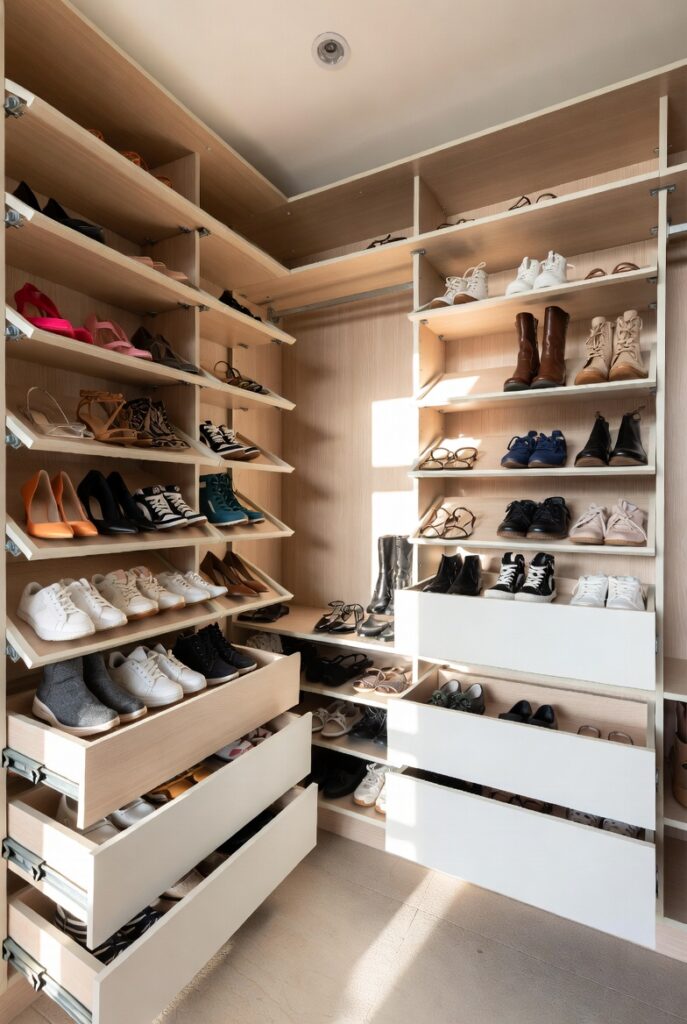
Best for: Any walk-in closet — shoe storage is consistently underplanned and the most common closet organization failure
Shoes stored in random piles on the closet floor, in the original boxes, or on shelves without a dedicated system create the most common and most persistent closet organization problem. A dedicated shoe storage section — sized for the actual collection with a clear display system — resolves this immediately and permanently.
Shoe storage options by type: angled shelves (display shoes at 15 to 20 degrees, making the style visible at a glance — the best option for a curated collection); clear shoe boxes (stackable, space-efficient, particularly good for seasonal or less-worn shoes); cubbies (individual compartments for each pair — easy to scan and access, space-efficient); and pull-out shoe drawers (completely hidden when closed, most efficient use of space).
Smart tip: Angled shoe shelves are the most satisfying shoe storage option because they display the full shoe rather than just the toe or the box. A wall of angled shoe shelves in a walk-in closet has the visual quality of a shoe boutique and makes selecting shoes significantly more enjoyable than rooting through boxes or piles.
Mistake to avoid: Designing shoe storage based on the current collection without accounting for future growth. Most people add shoes to their collection over time. Design shoe storage with 20 to 30% more capacity than currently needed — the extra space is easily filled, and retrofitting shoe storage into an already-complete closet system is significantly more expensive than building in capacity from the start.
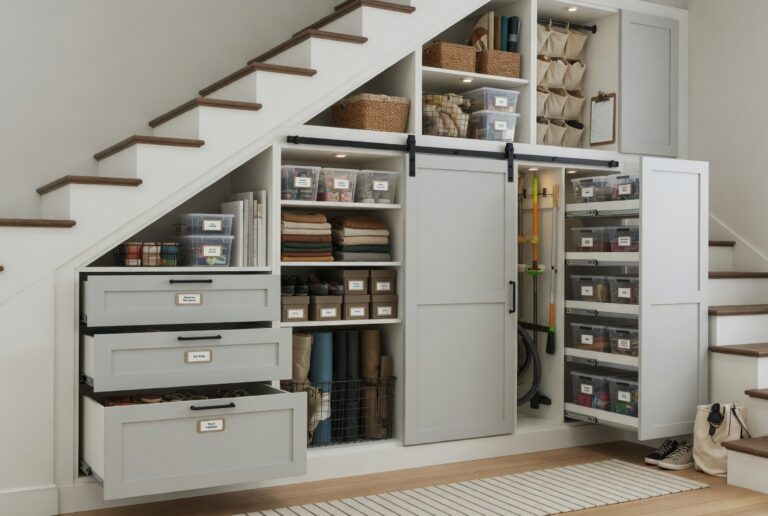
6. Build a Drawer Tower
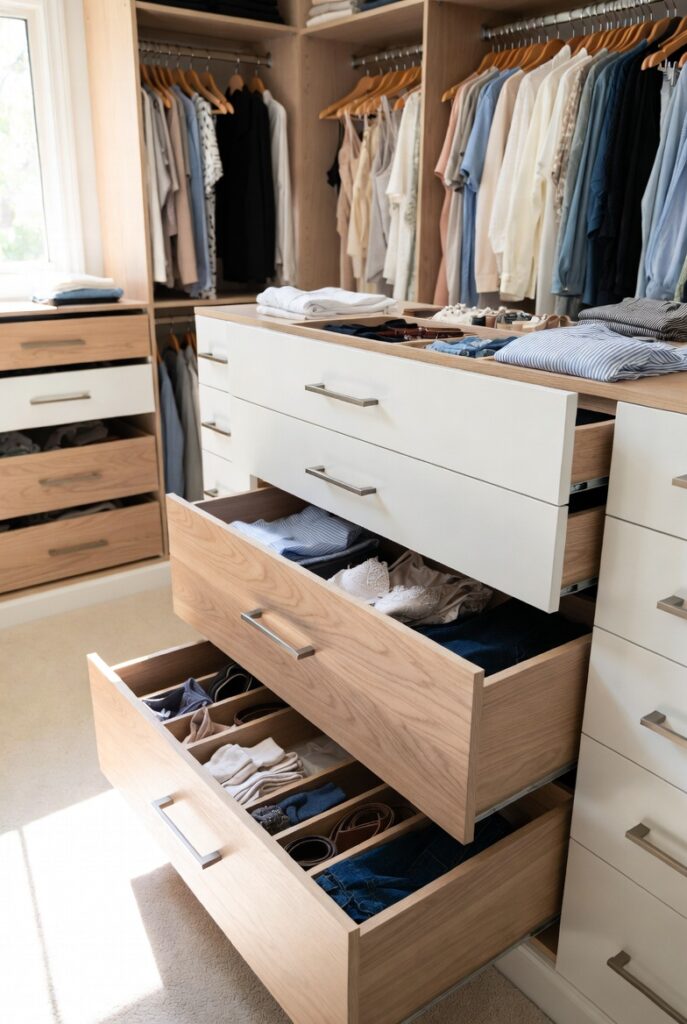
Best for: Any walk-in closet that stores folded items — drawers are more space-efficient and better for organization than open shelves for most folded clothing
A drawer tower — a vertical stack of drawers occupying one section of the closet wall — provides accessible, organized storage for folded clothing that open shelves can’t match. Items on open shelves require stacking, and stacked items become inaccessible without disturbing the pile above. Each drawer in a tower provides independent, full-access storage for one category of clothing.
The most useful drawer tower configuration: two to three shallow drawers (6 to 8 inches) at the top for underwear and socks; three to four medium drawers (10 to 12 inches) for T-shirts, shorts, and folded shirts; one to two deep drawers (14 to 16 inches) at the bottom for jeans, sweaters, or gym wear.
Smart tip: Use the file-fold method (Marie Kondo style) for items stored in drawers — folding items so they stand vertically in the drawer rather than lying flat. Vertical folding allows every item to be visible and accessible without disturbing adjacent items. A drawer organized with vertical folding holds roughly the same number of items as a horizontal-stacked drawer but allows instant access to any specific item.
Mistake to avoid: Building drawers without soft-close mechanisms in a frequently used closet. Drawers that slam closed on morning rush create unnecessary noise and damage both the drawer contents and the drawer mechanism over time. Soft-close drawer slides are a modest additional cost that pays back immediately in quality of daily use.
7. Add a Full-Length Mirror
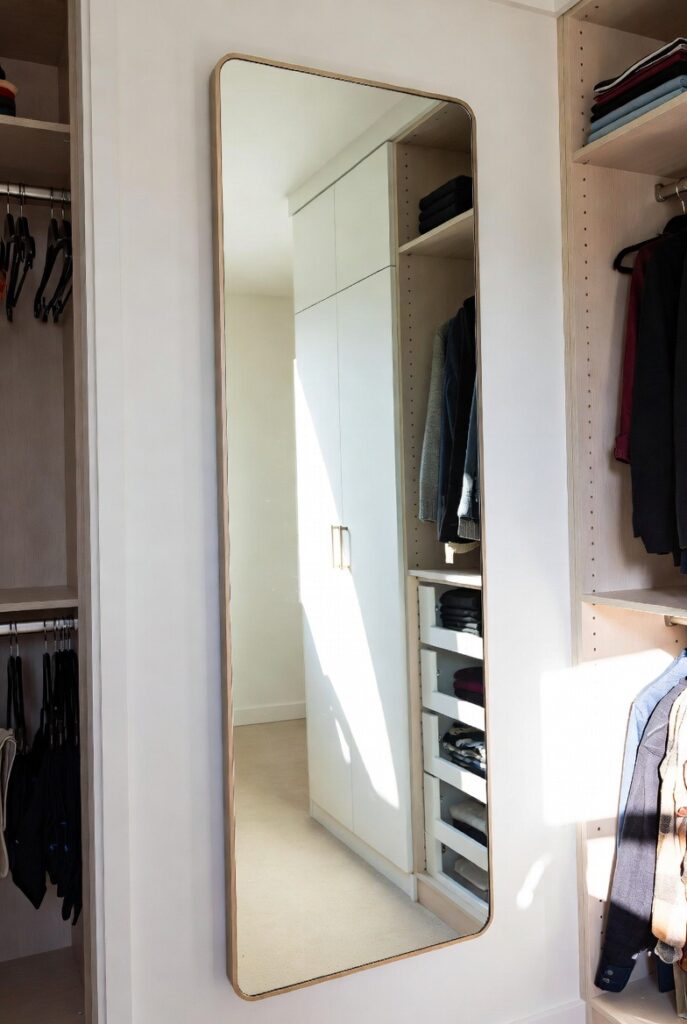
Best for: Every walk-in closet — a full-length mirror inside the closet is the most practical mirror location in the home
A full-length mirror inside the walk-in closet — on a wall, the back of the door, or mounted on the closet system itself — allows complete outfit assessment in the same space where the outfit was assembled. This eliminates the daily trip to the nearest full-length mirror elsewhere in the house and makes the closet a complete dressing room rather than just a storage area.
The mirror position: on the wall at the end of the closet visible from the entrance works best, allowing a view of the complete outfit from a distance adequate for overall assessment. A mirror too close to the viewing position requires stepping back awkwardly to see the full length.
Smart tip: A backlit mirror — LED strip lighting around or behind the mirror frame — provides the most flattering and accurate lighting for outfit assessment. Standard overhead closet lighting often creates unflattering downward shadows. A backlit or front-lit mirror at face level produces lighting closer to the natural light conditions in which the outfit will be seen.
Mistake to avoid: Installing a full-length mirror on the inside of a closet door in a closet where the door opens outward into a narrow passage. A door-mounted mirror viewed from 18 inches away is too close for full-length outfit assessment. Either mount the mirror on a wall with adequate viewing distance or choose an outward-opening door configuration that allows the mirror to be seen from an appropriate distance.
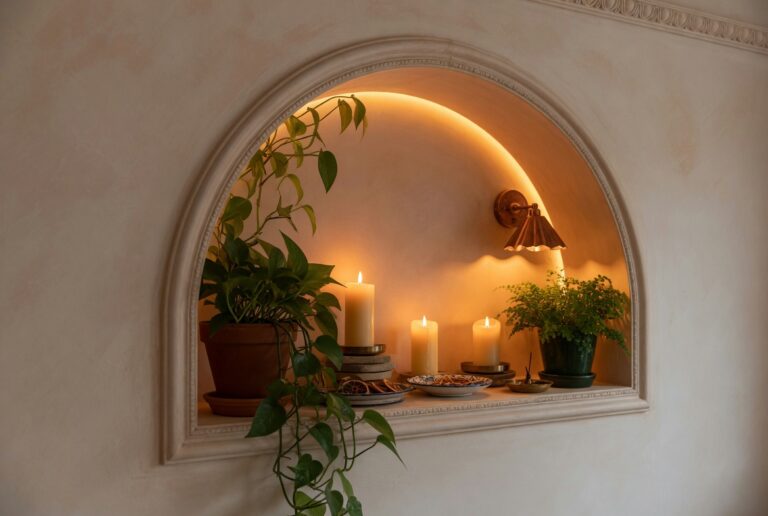
8. Use Proper Closet Lighting
Best for: Any walk-in closet — most closet lighting is inadequate and makes the space genuinely harder to use
Most walk-in closets rely on a single ceiling light that leaves corners dark, creates shadows between hanging clothes, and makes color matching difficult. Clothing color appears very differently under different light temperatures — a sweater that looks navy blue under warm artificial light may be clearly black or clearly purple under daylight. Choosing the wrong item from a poorly lit closet is a daily frustration with a simple solution.
The layered closet lighting approach: recessed ceiling lights (ambient illumination); LED strip lights above or below shelving (illuminating shelf contents from above); LED strip lights along the hanging rod (illuminating hanging clothes from the front, making colors and details visible); and task lighting at the mirror (for outfit assessment).
Smart tip: Use 3000K to 3500K LED bulbs in walk-in closet lighting — slightly cooler than the 2700K used elsewhere in the bedroom. This slightly cooler temperature renders clothing colors more accurately than warm white light, making color matching more reliable. It’s the temperature range used in clothing retail environments for exactly this reason.
Mistake to avoid: Relying solely on ceiling lighting in a walk-in closet with significant hanging clothing. Hanging garments block ceiling light from reaching the rod level — the clothes at the back of the hanging section are in shadow regardless of how many ceiling fixtures are used. Only LED strips along the hanging rod itself illuminate hanging clothes effectively.
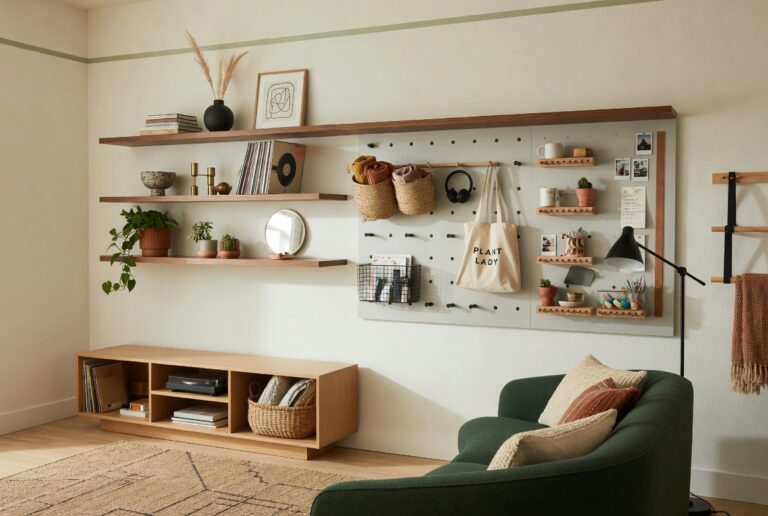
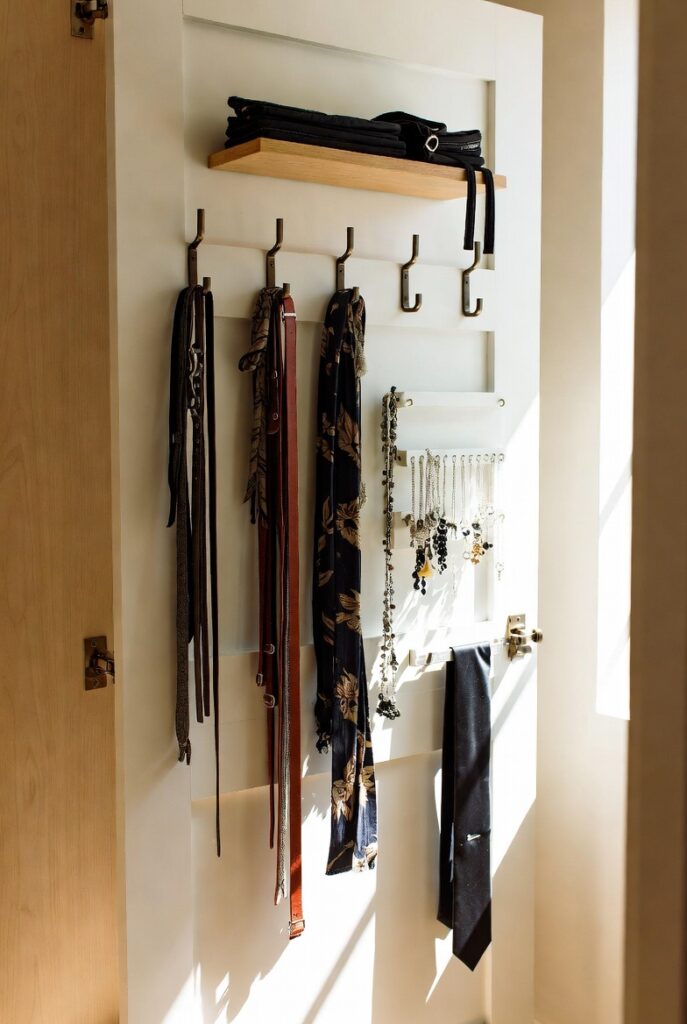
9. Organize Accessories Smartly
Best for: Anyone whose accessories — belts, scarves, ties, watches — are currently stored in a drawer or pile where they become tangled and inaccessible
Accessories are the category most consistently stored without a system in walk-in closets, and the category where poor storage creates the most daily frustration. A belt dragged from the bottom of a pile of other belts, or a necklace untangled from a jewelry drawer every morning, adds small but consistent friction to the daily routine.
Effective accessory storage by type: belts — a pull-out belt rack (each belt on its own hook, visible at a glance); scarves and ties — a rotating tie rack or a pull-out drawer with individual slots; watches — a watch roll or a drawer with individual watch cushions; sunglasses — a dedicated shelf or compartmentalized tray.
Smart tip: A pull-out accessory drawer with individual compartments — sized specifically for the items stored in each compartment — is more effective than any hook or rack system because the accessories are contained without tangling, visible without searching, and accessible without removing other items first. Custom compartment inserts can be purchased for most drawer sizes.
Mistake to avoid: Storing accessories in a general drawer with other items. Belts, necklaces, and earrings mixed with clothing items in the same drawer create tangles that take significant time to resolve and result in accessories being avoided rather than used because of the effort required to retrieve them.
10. Install a Valet Rod
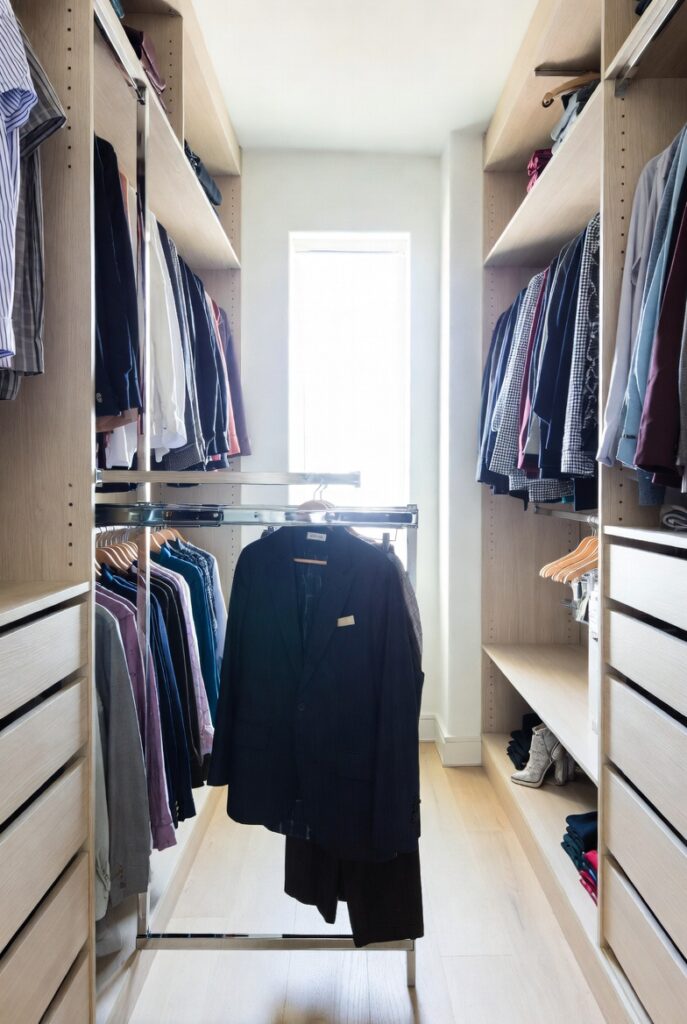
Best for: Any walk-in closet — the valet rod is the most underused and most useful closet accessory available
A valet rod — a small pull-out hanging bar that extends from the side of a closet section — provides a temporary hanging spot for tomorrow’s outfit, dry cleaning that’s just returned, or items being considered for packing. It eliminates the daily habit of laying tomorrow’s clothes on a chair or hanging them from a door handle — and the closet disorder that habit creates.
The valet rod retracts flat when not in use, taking up no space. Extended, it provides one or two hanging positions immediately adjacent to the main wardrobe — making outfit staging genuinely convenient rather than requiring a separate space for it.
Smart tip: Position the valet rod at the eye-level section of the closet, adjacent to the daily-use hanging zone. A valet rod positioned where tomorrow’s outfit can hang next to today’s context — the section where work clothes, casual clothes, or evening wear are stored — makes outfit selection more efficient by keeping the comparison visible.
Mistake to avoid: Installing a valet rod in a position where the extended rod creates a circulation problem. A valet rod that extends into the main traffic path through the closet — or hits the opposite wall when extended — becomes annoying to use consistently. Verify the clearance before installation.
11. Choose the Right Layout Shape
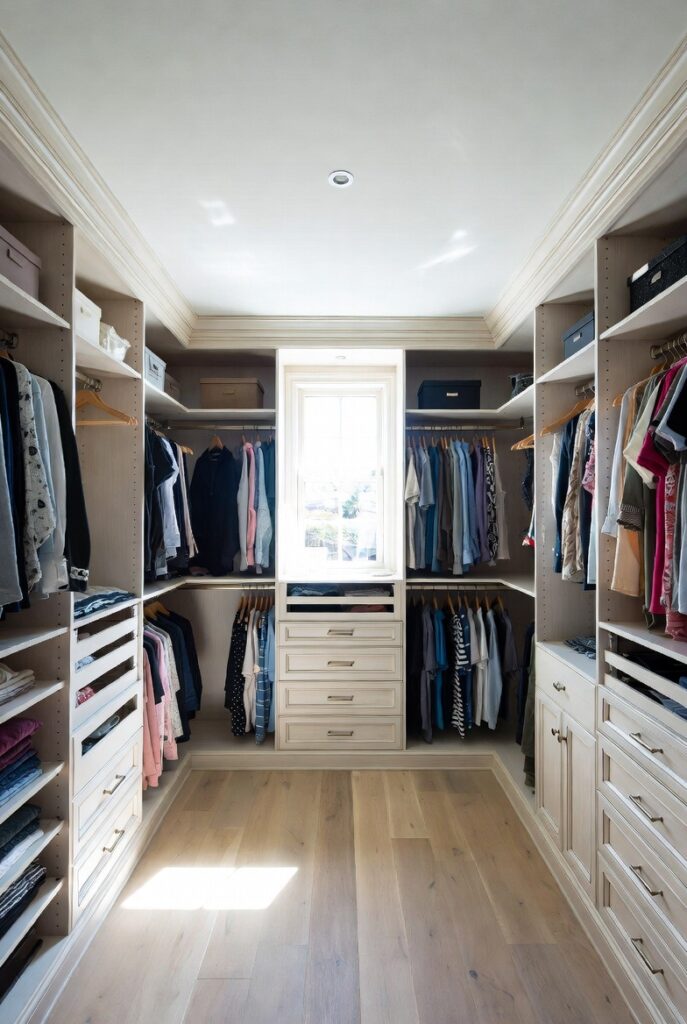
Best for: Anyone designing a new walk-in closet — the layout shape determines the storage capacity and the ease of use
The physical shape of a walk-in closet’s storage layout — single wall, double wall, L-shaped, or U-shaped — should be matched to the room’s dimensions and the wardrobe’s storage requirements. Choosing the wrong layout wastes floor space, creates awkward circulation, or fails to provide adequate storage for the actual wardrobe.
Single-wall layout: suits narrow rooms (under 6 feet wide) where storage on one side and circulation on the other is the only viable configuration. Limited total storage but the most accessible — every item on the single wall is immediately reachable. Double-wall layout: two walls of storage facing each other with a central circulation aisle. Most efficient for rectangular rooms 6 to 10 feet wide. L-shaped layout: uses two walls at a right angle. Suits square or irregular rooms. U-shaped layout: storage on three walls. Maximum storage capacity. Requires a minimum room width of 10 feet for adequate circulation at the center.
Smart tip: For a shared walk-in closet, consider separating the layout by person rather than by clothing category. One wall or one section per person — with each person’s layout configured for their specific wardrobe — reduces the daily interference between two wardrobes sharing a single organized system.
Mistake to avoid: Designing a U-shaped or double-wall layout in a room too narrow for comfortable circulation. A closet where two people can’t pass each other in the central aisle, or where a drawer can’t be fully opened without hitting the opposite storage unit, creates daily frustration regardless of how well-organized the storage system itself is.
12. Add Hidden Laundry Storage

Best for: Any walk-in closet — a hidden hamper eliminates the pile of worn-but-not-dirty clothes that accumulates on chairs and floors
The worn-but-not-dirty category — clothes that have been worn once but could be worn again before washing — is the category most responsible for bedroom disorder. Without a specific place to put these items, they accumulate on chairs, bedposts, and floors. A pull-out hamper or open basket within the walk-in closet gives this category a legitimate home.
A pull-out laundry hamper built into the closet system — a ventilated fabric or wicker basket mounted on a pull-out frame — conceals dirty laundry behind a cabinet door that matches the rest of the closet finish. Multiple hampers with separate sections for lights, darks, and delicates can be incorporated into the same pull-out unit.
Smart tip: Add a secondary hook or small open shelf within the closet specifically designated for items being worn again before washing. A hook labeled “tomorrow’s outfit” or a small shelf for the clothes being cycled before washing is more functional than a hamper for this specific category — a hamper suggests washing is imminent, which creates ambiguity about which items should go in it.
Mistake to avoid: Installing a pull-out laundry hamper without ventilation. Worn clothing in a sealed, unventilated container develops a persistent odor within days. Specify a hamper with mesh sides or ventilation gaps that allow air circulation, and ensure the cabinet door has at least a small gap at the bottom for air exchange.
13. Style with a Consistent Color Palette
Best for: Walk-in closets that are visible from the bedroom — a consistent visual palette makes the closet feel designed rather than merely functional
A walk-in closet with a consistent color palette — cabinet finishes, storage boxes, and exposed items in coordinating tones — has a visual calm that reduces the stimulation of being surrounded by an entire wardrobe first thing in the morning. The consistent palette also creates the boutique-like quality that makes a walk-in closet feel like a considered space rather than a storage room.
Palette approaches: all-white or off-white (the cleanest look — shows what’s stored rather than the storage system); warm neutrals (greige, warm linen, soft taupe — creates a calming, spa-like atmosphere); monochromatic tones (all clothing organized by color creates a gradient effect that’s visually striking and makes item retrieval faster).
Smart tip: Organize hanging clothing by color within each category — all shirts arranged from white through cream, yellow, orange, red, pink, purple, blue, green, grey, to black. Color-organized hanging clothes create a visually satisfying gradient and make finding a specific item faster because the search area is immediately narrowed to the relevant color section.
Mistake to avoid: Using a wide variety of storage box colors, basket materials, and container types within the same closet. Visual consistency in storage containers — all the same box style in the same color, or all matching baskets — creates a calm, organized appearance. A collection of different box sizes, colors, and materials looks cluttered even when everything is neatly stored inside.
14. Use the Back of the Door
Best for: Any walk-in closet with a door — the back of the door is almost universally unused storage space
The back of the walk-in closet door provides a storage surface that most closets leave completely empty. Over-door organizers — available in versions specific to shoes, accessories, beauty products, and general items — mount on the door with hooks that fit over the top edge, requiring no installation and leaving no marks.
More permanent options: a door-mounted mirror with integrated storage behind it; a narrow shelf unit secured to the door; or individual hooks for specific items (tomorrow’s bag, the day’s accessories, or frequently grabbed outerwear).
Smart tip: Mount a clear-pocket organizer on the back of the closet door specifically for daily-use accessories — the sunglasses worn every day, the bag used most frequently, the items that need to be grabbed on the way out. Keeping these items on the door rather than in a drawer or on a shelf saves the 30 to 60 seconds per day spent locating them — genuinely meaningful over time.
Mistake to avoid: Using an over-door organizer so heavy that it causes the door to sag on its hinges. Door hinges are designed for the weight of the door itself — a heavy over-door organizer loaded with shoes or other items can pull the door out of alignment over time. Ensure the over-door storage is lightweight, or mount a more permanent organizer directly into the door’s structural material rather than hanging it from the top.
15. Add a Seating Area or Ottoman
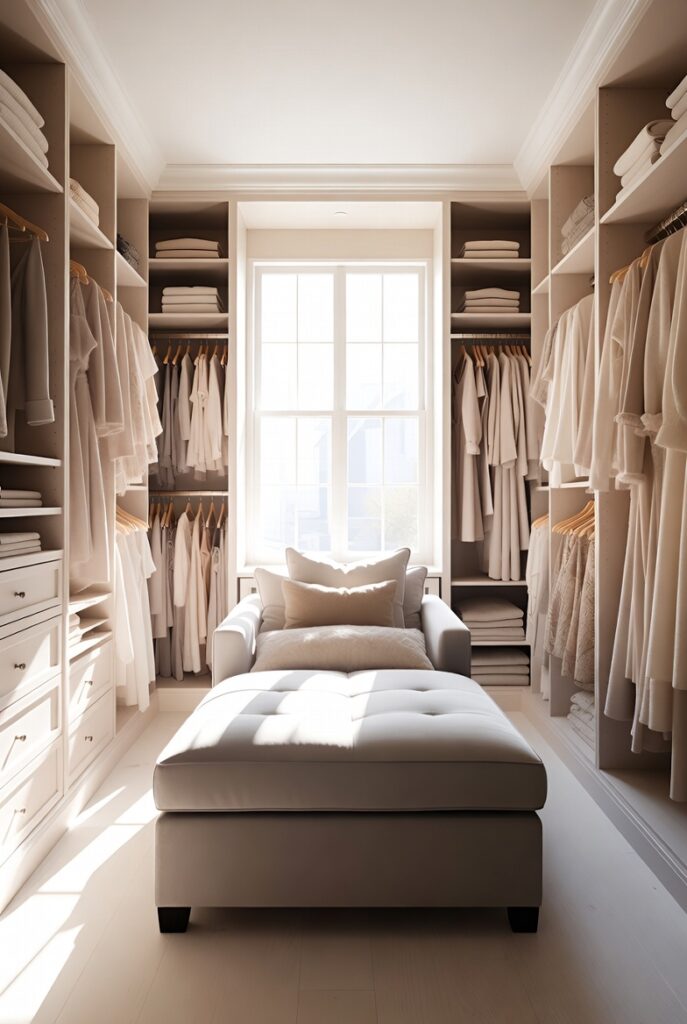
Best for: Walk-in closets with adequate floor space — seating converts a storage space into a genuine dressing room
A bench, ottoman, or upholstered stool within the walk-in closet provides a place to sit while putting on shoes, laying out items under consideration, or simply having a moment before the day begins. In a closet large enough for it, a seating element is the detail that elevates the space from organized storage to a room.
A storage ottoman — a cushioned seat with a hinged lid that opens to interior storage — combines seating with useful additional storage for items used less frequently (seasonal accessories, formal wear additions, out-of-season bags).
Smart tip: Position the seating element where it’s visible from the mirror. Sitting while assessing an outfit — for lower-body details, shoe choices, or sock and trouser combinations — is more practical than awkwardly bending to look at feet in a standing mirror. Seating adjacent to the mirror makes the full outfit assessment more thorough and more comfortable.
Mistake to avoid: Adding seating to a walk-in closet without verifying that adequate circulation space remains. A bench or ottoman placed without adequate floor clearance around it creates a closet that’s harder to navigate rather than more pleasant to use. Maintain at least 36 inches of clear floor space on all sides of any seating element.
16. Organize Handbags and Purses
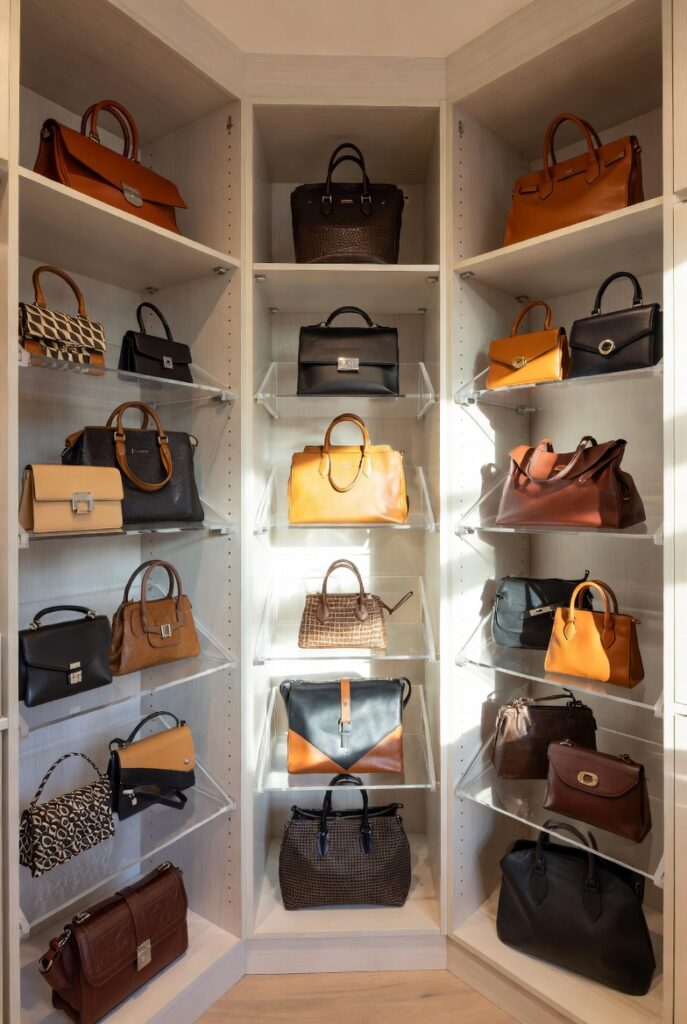
Best for: Any wardrobe with more than five bags — handbag storage is consistently among the worst-organized closet categories
Handbags stored in piles, in their original dust bags on a high shelf, or stacked inside each other are inaccessible and difficult to maintain in good condition. A dedicated handbag storage system — sized for the actual collection with each bag visible and accessible — makes the collection genuinely usable rather than aspirationally owned.
Handbag storage options: individual shelf cubbies (the clearest display, each bag on its own shelf section — requires significant shelf space); pull-out deep drawers or baskets (concealed, space-efficient, good for bags used less frequently); hooks inside a closet section (for smaller bags and clutches — visible and accessible); and clear acrylic stands or risers (display quality, suitable for smaller collections).
Smart tip: Stuff unused handbags with tissue paper or a bag insert to maintain their shape in storage. A bag that collapses into itself between uses develops creases and loses its structure over time. A bag that’s properly stuffed maintains its shape and looks better when used — a small maintenance step that significantly extends the bag’s lifespan and appearance.
Mistake to avoid: Stacking handbags on top of each other on shelves. Stacked bags damage each other — the hardware of one bag scratches the leather of the one below, and the weight of stacked bags distorts the shape of the bags at the bottom. Each bag should have its own space, unstacked.
17. Use Uniform Hangers Throughout
Best for: Any walk-in closet — this single change has the most immediate visual impact of any closet improvement
Replacing a mixed collection of wire, plastic, and wooden hangers with a single type throughout the closet is the fastest way to make a walk-in closet look significantly more organized. Mixed hangers create visual noise — different heights, different materials, different spacing — that makes even neatly organized clothing look chaotic. Uniform hangers create a consistent visual rhythm that reads as organized regardless of what’s hanging.
Velvet slim hangers are the best all-purpose choice for most wardrobes: they’re thin (taking up approximately one-third the space of plastic hangers), have a non-slip surface that holds items without sliding, and are available in a consistent color range that creates visual uniformity.
Smart tip: Replace all hangers at once rather than gradually. Gradual replacement leaves the closet in a mixed state for months — a worse visual outcome than the original mixed collection. Purchase enough uniform hangers for the entire wardrobe in one order and replace everything in one session. The total cost is modest and the visual improvement is immediate.
Mistake to avoid: Using velvet slim hangers for very heavy items — thick coats, heavy wool suits, or leather jackets. Slim velvet hangers can bend or break under significant weight, and the narrow profile of the hanger doesn’t distribute a heavy item’s weight adequately, leading to shoulder deformation over time. Keep sturdy wooden or padded hangers for heavy items specifically.
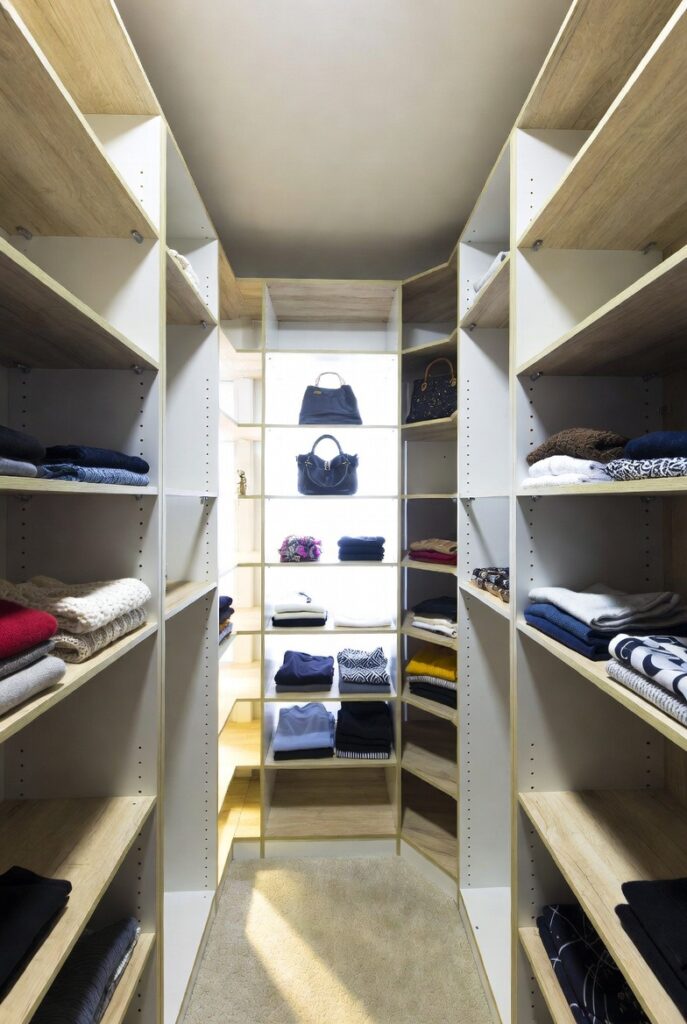
18. Maximize Corner Space

Best for: L-shaped and U-shaped closet layouts — corner space is the most commonly wasted area in walk-in closet design
Corners in a walk-in closet present the same challenge as kitchen corners: the intersection of two storage walls creates a zone where items at the back are difficult to reach from either direction. Without a specific solution, corners become dead zones where items are stored and forgotten.
Corner solutions for walk-in closets: a rotating carousel (similar to a lazy Susan — items spin to the front from both sides); angled corner shelving (shelves positioned at 45 degrees across the corner, accessible from both adjacent sections); a corner tower with pull-out trays (a vertical unit that fills the corner dead zone with drawers that extend fully forward); or open corner shelving for display items (bags, accessories, or decorative items that benefit from visibility).
Smart tip: A corner tower with pull-out trays is the most space-efficient corner solution because the pull-out mechanism brings the full depth of the corner unit to the front — making items at the back accessible without reaching. Angled corner shelving is easier to build but leaves items at the back of each shelf in a relatively inaccessible position.
Mistake to avoid: Filling a corner with a hanging rod that turns the corner. Hanging items around a corner are compressed at the turn and become inaccessible — a single section of hanging that turns a corner is typically less functional than the equivalent amount of shelving or drawer storage in the same space.
19. Add Jewelry Storage
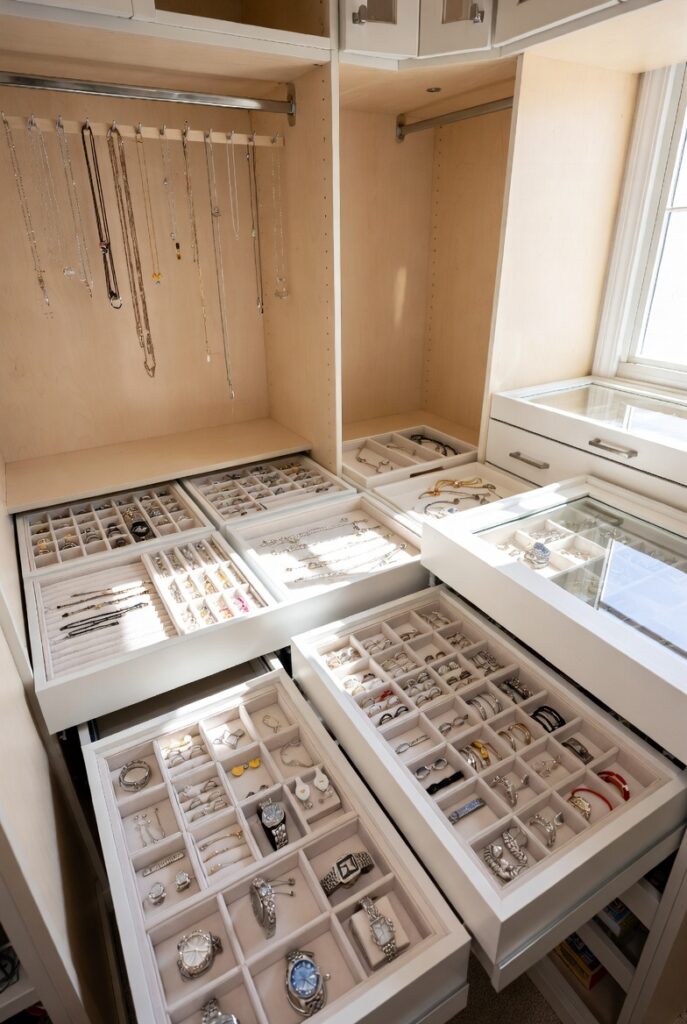
Best for: Any closet belonging to someone with a jewelry collection — dedicated jewelry storage prevents tangling, loss, and damage
Jewelry stored in a general drawer or a single jewelry box becomes tangled, difficult to retrieve, and easily lost or damaged. A dedicated jewelry storage system within the walk-in closet — sized for the actual collection and designed around how the jewelry is actually used — makes the collection accessible, visible, and cared-for.
Jewelry storage options by collection size: a velvet-lined drawer with custom compartments (the most elegant and protective solution — each piece in its own space); a wall-mounted jewelry armoire (displays the full collection behind a mirrored door); acrylic jewelry organizers on a shelf (clear sides allow visibility from outside — suitable for smaller collections); and individual ring, earring, and necklace organizers stacked in a designated drawer.
Smart tip: Hang necklaces rather than coiling them. Necklaces coiled in a drawer or box tangle within hours of storage. Individual hooks — a wall-mounted hook strip, a pegboard section, or individual hooks inside a jewelry drawer — keep each necklace separated and instantly accessible. A necklace on its own hook takes 3 seconds to select and put on; the same necklace untangled from a pile takes significantly longer.
Mistake to avoid: Storing fine jewelry in an open-air display without humidity control in climates with high humidity or significant seasonal humidity variation. Silver tarnishes rapidly in humid conditions; some metals and gemstones are affected by humidity over time. Fine jewelry stored in a closed, ventilated drawer or box maintains its condition significantly better than jewelry displayed on open hooks or trays.
20. Edit Your Wardrobe First
Best for: Any walk-in closet organization project — editing is the prerequisite for any successful organization system
The most common walk-in closet organization mistake is organizing an over-large wardrobe rather than editing the wardrobe before organizing it. A closet system designed for 200 items and loaded with 350 items never looks organized — the system’s capacity is exceeded before it’s fully used. Editing the wardrobe first reduces the storage requirement, simplifies the zoning decisions, and makes the resulting organized closet genuinely maintainable.
The editing framework: items worn in the last 12 months stay; items not worn in 12 months are evaluated (does it fit, do you love it, does it have a realistic occasion — if not, it goes); damaged or worn-out items are removed regardless of sentiment; and duplicate items are reduced to the number actually needed.
Smart tip: The one-year rule is the most practical editing guideline available: if an item hasn’t been worn in the past 12 months, it almost certainly won’t be worn in the next 12. The exceptions (truly special occasion items — a wedding outfit, a formal piece worn once per year) are obvious and can be kept with intentionality. Everything else that hasn’t been worn in a year should be donated, sold, or discarded.
Mistake to avoid: Editing and organizing in the same session. Editing a full wardrobe is cognitively demanding — decision fatigue sets in after 30 to 60 minutes of making keep-or-go decisions. Organizing after editing, when fresh, produces significantly better results than attempting both in one marathon session. Edit first, rest, then organize.
Before You Start
- Measure your current wardrobe before designing. Count hanging items by category, estimate shelf needs, count shoes, and list accessories. Design the closet for your actual wardrobe, not for an ideal wardrobe or a generic design.
- Consider the lighting from the start. Lighting is most easily and cheaply installed during construction. Retrofitting LED strips into an existing closet system is difficult. Plan lighting during the design phase.
- Budget for hardware quality. Drawer slides, hinges, and closet rod brackets are used multiple times daily. Cheap hardware fails quickly and degrades the experience of using the closet. Invest in hardware rated for the expected daily use frequency.
- Edit before you build. Designing and building storage for a wardrobe that needs editing wastes money on capacity that stores unwanted items. Edit first, then design.
Conclusion
A walk-in closet that works is one where the system matches the wardrobe — where the zone sizes reflect actual clothing proportions, where the most-used items are most accessible, and where every category has enough dedicated space to be stored without compromise. Getting there requires honest assessment of the wardrobe before designing the storage, quality installation that will withstand daily use, and consistent habits that return items to their designated places. The result is a closet that stays organized without daily maintenance — because the system makes organization the path of least resistance.