
The best outdoor living spaces don’t get used only in summer. They get used on crisp autumn evenings beside a fire, on spring mornings with coffee before the day begins, on rainy afternoons under a covered patio that makes the sound of rain something pleasant rather than something that drives you inside. The difference between an outdoor space that gets used year-round and one that gets used for six weeks in summer comes down to a small number of decisions made during design: adequate shelter, a heat source for cool evenings, layered lighting for after dark, and furniture that stays comfortable and attractive through changing weather.
These 20 ideas cover every element of a year-round outdoor living space — from the foundational covered structure to the smart storage that keeps everything organized — with specific guidance on what makes each element genuinely functional rather than just attractive.
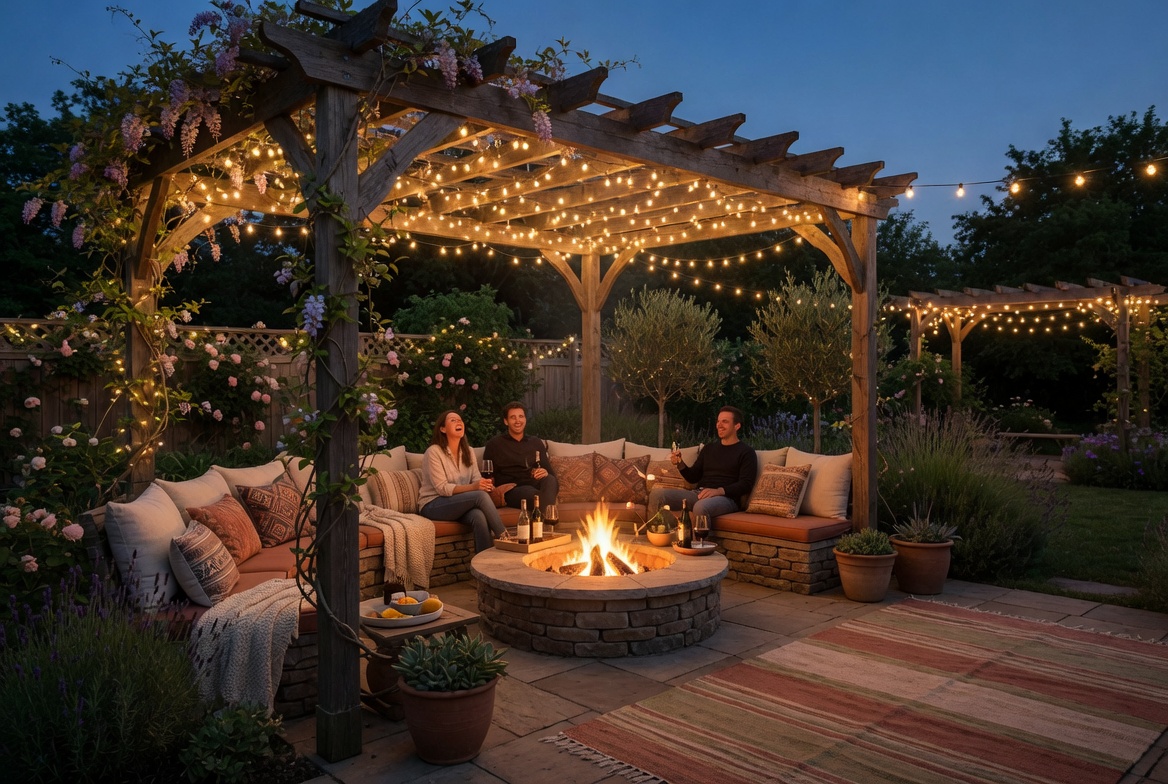
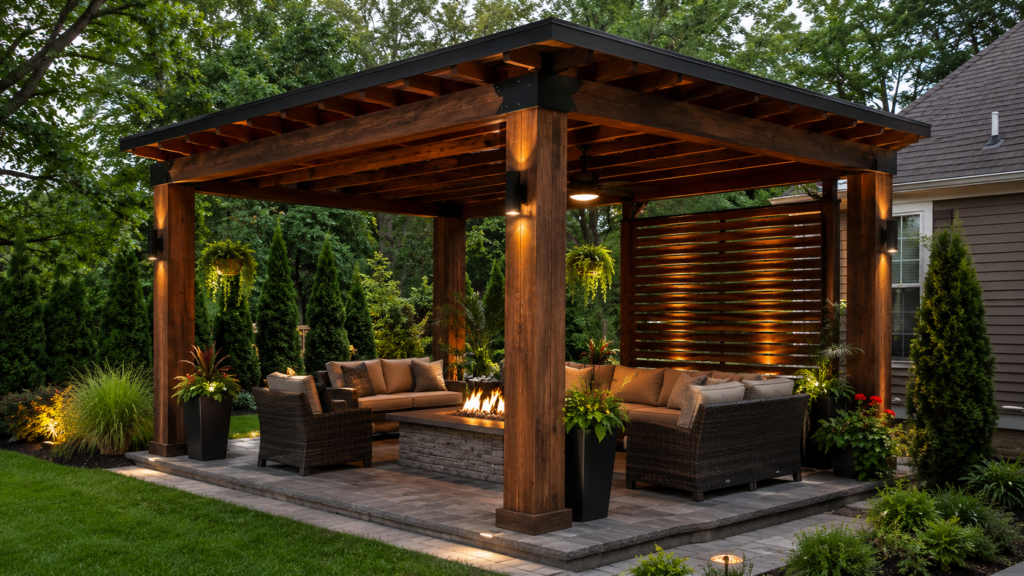
1. Build a Covered Patio or Pergola
Best for: Any outdoor space — covered structure is the single most impactful improvement for year-round use
A covered patio or pergola converts a fair-weather outdoor space into an all-conditions one. Rain, intense sun, and light snow become features of the covered outdoor room rather than reasons to go inside. The structure also defines the space — creating a ceiling that makes the outdoor area feel like a room rather than simply a patch of ground with furniture on it.
The choice between a fully covered patio (solid roof, complete weather protection) and a pergola (open slatted structure, partial shade) depends on climate. In regions with significant rainfall, a solid roof is significantly more practical. In drier climates, a pergola provides shade and architectural definition without the enclosed feeling of a solid roof.
Smart tip: Orient the covered structure to the north or northeast side of the outdoor space where possible, so it provides shade during the hottest afternoon hours without blocking morning sun entirely. A covered patio facing west bakes in afternoon sun; one facing north provides consistent shade without losing morning light.
Mistake to avoid: Building a pergola or covered patio that’s too small for the intended use. The covered area always feels smaller once furnished with a table, chairs, and the functional elements of outdoor living. Build at least 20 to 30 percent larger than the furniture footprint — the extra space provides the circulation and breathing room that makes the covered outdoor space feel genuinely comfortable.
2. Create an Outdoor Kitchen
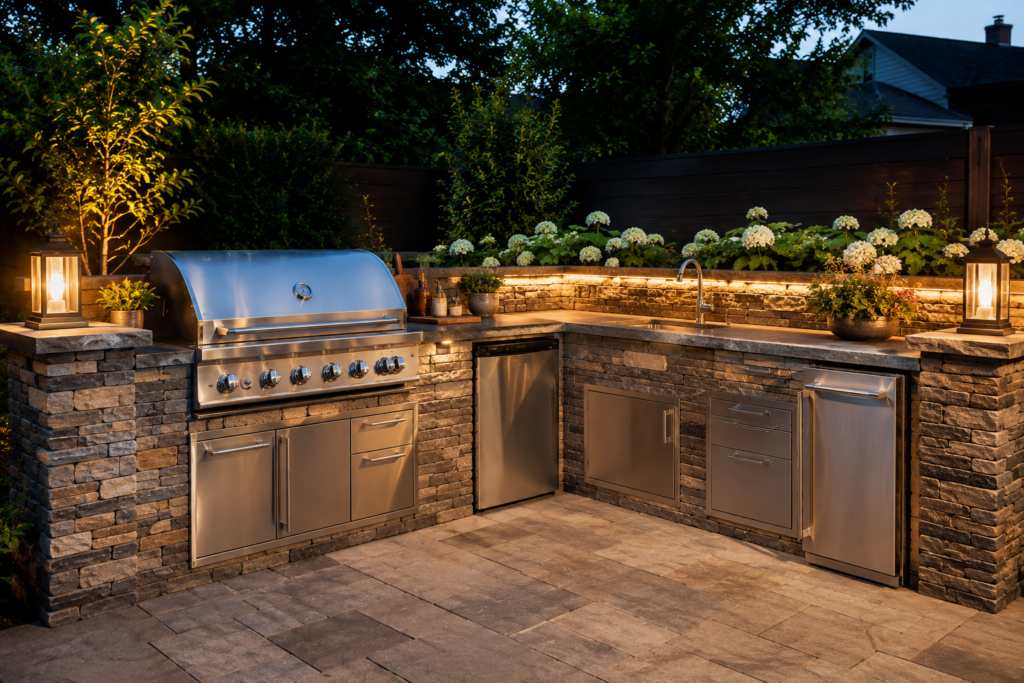
Best for: Households that entertain frequently — an outdoor kitchen extends the entertaining season and keeps the chef connected with guests
An outdoor kitchen — at minimum a built-in grill station with counter space on both sides — converts outdoor cooking from a solitary activity at a portable grill to a genuine social experience where the cook works alongside guests. The built-in format also keeps the outdoor space organized: everything needed for outdoor cooking has a permanent home rather than being assembled and disassembled for each use.
The minimum practical outdoor kitchen: a built-in gas or charcoal grill, 18 to 24 inches of counter space on each side, a small refrigerator for drinks and ingredients, and adequate weatherproof storage for cooking tools and supplies.
Smart tip: Position the outdoor kitchen adjacent to the indoor kitchen door so ingredients, serving dishes, and cleanup access are straightforward. An outdoor kitchen positioned far from the house requires carrying everything across the yard in both directions — the inconvenience reduces how often it gets used significantly.
Mistake to avoid: Using indoor kitchen appliances in an outdoor kitchen. Indoor refrigerators, grills, and electronics are not rated for the temperature fluctuations, moisture exposure, and UV radiation of outdoor use — they fail rapidly. Specify outdoor-rated appliances specifically designed for the conditions they’ll face.
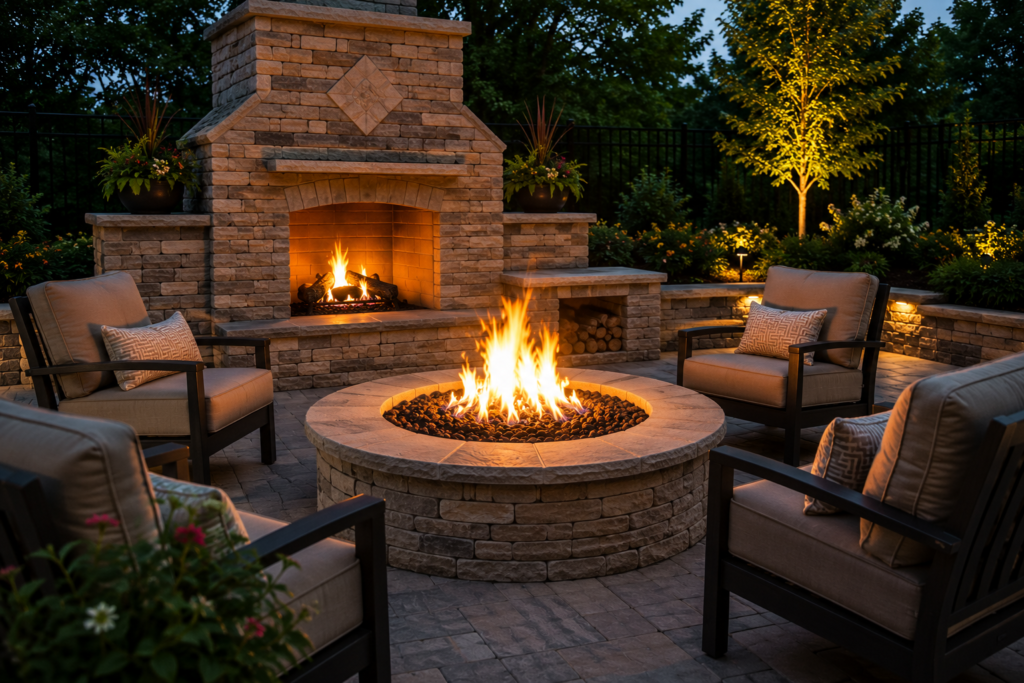
3. Add a Fire Pit or Outdoor Fireplace
Best for: Extending outdoor use into cool evenings and cold-weather months — nothing extends the outdoor season more effectively than a heat source
A fire pit or outdoor fireplace is the single most effective element for year-round outdoor use. It extends comfortable outdoor time from the warm months into autumn and early winter, creates a social focal point that draws people together, and provides the visual quality of an open fire — one of the most universally appealing sensory experiences available in any setting.
Fire pit options: in-ground (the most naturalistic, becomes a permanent landscape feature); above-ground bowl (portable, flexible positioning, lower cost); fire table (incorporates a fire element into a coffee table format — elegant and functional); outdoor fireplace (the most architecturally significant, becomes the focal point of the entire outdoor room).
Smart tip: Position the fire pit or fireplace where prevailing wind doesn’t blow smoke toward the seating area. Smoke direction varies with wind — a fire pit positioned centrally in a seating circle exposes all seating to smoke when the wind changes. Position fire elements to one side of the seating arrangement so the seating arc faces away from the prevailing wind direction.
Mistake to avoid: Building a permanent outdoor fireplace without checking local regulations. Many municipalities have regulations about outdoor fireplaces — setback distances from structures, chimney height requirements, and in some areas, restrictions on wood-burning fires during certain air quality conditions. Check before building any permanent fire structure.
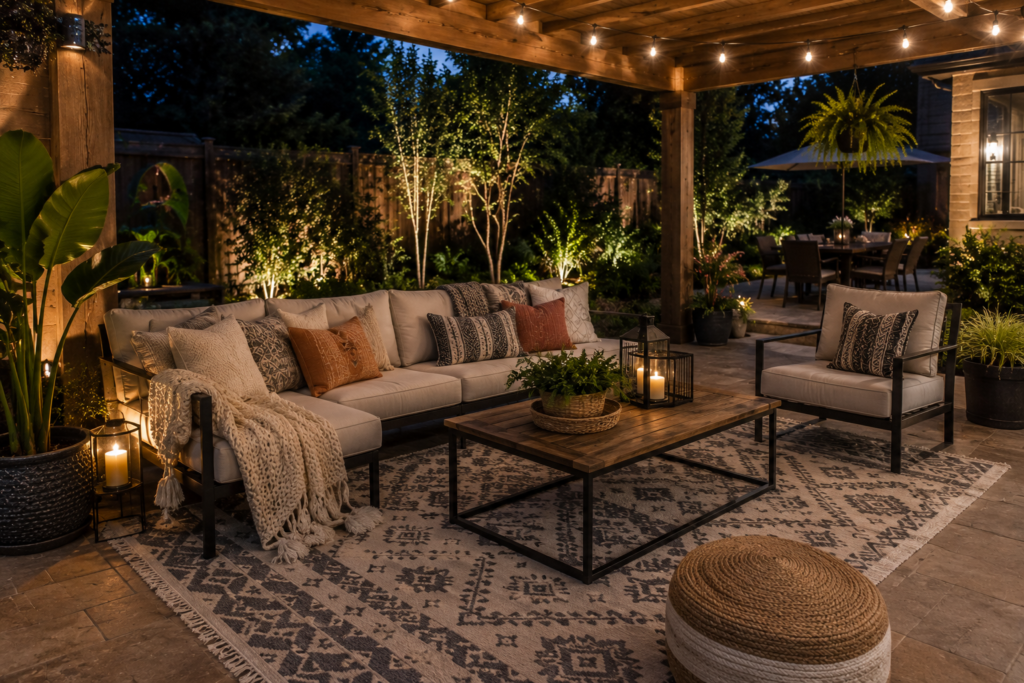
4. Design a Comfortable Seating Zone
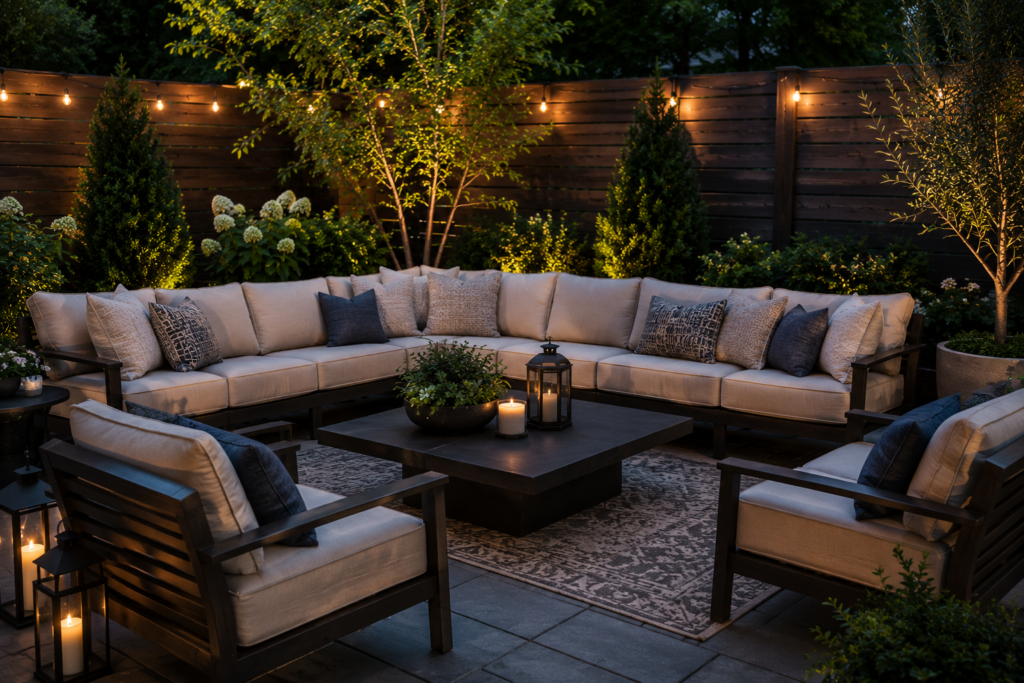
Best for: Every outdoor space — seating quality determines whether people stay outside or drift back indoors
Outdoor seating that’s genuinely comfortable — with weather-resistant cushions, appropriate depth and height, and a mix of seating types for different uses — keeps people outdoors longer and creates the atmosphere of a room rather than a temporary station. The most important quality in outdoor seating is that it invites lingering rather than just providing a place to sit.
Weather-resistant materials for year-round seating: teak (naturally rot-resistant, ages to silver-grey beautifully); powder-coated aluminum (lightweight, rust-proof, available in many colors); high-density polyethylene (HDPE) wicker (looks like traditional wicker but is moisture and UV resistant); Sunbrella fabric cushions (the industry standard for outdoor fabric — UV-resistant, mold-resistant, and cleanable).
Smart tip: Include multiple seating types in a single outdoor space — a larger sofa grouping for group relaxation, individual chairs that can be repositioned, and a dining table setup for meals. The ability to reconfigure the space for different uses and different group sizes makes the outdoor room significantly more versatile and gets it used more often.
Mistake to avoid: Choosing outdoor furniture based on appearance alone without checking the fabric and frame materials. Beautiful outdoor furniture made from inappropriate materials deteriorates rapidly — sun bleaches cushions, rain rusts frames, and moisture rots natural wicker. Check material specifications specifically before purchasing any outdoor furniture intended for permanent outdoor use.
5. Install Outdoor Dining Area
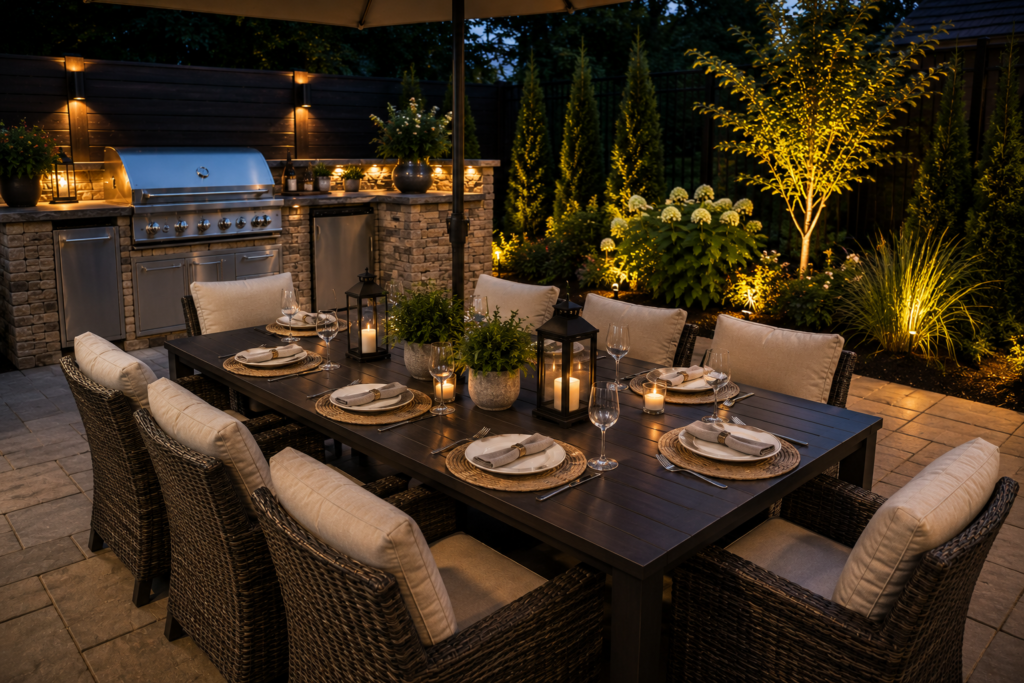
Best for: Any household that values outdoor meals — dedicated outdoor dining creates a genuine dining room experience outdoors
A dedicated outdoor dining area — a table sized for the household’s typical gathering number plus two to four extra seats for guests, positioned under the covered structure and adjacent to the outdoor kitchen — converts outdoor eating from an occasional summer activity to a genuine daily option in good weather.
The outdoor dining table should be sized for the covered space with adequate circulation around all sides — minimum 36 inches between the table edge and any wall, fence, or furniture behind it, to allow comfortable chair movement.
Smart tip: Choose a dining table with an umbrella hole in the center even if you initially plan to use it under a covered structure. The flexibility to use the table in an uncovered position with an umbrella gives the outdoor dining area far more versatility than a table without this option.
Mistake to avoid: Positioning outdoor dining too far from the indoor kitchen in a household that eats outdoors regularly. Carrying food from a distant kitchen across the yard for every meal, and carrying dishes back for every cleanup, reduces the pleasure of outdoor dining significantly. Position the outdoor dining area as close to the indoor kitchen access as the layout allows.
6. Layer Outdoor Lighting
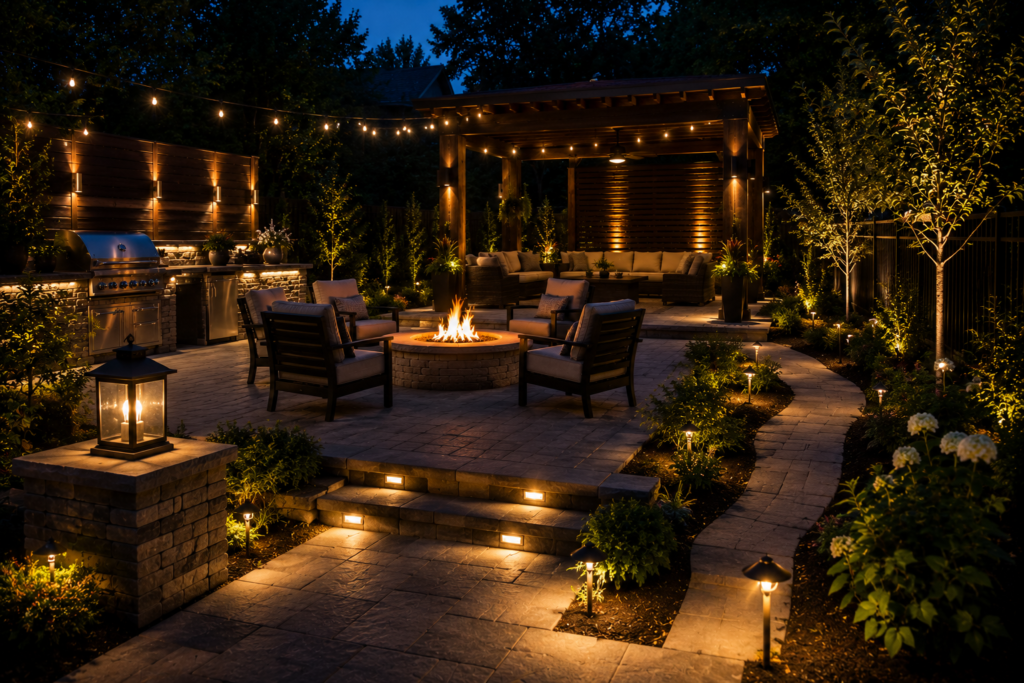
Best for: Any outdoor space used after dark — lighting transforms the evening outdoor experience completely
Outdoor lighting that works for evening use requires three layers: ambient (general illumination across the space), task (focused light where it’s needed — over the dining table, at the grill, beside reading chairs), and accent (lights that highlight features — planting, the fire pit, architectural elements). A single overhead light provides none of these adequately.
String lights — the warm-toned Edison-style bulbs strung across the covered outdoor area — have become the dominant ambient lighting choice for outdoor spaces because they create a soft, festive atmosphere that overhead recessed lights can’t replicate. They’re also relatively inexpensive, easy to install, and widely available.
Smart tip: Connect all outdoor lighting to smart plugs or a smart switch system that allows the lights to be controlled from a smartphone or voice command. The ability to turn on outdoor lighting before stepping outside, adjust brightness for different occasions, and set schedules makes outdoor lighting consistently useful rather than occasionally used.
Mistake to avoid: Using standard indoor extension cords to power outdoor lighting. Indoor-rated cords are not weatherproof — they create shock and fire hazards when used outdoors permanently. Use outdoor-rated extension cords and outdoor-rated fixtures specifically, and route all permanent electrical connections through properly weatherproofed junction boxes.
7. Add a Water Feature
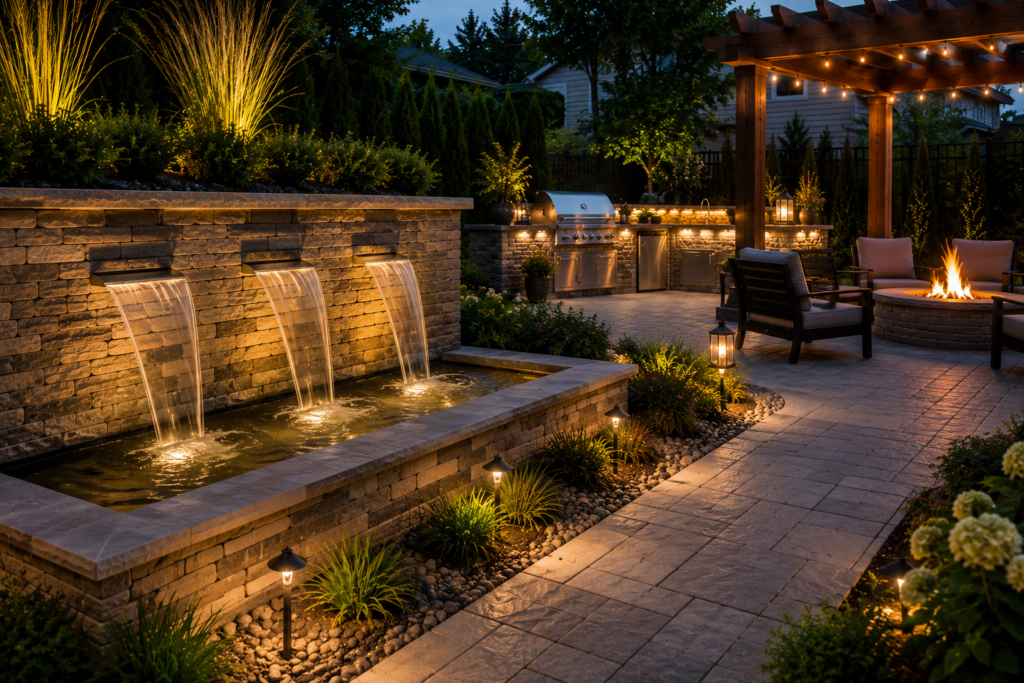
Best for: Outdoor spaces where ambient sound and a visual focal point enhance the experience
A water feature in an outdoor living space does two things simultaneously: it creates a sound environment that masks unwanted noise from traffic, neighbors, and the broader suburban environment; and it provides a visual focal point that draws the eye and creates a sense of destination within the space.
The scale of the water feature should suit the scale of the outdoor space. A small bubbling stone fountain suits a compact patio; a larger recirculating waterfall or pond suits a larger garden space with more visual range.
Smart tip: Position the water feature where it’s audible from the main seating area — the acoustic benefit of moving water depends on being within the sound’s effective range. A water feature that can’t be heard from the seating area provides visual interest only, losing the sound masking and atmospheric quality that makes water features genuinely valuable in outdoor living spaces.
Mistake to avoid: Installing a water feature without planning its maintenance. Fountain basins collect debris, algae, and evaporation requires regular topping up. A feature that’s difficult to access for cleaning becomes neglected — a neglected water feature looks worse than no water feature. Design easy access for cleaning and maintain it on a regular schedule from the first season.
8. Create Privacy with Screens and Plants

Best for: Urban and suburban outdoor spaces where neighboring properties are close — privacy is the most common barrier to year-round outdoor use
An outdoor space that feels overlooked gets used less than one that feels private. Creating a sense of enclosure — through planted screens, privacy panels, outdoor curtains on a pergola, or a combination of these elements — converts an exposed outdoor space into a genuine retreat that feels separate from the surrounding environment.
Planted privacy screens of bamboo, tall grasses, or evergreen shrubs provide soft, natural enclosure that improves with time as the planting fills in. Structural screens of timber, metal, or composite panels provide immediate, year-round privacy regardless of season.
Smart tip: Use a combination of structural panels for immediate privacy and planting for long-term softening. A timber privacy screen provides instant enclosure; climbing plants or tall grasses planted at its base progressively soften its appearance over time. The combination achieves both immediate and long-term privacy quality in a way that either element alone cannot.
Mistake to avoid: Planting tall hedging or trees too close to the outdoor living structure. Roots from large plants eventually damage paving, foundations, and drainage. Position any significant tree or large shrub planting at least 10 feet from any outdoor structure — further for species known for aggressive root systems.
9. Build an Outdoor Bar
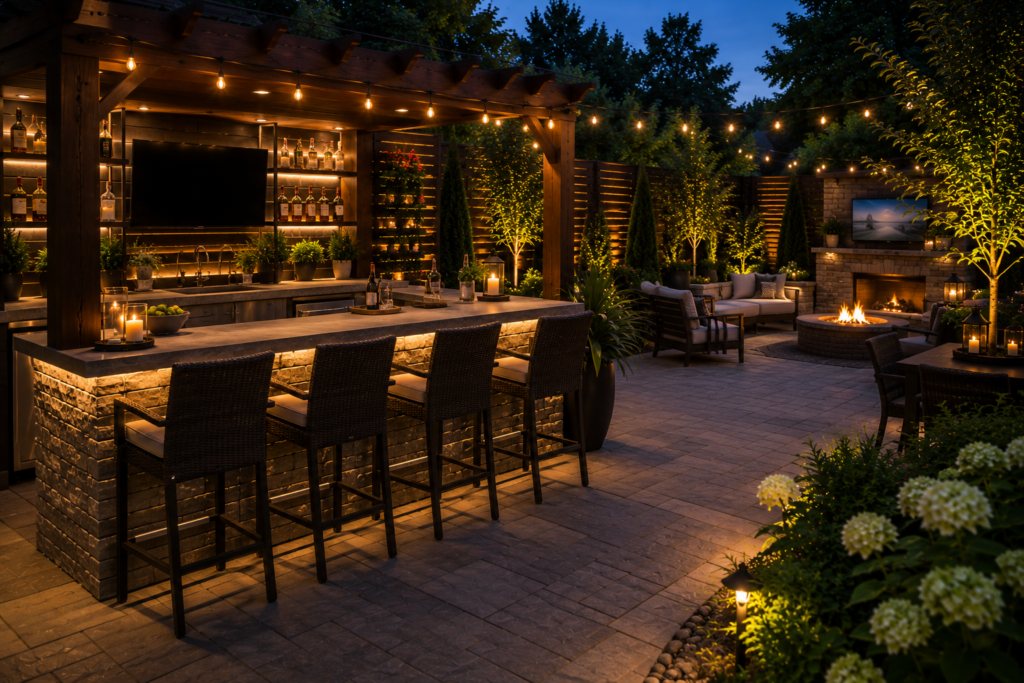
Best for: Households that entertain guests — an outdoor bar creates a social hub that organizes outdoor gatherings
An outdoor bar — a counter-height surface with bar stool seating on one side and serving equipment, refrigeration, and storage on the other — creates a social focal point that organizes outdoor entertaining. Guests gather at the bar naturally, the host serves from a defined position, and the drinks and ice have a permanent organized home rather than being arranged on whatever surface is available.
Even a modest outdoor bar — a counter-height shelf with bar stools, a small refrigerator beneath, and a simple ice bucket setup — creates the social dynamic of a proper bar without the cost of a full outdoor kitchen.
Smart tip: Position the outdoor bar between the indoor kitchen access and the main seating area so it’s convenient for restocking from inside while being accessible from all seating positions. A bar that requires guests to move away from the main social area to access drinks creates a traffic pattern that fragments the gathering.
Mistake to avoid: Building an outdoor bar with insufficient depth for practical use. A bar counter less than 18 inches deep doesn’t accommodate the ice bucket, bottle storage, and serving space needed for actual bar use. Minimum 20 to 24 inches of depth allows adequate working space on the serving side while maintaining the visual proportion of a proper bar counter.
10. Install a Pizza Oven

Best for: Households that cook together — a pizza oven creates one of the most engaging outdoor cooking experiences available
A wood-fired outdoor pizza oven creates a genuinely social cooking experience — making pizza is interactive, the fire is visually compelling, and the results are dramatically better than any indoor oven can achieve. The high temperatures of a wood-fired pizza oven (700 to 900°F) produce the charred, crisp base and fast-melted toppings of authentic Neapolitan pizza in 60 to 90 seconds per pizza.
Pizza ovens also function as versatile outdoor ovens beyond pizza — roasting, bread baking, and slow cooking in the residual heat after the pizza session are all possible in a well-designed pizza oven.
Smart tip: Build the pizza oven on a dedicated stand or counter at working height (34 to 36 inches from the floor to the oven mouth) rather than placing a portable oven directly on a table. Working height access is essential for comfortable pizza loading and retrieval — bending to a low oven with 900°F interior temperatures and a long pizza peel is awkward and potentially dangerous.
Mistake to avoid: Lighting a wood-fired pizza oven to full temperature on its first use without a curing process. New pizza ovens — particularly those with a mortar dome — need a series of progressively hotter fires to cure the mortar and drive out moisture without cracking. Follow the manufacturer’s curing schedule specifically — skipping it risks structural cracking that’s difficult to repair.
11. Add Outdoor Heating Solutions
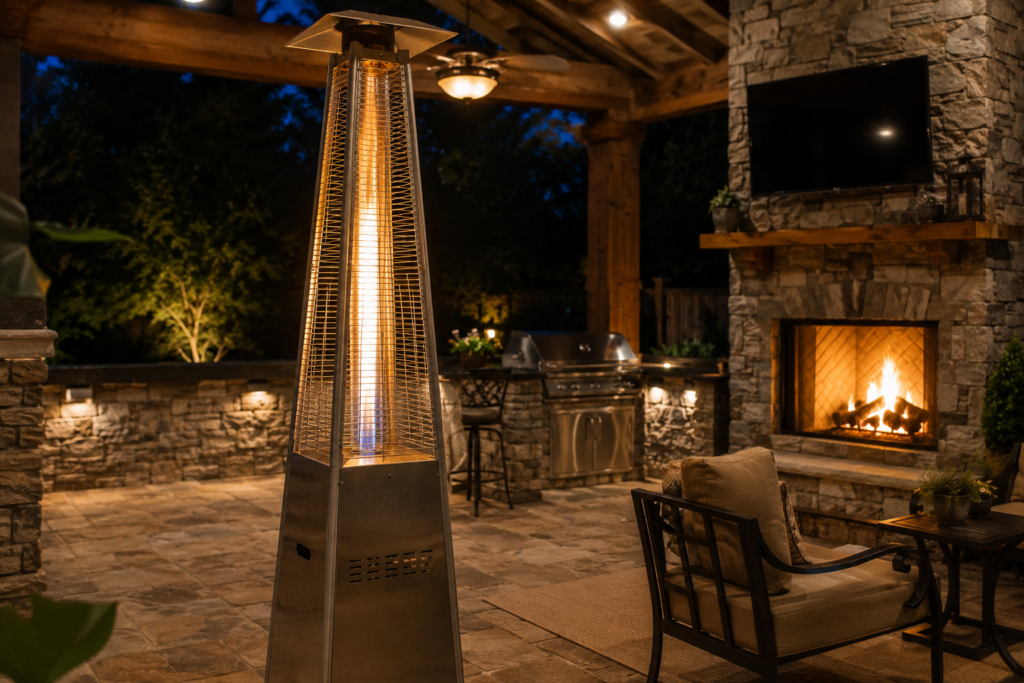
Best for: Extending the outdoor season into cool evenings and cold-weather months — without heat, outdoor living ends when temperatures drop
Outdoor heating extends the usable outdoor season by two to four months in most temperate climates. The choice of heating system depends on the covered structure and how cold the winters get.
Freestanding propane heaters: the most flexible option — positioned where needed, stored when not in use, no installation required. Effective to approximately 40°F ambient temperature. Wall-mounted infrared heaters: the most efficient option — they heat objects and people directly rather than heating air that disperses. More effective in exposed, breezy conditions than propane heaters. In-ceiling overhead heaters: the most integrated option — mounted above the seating area, they provide consistent warmth without any floor footprint. Ideal for fully covered outdoor rooms.
Smart tip: Choose infrared heaters for covered pergola and patio applications — they’re more efficient than propane heaters in partially open structures where warm air disperses. Infrared heats people and surfaces directly; the warm air produced by convection heaters blows away in any breeze, reducing effectiveness significantly in exposed outdoor spaces.
Mistake to avoid: Using propane or natural gas heaters inside a fully enclosed outdoor structure without adequate ventilation. Combustion heaters in enclosed spaces produce carbon monoxide — a genuinely dangerous gas with no smell or color. Only use combustion heaters (gas, propane, wood) in spaces with adequate air exchange. Electric infrared heaters are safe in enclosed outdoor rooms.
12. Create a Shade Sail or Canopy
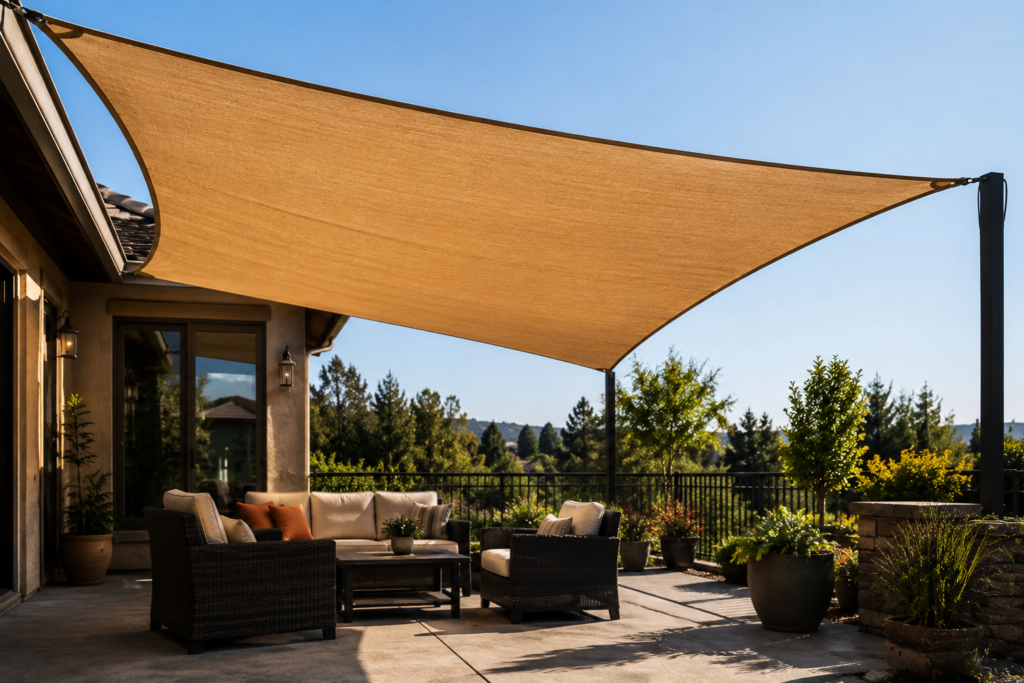
Best for: Outdoor spaces without a permanent covered structure — shade sails provide contemporary sun protection at lower cost
A shade sail — a tensioned fabric panel stretched between anchor points — provides effective sun protection with a contemporary aesthetic that permanent structures can’t achieve. Shade sails can be arranged in overlapping configurations that create complete overhead coverage, or in offset arrangements that provide partial shade with visual interest.
High-quality shade sails (HDPE fabric with UV blocking rating of 90 to 95%) block the majority of harmful UV radiation while remaining breathable — they don’t trap heat beneath them the way solid covers do.
Smart tip: Tension shade sails at an angle rather than horizontally. A tilted sail sheds rain more effectively, catches wind more elegantly, and creates a more dynamic visual composition than a flat horizontal installation. A 20 to 30 degree angle from horizontal is the standard installation recommendation for both drainage and aesthetics.
Mistake to avoid: Mounting shade sail anchor points in insufficient structural supports. A large tensioned sail experiences significant wind load — the anchor points need to be able to resist both the tensioning force and additional wind loading without pulling out of the wall, post, or ground anchor. Have a structural engineer or experienced installer assess anchor point adequacy for large shade sail installations.
13. Build a Gazebo
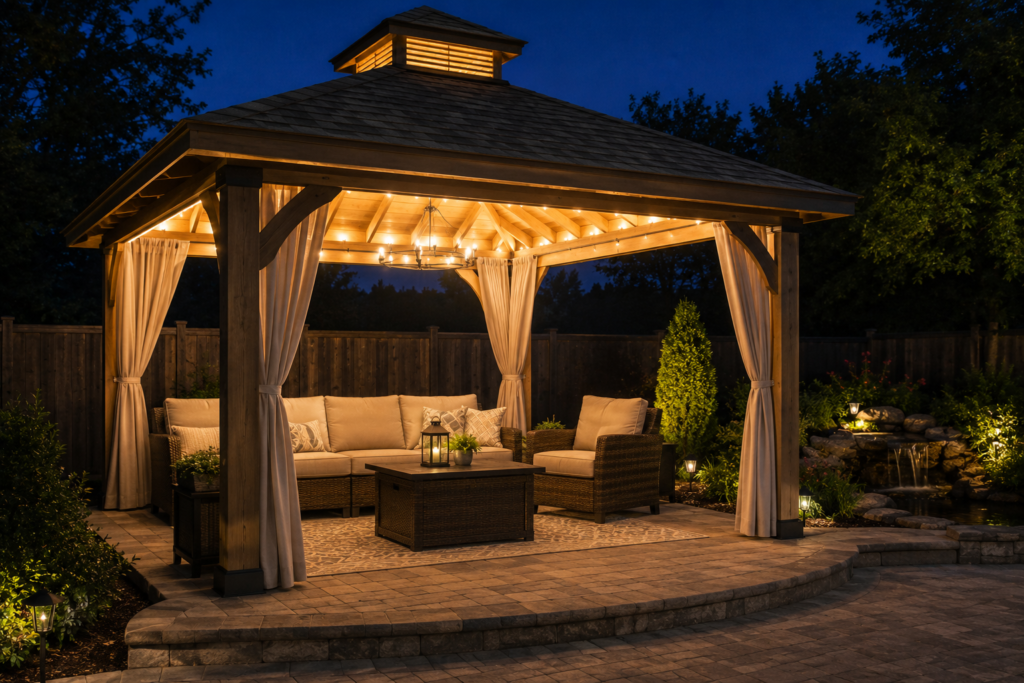
Best for: Outdoor spaces needing a fully enclosed, weather-protected structure — the gazebo is the most complete outdoor room available
A gazebo — a freestanding structure with a solid roof and open or screened sides — provides the highest level of weather protection available in an outdoor structure short of a full indoor room. The enclosed quality of a gazebo creates a distinct outdoor room that’s separate from the main yard — a destination within the garden that has its own atmosphere.
Screened gazebos — with insect screening on all open sides — solve the most common summer outdoor living problem (insects) while maintaining the air circulation and visual connection with the garden that make outdoor spaces enjoyable.
Smart tip: Size a gazebo for a specific purpose rather than as a general outdoor room. A 10×12 foot gazebo works well as a dedicated outdoor dining room. A 12×14 foot gazebo suits a combined lounge and dining function. A gazebo that’s too large for its intended use loses the enclosed, intimate quality that makes the structure valuable.
Mistake to avoid: Siting a gazebo in a position that makes it feel isolated from the main outdoor living area. A gazebo positioned too far from the house or from other outdoor spaces gets used infrequently because it requires deliberate effort to reach. Position the gazebo as a natural extension of the main outdoor space — connected by a clear path and visible from the house interior.
14. Design a Wellness Outdoor Space

Best for: Households prioritizing health and mental wellbeing — outdoor wellness features are one of the fastest-growing home improvement categories
Outdoor wellness spaces — areas specifically designed for yoga, meditation, cold plunge, hot tub use, or sauna — extend the function of outdoor living beyond entertaining and dining into the territory of daily wellbeing practice. A dedicated outdoor yoga deck, a compact cold plunge tub adjacent to a hot tub, or a garden sauna creates a daily ritual that increases the frequency of outdoor use significantly.
Cold plunge pools — compact tanks of cold water used for cold water immersion therapy — have become one of the most requested outdoor additions because of their compact footprint (most are approximately bathtub-sized), their health associations, and their ability to be paired with a hot tub or sauna for contrast therapy.
Smart tip: Position wellness outdoor spaces in the most sheltered, private area of the outdoor space — away from sightlines from neighboring properties and from the more public entertaining areas. The introspective quality of yoga practice, meditation, and cold plunge works best in a context of genuine privacy rather than in the same zone as a social outdoor kitchen or fire pit.
Mistake to avoid: Installing a hot tub or cold plunge without planning for drainage and water management. Hot tubs require periodic full draining and refilling — the waste water needs somewhere to go that won’t saturate the surrounding landscape. Cold plunge pools are typically smaller and easier to manage, but still require a drainage plan as part of their installation.
15. Add an Outdoor TV and Entertainment
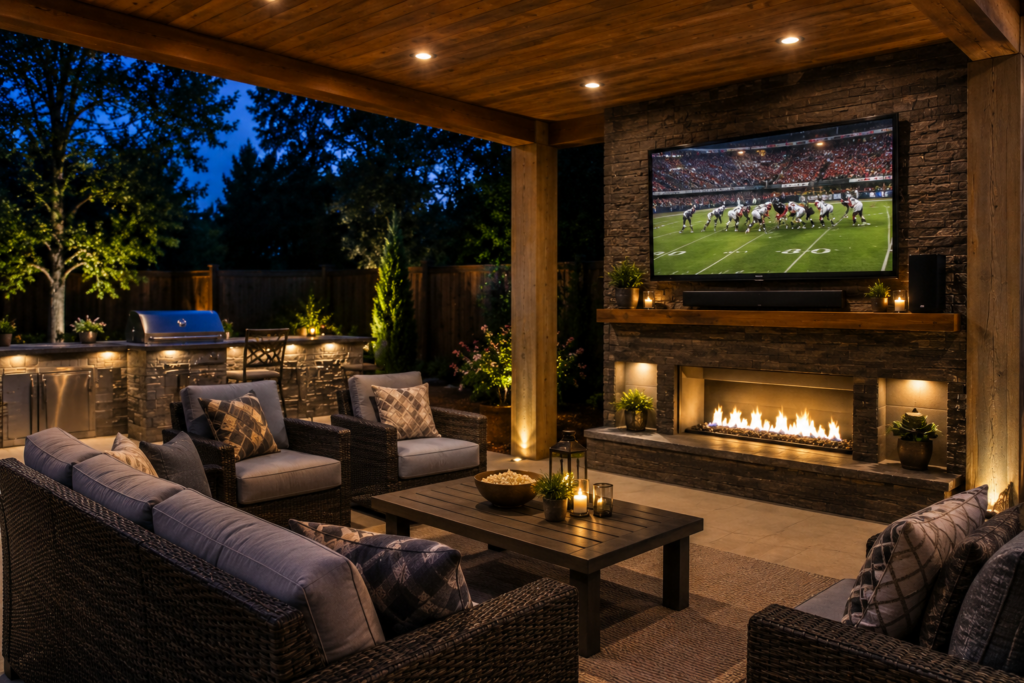
Best for: Households that want to extend indoor entertainment activities to the outdoor space — an outdoor TV completes the outdoor living room
A weatherproof outdoor television under a covered patio — with weatherproof speakers for audio — converts the outdoor living space into a genuine entertainment venue that can accommodate sports viewing, movie nights, and gaming alongside traditional outdoor activities. The outdoor entertainment system is particularly valuable during seasons when the weather is comfortable but not ideal for active outdoor pursuits.
Weatherproof televisions feature anti-glare screens optimized for outdoor viewing in varying light conditions, temperature management systems for extreme hot and cold operation, and corrosion-resistant construction for permanent outdoor installation.
Smart tip: Size the outdoor television for the viewing distance from the primary seating. A television that’s adequate for an indoor living room at 12 feet may be too small for an outdoor space where seating is more spread out. Use the standard viewing distance guideline (screen size in inches divided by 0.55 = recommended viewing distance in inches) to size the screen for the actual outdoor seating distance.
Mistake to avoid: Installing an outdoor television in a position exposed to direct rain without adequate overhead protection. Even weatherproof televisions are rated for weather resistance, not full submersion — they need overhead shelter. A television installed under a pergola with a solid roof has adequate protection; one mounted on an exposed fence without any overhead cover deteriorates rapidly regardless of its weatherproof rating.
16. Use Outdoor Rugs and Soft Furnishings
Best for: Any outdoor space — rugs and soft furnishings convert an outdoor area into a room instantly
An outdoor rug beneath the seating area — defining the seating zone as a distinct space within the larger outdoor area — creates the visual and psychological quality of a room rather than furniture placed outside. The rug anchors the furniture grouping, provides warmth underfoot, and adds color and pattern that the hard landscaping surface can’t provide.
Outdoor rugs made from polypropylene or recycled plastic material are fully weatherproof — they don’t absorb moisture, resist mold and mildew, and can be cleaned with a hose and brush.
Smart tip: Choose an outdoor rug large enough that all the furniture in the seating area fits on it with front legs at minimum — ideally with all four legs of every chair on the rug. A rug that’s too small for the furniture grouping makes the space look poorly proportioned and reduces the grounding effect that makes the rug valuable.
Mistake to avoid: Leaving outdoor rugs in position through extended periods of rain and wet weather without allowing them to dry. Even polypropylene rugs on permeable surfaces can develop mold beneath them if they stay wet for extended periods. Stand rugs on edge to drain after heavy rain, and store them away during extended wet periods.
17. Plant a Garden Border Around the Space

Best for: Any outdoor living space — a planted border converts a paved area into a garden room
A planted border around the edges of an outdoor living space — combining flowering perennials, fragrant herbs, grasses, and structural shrubs — softens the hardscape, introduces fragrance and color, attracts pollinators, and creates the enclosure that converts an open paved area into a garden room. The border provides a living frame for the outdoor space that changes through the seasons, keeping the area visually interesting year-round.
The border also acts as a transition between the outdoor living area and the broader garden — creating a layered edge that blurs the boundary between the defined living space and the natural landscape.
Smart tip: Include at least one fragrant plant in any outdoor living space border. Lavender, rosemary, sweet alyssum, gardenia (in warmer climates), or night-scented jasmine all provide fragrance that makes the outdoor space genuinely pleasurable to inhabit — fragrance is the sensory quality most often overlooked in outdoor space design and the one that most powerfully creates atmosphere.
Mistake to avoid: Planting the border too close to the paved surface without considering mature plant widths. Most border plants spread significantly as they establish — a lavender plant 12 inches wide at planting becomes 24 to 30 inches wide at maturity. Plants that encroach onto the paved surface require constant cutting back. Allow adequate width between the pavement edge and the planted border for mature plant spread.
18. Build Smart Storage Solutions
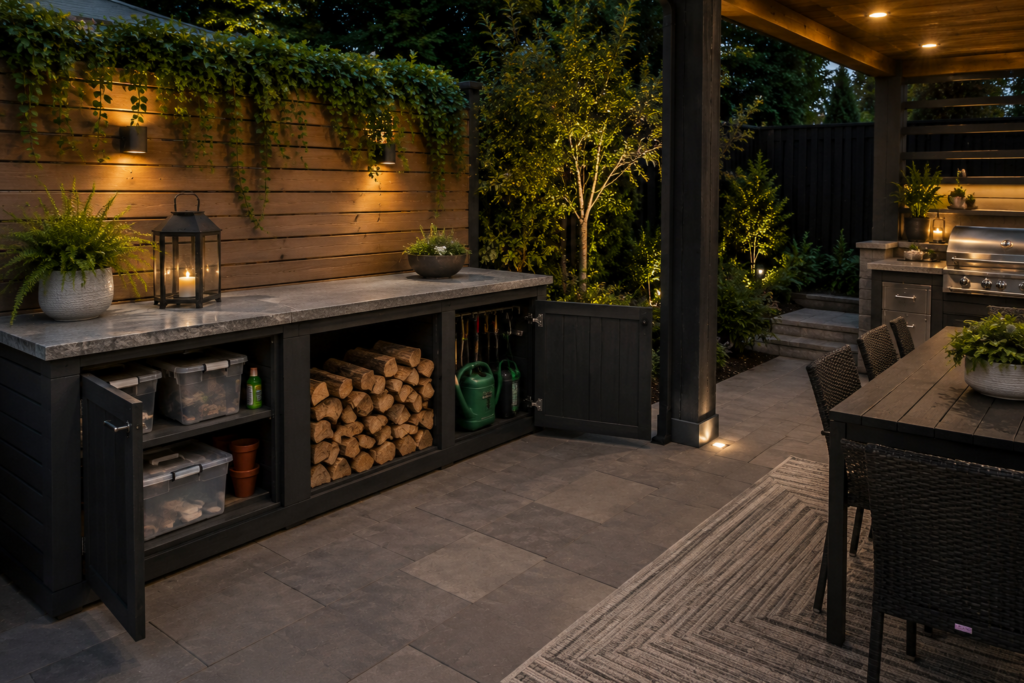
Best for: Any outdoor space used year-round — storage determines whether the space stays organized or becomes cluttered
An outdoor space without adequate storage accumulates clutter — cushions left on furniture deteriorate in rain, cooking tools pile up on counters, seasonal items occupy space needed for current use. Built-in storage benches, weatherproof deck boxes, and outdoor cabinetry solve the organization problem permanently while adding functional surfaces to the space.
Built-in storage benches serve double duty — additional seating capacity when the outdoor space hosts larger gatherings, and covered storage for cushions, outdoor games, and seasonal items when not in use as seating.
Smart tip: Size storage for the full inventory of outdoor items plus 30 percent extra capacity. Storage that’s full from day one is inadequate within one season as accessories, tools, and seasonal items accumulate. The outdoor space stays organized only when storage is generous enough to accommodate everything that belongs in it without compression.
Mistake to avoid: Using indoor furniture or storage products in an outdoor space. Indoor furniture — even solid wood furniture — is not rated for moisture exposure, UV radiation, and temperature cycling of outdoor conditions. It deteriorates rapidly and needs replacement within one to three seasons. Invest in outdoor-rated storage specifically from the beginning.
19. Create a Kids and Family Zone
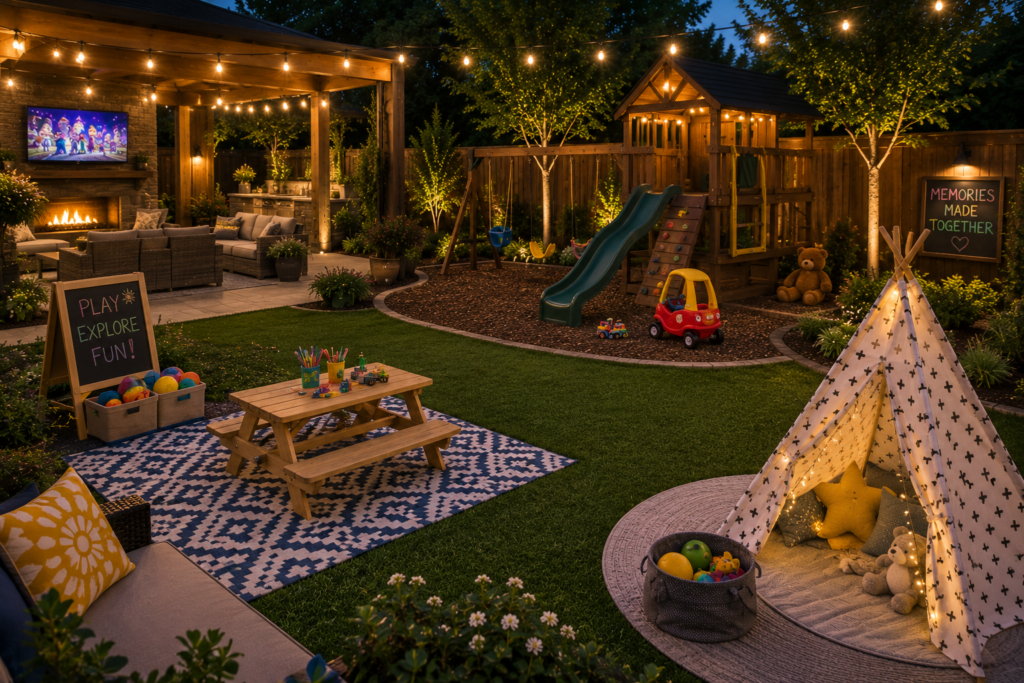
Best for: Families with children — a dedicated play area within the outdoor space keeps the whole family outdoors together
An outdoor living space that works for the entire family — with a play zone integrated into or adjacent to the adult living area — keeps family time outdoors rather than fracturing between adults outside and children inside. The play area can include a sandbox, a small water play feature, a climbing structure, or simply a defined grass area for active play — positioned where parents can supervise from the main seating area.
As children grow, the play zone can be repurposed — a sandbox becomes a planting bed, a swing set area becomes an additional seating zone. Designing with this evolution in mind prevents the play equipment from becoming a permanent feature in space that could be repurposed.
Smart tip: Use impact-absorbing surfacing (rubber mulch, sand, or engineered wood fiber) under any climbing structure or active play equipment — not the same hard paving as the adult seating area. Falls from play equipment onto hard paving cause significantly more serious injuries than falls onto impact-absorbing surfaces. The surfacing investment is worthwhile for any play area adjacent to hard landscaping.
Mistake to avoid: Positioning the children’s play area out of sight from the adult seating zone. A play area that can’t be seen from where adults sit forces a choice between supervising children and participating in adult conversation. Position play equipment within direct sightline of the main adult seating area to allow simultaneous supervision and adult engagement.
20. Plan Your Outdoor Space for All Seasons
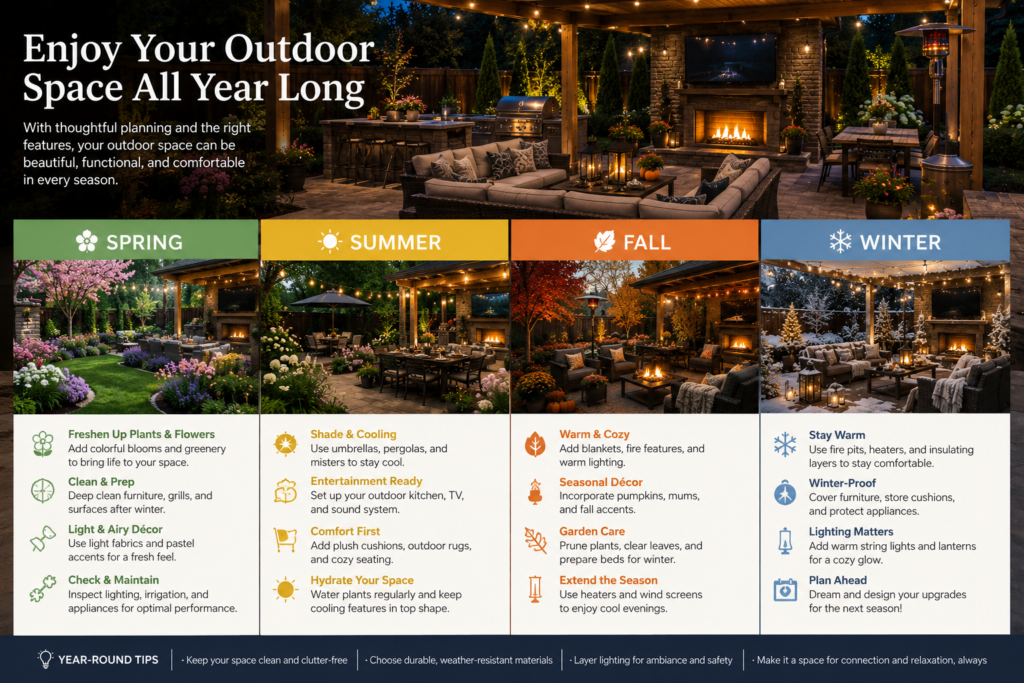
Best for: Anyone designing or redesigning an outdoor living space — seasonal planning prevents the most common outdoor living disappointments
An outdoor space that gets used year-round requires different elements at different times of year — and planning for all seasons from the beginning prevents the common pattern of investing in a beautiful summer space that sits unused for eight months of the year.
Summer: shade is the priority. Shade sails, pergola coverage, and strategic planting that blocks afternoon sun determine whether the outdoor space is usable during the hottest months. Heating extends the space into autumn and early winter — a fire pit or outdoor heater makes October evenings outside possible in most climates. The covered structure protects from spring and autumn rain that otherwise makes outdoor use impractical. Lighting extends use into the shorter evenings of autumn and winter.
The furniture materials determine whether year-round outdoor use is practical. Furniture that requires cushions to be stored every time rain threatens, or frames that rust or warp through winter, creates maintenance demands that discourage year-round use. Choose materials rated for permanent outdoor installation in your specific climate.
Smart tip: Design the transition between indoor and outdoor spaces as carefully as the outdoor space itself. A door that’s awkward to open when carrying food, a threshold that’s a trip hazard, or a step down that’s difficult to navigate in the dark all reduce how often the outdoor space gets used. A smooth, wide transition — ideally with the indoor and outdoor floors at the same level — makes the outdoor space feel like a natural extension of the interior.
Mistake to avoid: Designing the outdoor space for one primary use and ignoring others. A space designed exclusively for large-scale entertaining gets used rarely — most households entertain on only a handful of occasions per year. Design the space for daily use first (morning coffee, quiet reading, everyday family meals) and entertaining capacity second. A space that’s genuinely used daily for ordinary purposes will also be ready and comfortable for occasional entertaining.
Before You Start
- Assess how you actually spend time outdoors. The most successful outdoor spaces are designed for how people actually use them — not how they imagine they might. Do you primarily want to dine outdoors, lounge, cook, or entertain? Design around the real answer.
- Check local regulations. Outdoor structures — pergolas, gazebos, outdoor kitchens — often require building permits above certain sizes. Check permit requirements before beginning any structural outdoor project.
- Plan for drainage. Any covered outdoor area needs a drainage plan for rainwater. Water that pools on a patio or in a covered structure creates both structural problems and an unusable space during rain events.
- Budget for quality materials. Outdoor materials face conditions that indoor materials don’t — UV radiation, moisture, temperature cycling. Budget for materials rated for outdoor use from the beginning; replacing cheap materials within two to three seasons costs more than buying appropriate materials initially.
Conclusion
An outdoor living space that gets used year-round is one that was designed for year-round use from the beginning — with adequate shelter, a heat source for cool evenings, quality materials that don’t require constant maintenance, and enough versatility to serve the space’s actual daily use patterns alongside its occasional entertaining role. The investment in getting these fundamentals right pays back every time the outdoor space is used on a day when it otherwise wouldn’t have been — which, over the life of a well-designed outdoor space, amounts to hundreds of additional days of outdoor living.