A pergola is one of the most transformative additions you can make to any outdoor space. It creates an instant sense of architecture, defines a zone within the yard, provides partial shade, and gives climbing plants a structure to grow on — all while adding real value to the property. Whether your backyard is large or small, a pergola designed for the space and furnished thoughtfully becomes the outdoor room you’ll use more than any other.
These 20 pergola ideas cover every style, every material, and every use — from simple weekend builds to fully equipped outdoor living spaces that rival anything indoors.
1. Attach a Pergola to the House
Best for: Backyards where a seamless connection between indoor and outdoor living is the priority
An attached pergola — built with one side fixed to the house wall and the opposite side supported by posts — is the most functional pergola configuration available. It extends the living space of the house directly into the garden, creates a covered transition zone between inside and outside, and benefits from the structural support of the house wall on one side.
The attached configuration also simplifies construction and reduces material costs compared to a freestanding structure of equivalent size, since two of the four required supports are replaced by the house wall attachment.
Smart tip: Align the pergola roof beams with the ceiling height of the adjacent interior room where possible. When the indoor and outdoor ceiling lines match, the transition between inside and outside feels seamless and intentional rather than like an addition bolted to the back of the house.
Mistake to avoid: Attaching a pergola to the house without checking local planning permissions and building regulations. In many areas, structures attached to the main dwelling require permits that freestanding garden structures do not. Check before building to avoid costly removal or modification later.
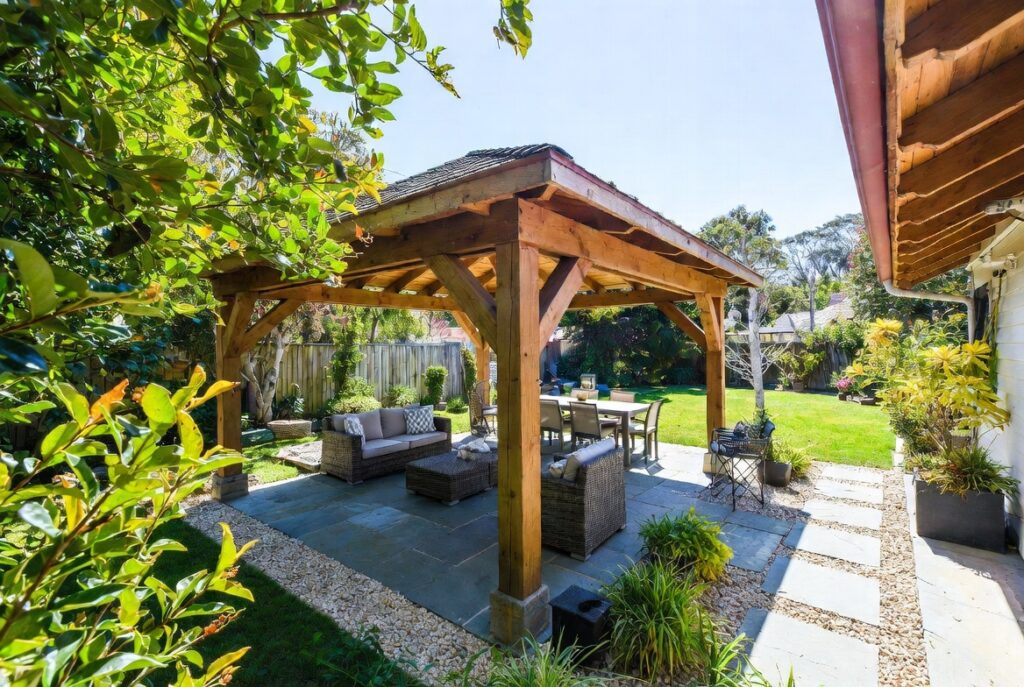
2. Build a Freestanding Pergola Over a Patio
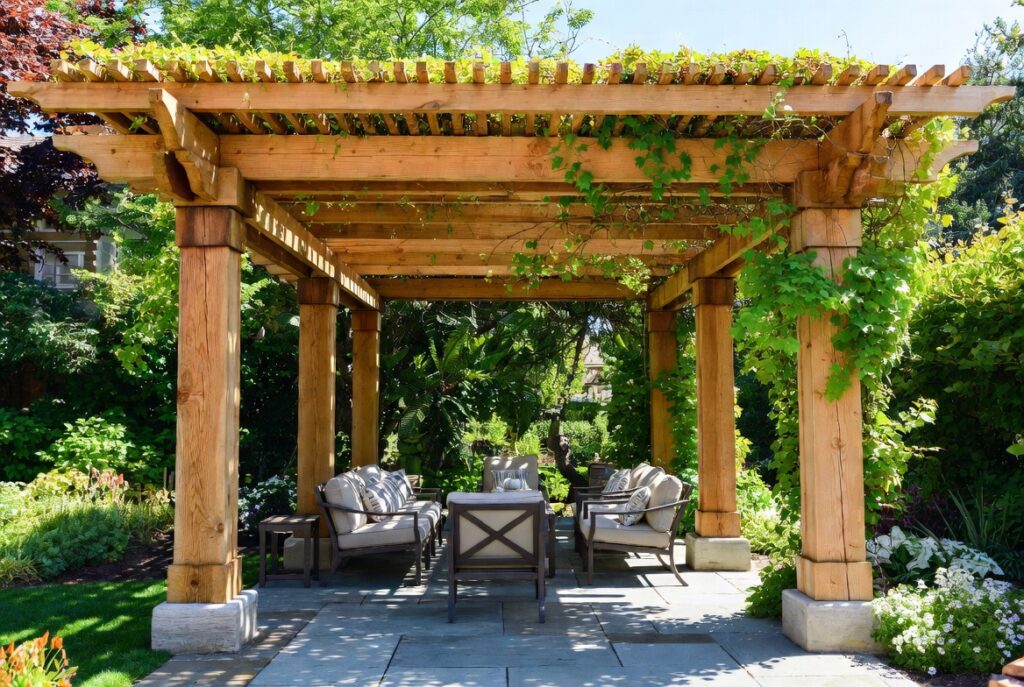
Best for: Existing patios that need definition, shade, and a sense of enclosure without structural attachment to the house
A freestanding pergola positioned over an existing patio creates an outdoor room within the garden — a defined, purposeful space that feels separated from the rest of the yard. The four posts anchor the space visually and practically, and the overhead structure provides partial shade and a framework for lighting, plants, and decorative elements.
Freestanding pergolas offer more flexibility in positioning than attached structures — they can be placed anywhere in the garden where they make functional and aesthetic sense, and they can be relocated (with significant effort) if the garden layout changes.
Smart tip: Size the pergola to match the patio beneath it — the pergola footprint should align with or slightly exceed the patio perimeter. A pergola that’s smaller than the patio it covers creates an awkward visual relationship; one that matches or slightly overhangs the patio creates a sense of the structure belonging naturally to its location.
Mistake to avoid: Setting pergola posts directly in soil without adequate concrete footings. Posts set in soil will move, lean, and rot over time. Always set posts in concrete footings dug below the frost line — the depth required depends on your climate and soil type.
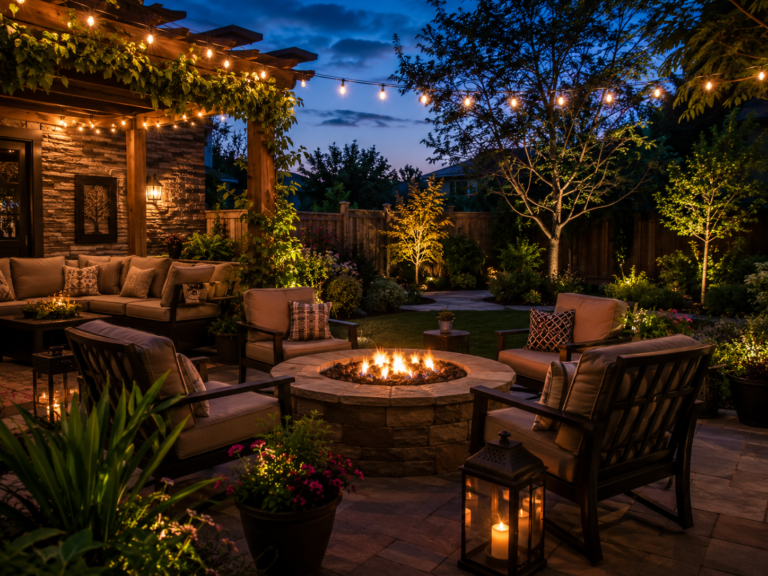
3. Hang String Lights for Evening Ambiance
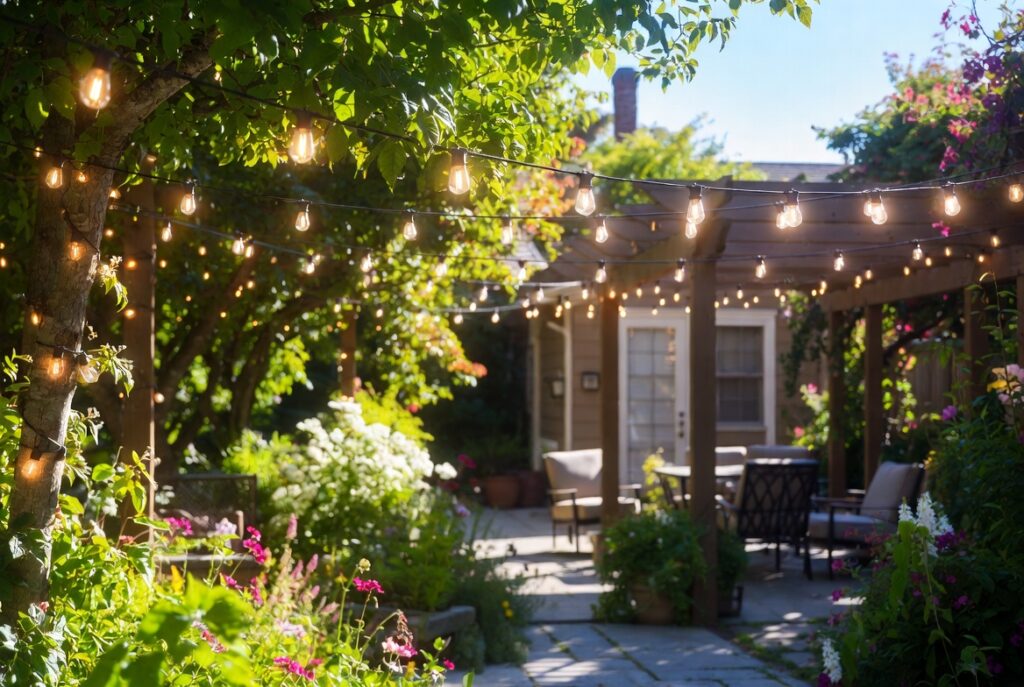
Best for: Any pergola used for evening entertaining or relaxation — string lights are the single most impactful pergola accessory
String lights draped across pergola beams transform the outdoor space after dark in a way that no other single addition achieves. They create warmth, define the space against the surrounding darkness, and produce exactly the kind of soft, diffused light that makes outdoor evenings feel genuinely magical rather than merely functional.
Warm white bulb string lights (Edison-style or globe bulbs) work best for pergolas — they produce a warm, amber glow that flatters people, plants, and furniture equally. Cool white or blue-tinted lights create a harsher effect that undermines the relaxed evening atmosphere.
Smart tip: Drape string lights in parallel runs across the pergola from beam to beam rather than in a single strand along the perimeter. Parallel runs create an overhead canopy of light that makes the pergola feel like a lit room; perimeter-only lighting creates a frame effect that leaves the center of the space dark.
Mistake to avoid: Using string lights that aren’t rated for outdoor use. Indoor string lights exposed to moisture will fail quickly and present a safety risk. Always use lights specifically rated for outdoor installation — they cost slightly more but are weatherproofed and will last through multiple seasons.
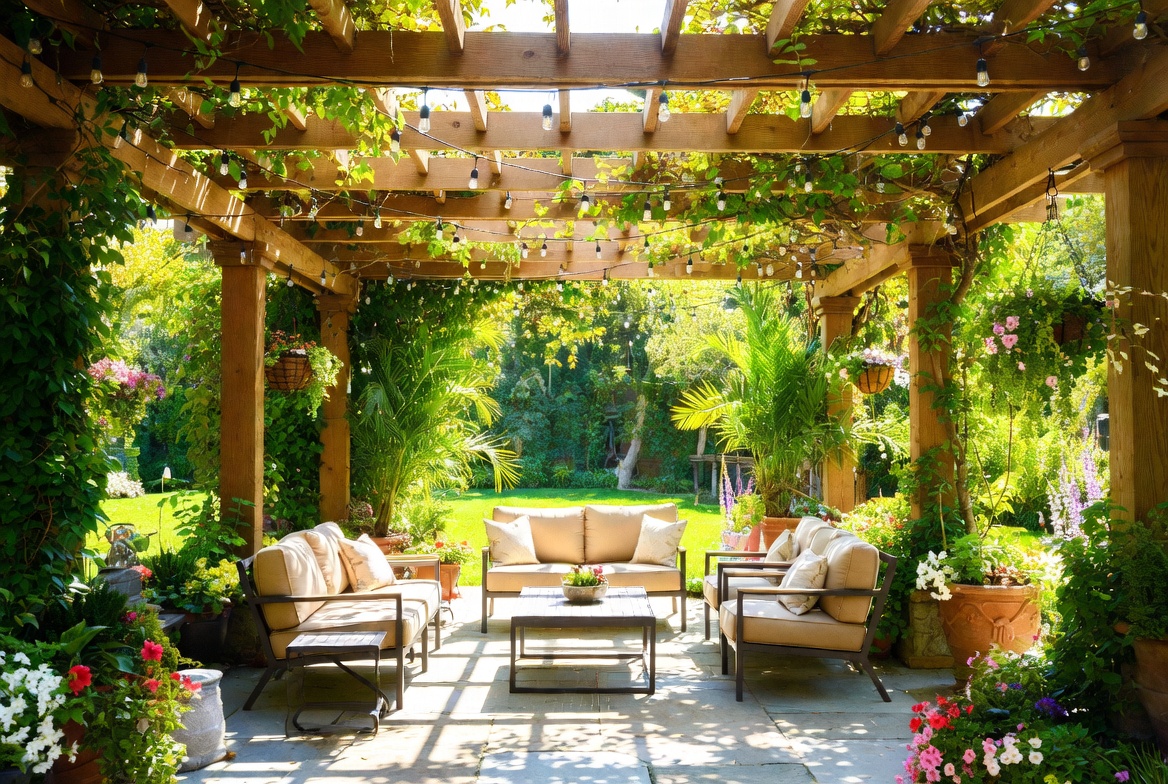
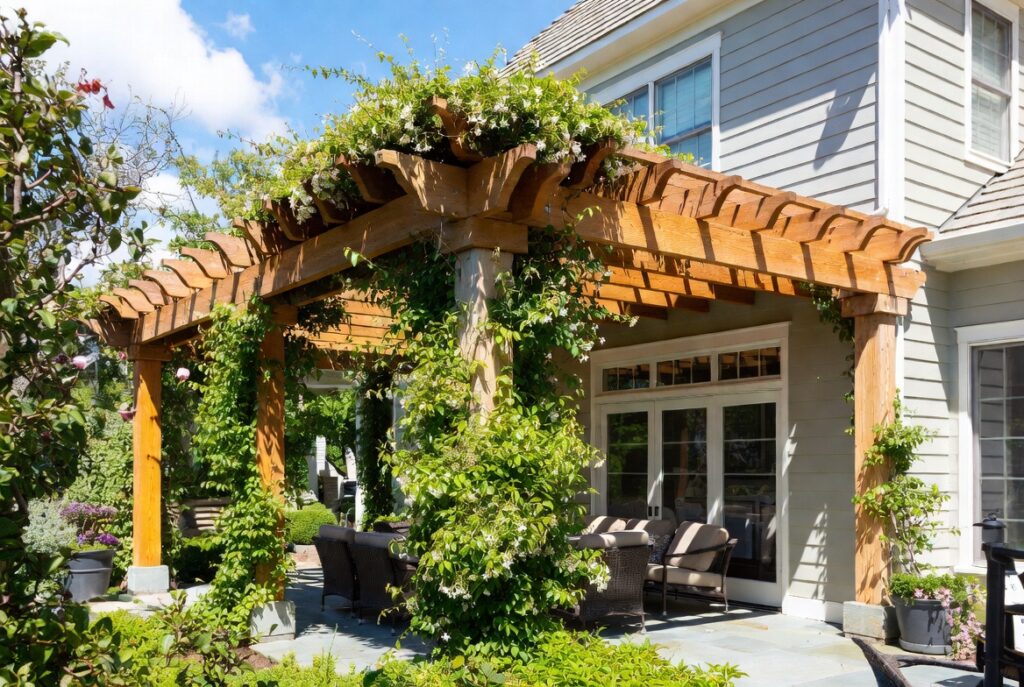
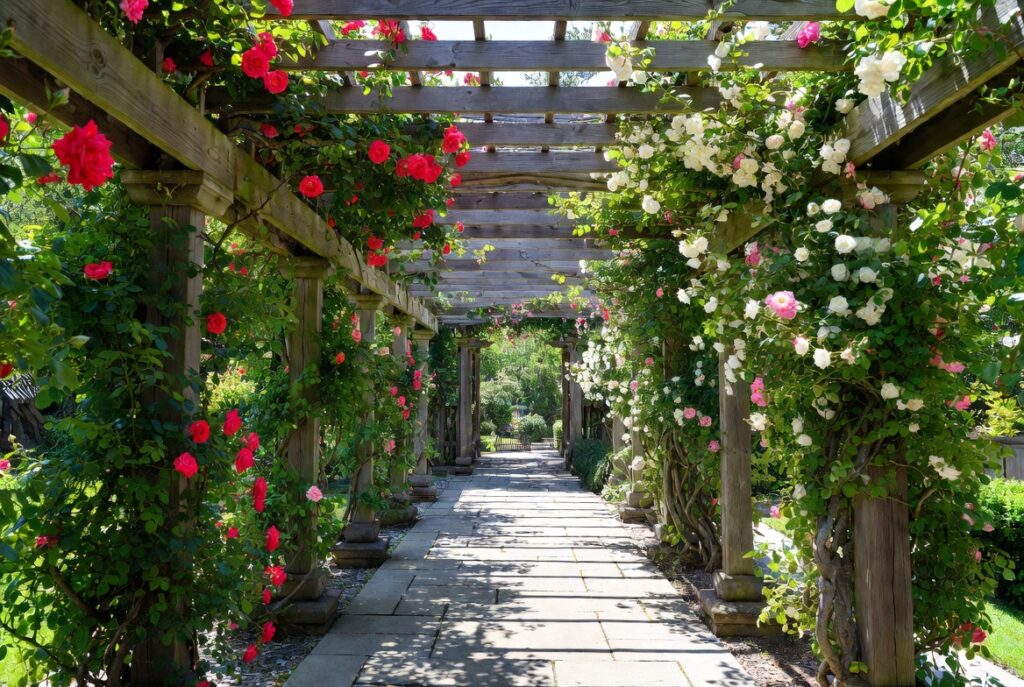
4. Grow Climbing Plants Up the Posts
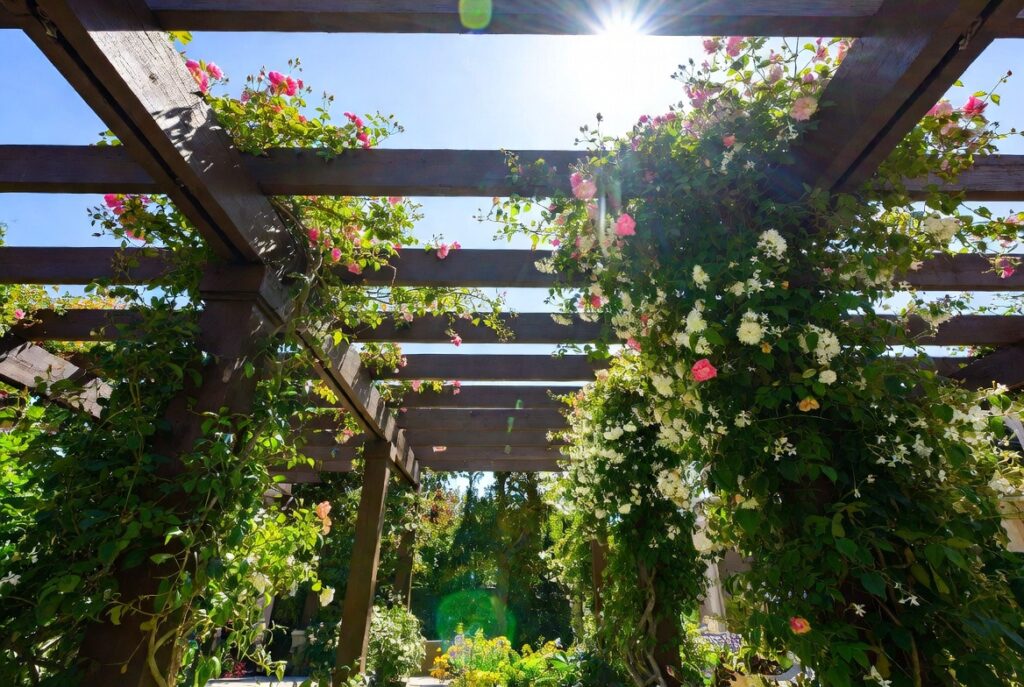
Best for: Any pergola where a natural, garden-integrated appearance is preferred over a purely architectural one
Climbing plants growing up pergola posts and across the overhead beams create the most beautiful and most naturalistic pergola appearance possible — turning a timber or metal structure into something that looks as though it has always been part of the garden. The plants provide seasonal interest, fragrance, shade through leaf cover, and the living quality that makes a pergola feel genuinely connected to the landscape around it.
Excellent climbing plants for pergolas include wisteria (spectacular in flower but vigorous — needs a strong structure), climbing roses, clematis, jasmine, honeysuckle, and grape vines. Choose based on your climate, desired fragrance, and how much coverage you want.
Smart tip: Plant climbers at the base of each post rather than just one or two posts. Four posts with climbers create a much more enveloping effect than one or two covered posts — the pergola becomes a green room rather than a structure with some plants growing on it.
Mistake to avoid: Underestimating the vigor of wisteria. It is one of the most beautiful pergola plants available but also one of the most aggressive — its stems can damage gutters, roots can affect foundations, and it requires annual pruning to keep in bounds. Only choose wisteria for a very sturdy pergola and if you’re prepared for the maintenance it requires.
5. Add Curtains or Shade Sails for Privacy
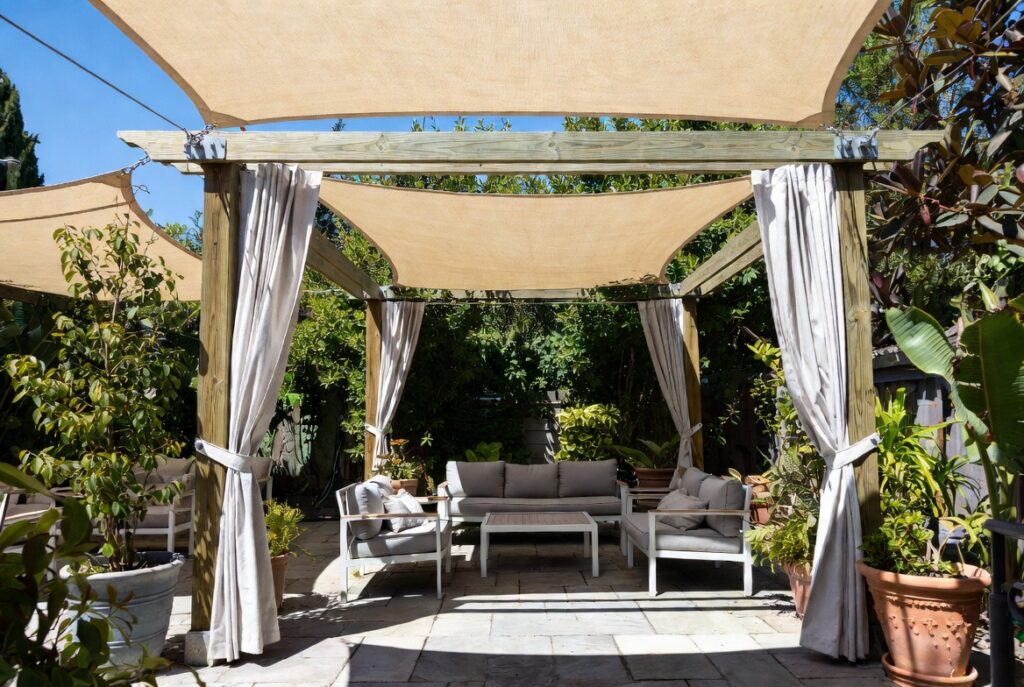
Best for: Pergolas overlooked by neighbors or positioned close to property boundaries
Outdoor curtains hung from pergola beams add privacy, reduce wind, provide additional shade, and create a dramatically more enclosed, room-like atmosphere beneath the structure. When drawn, they transform an open pergola into something approaching a proper outdoor room; when open, they frame the garden view and add a relaxed, luxurious quality to the space.
Use outdoor-rated fabric — canvas, Sunbrella, or similar UV and moisture-resistant materials. Natural linen and cotton look beautiful but will deteriorate quickly in outdoor conditions. Purpose-made outdoor curtains are available in a wide range of colors and are designed to withstand the conditions that indoor fabrics cannot.
Smart tip: Install curtain tracks or tension wire along the outer beam of the pergola rather than using individual hooks. A smooth track allows curtains to be drawn with a single pull and hangs them more cleanly than individual hooks, which tend to bunch and sag over time.
Mistake to avoid: Using curtains in very exposed locations subject to strong winds without a secure tie-back system. Unsecured outdoor curtains in windy conditions flap constantly, wear quickly, and can wrap around the pergola structure in ways that damage both the fabric and the posts.
6. Create a Pergola Dining Area
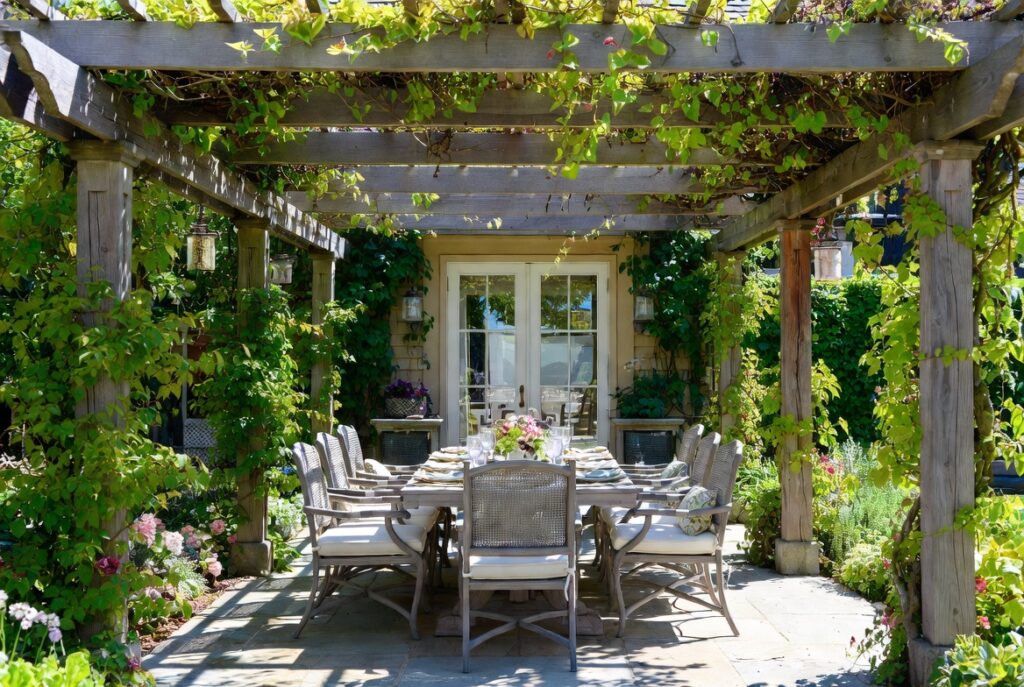
Best for: Families who eat outdoors regularly and want a dedicated, sheltered outdoor dining space
A pergola positioned over an outdoor dining table creates one of the most used and most enjoyed spaces in any garden. The overhead structure provides partial shade during the day, a framework for string lights in the evening, and a defined sense of place that makes outdoor dining feel like a genuine occasion rather than simply eating outside.
Size the pergola to accommodate the dining table and chairs with comfortable clearance — a minimum of 90cm on all sides of the table for comfortable chair movement. A dining table for six typically requires a pergola of at least 3.5m x 3.5m.
Smart tip: Position the dining pergola within easy reach of the kitchen — ideally with a direct path or direct line of sight from the kitchen door. The most beautiful outdoor dining space loses its appeal quickly if carrying food to it requires a significant journey or navigating steps and obstacles.
Mistake to avoid: Building the dining pergola over a surface that becomes slippery when wet. Smooth stone, polished concrete, and some tiles become dangerously slippery in rain — particularly important if the pergola is used for dining with food and drink around. Choose textured paving or add anti-slip treatment to any smooth surface beneath a dining pergola.
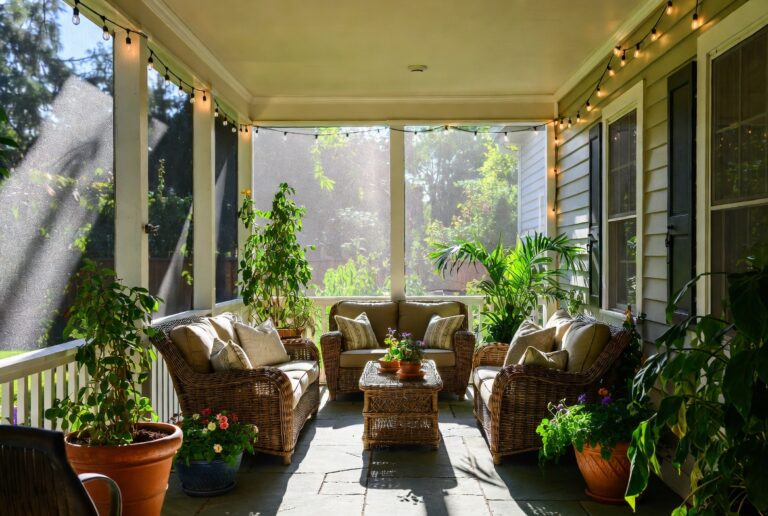
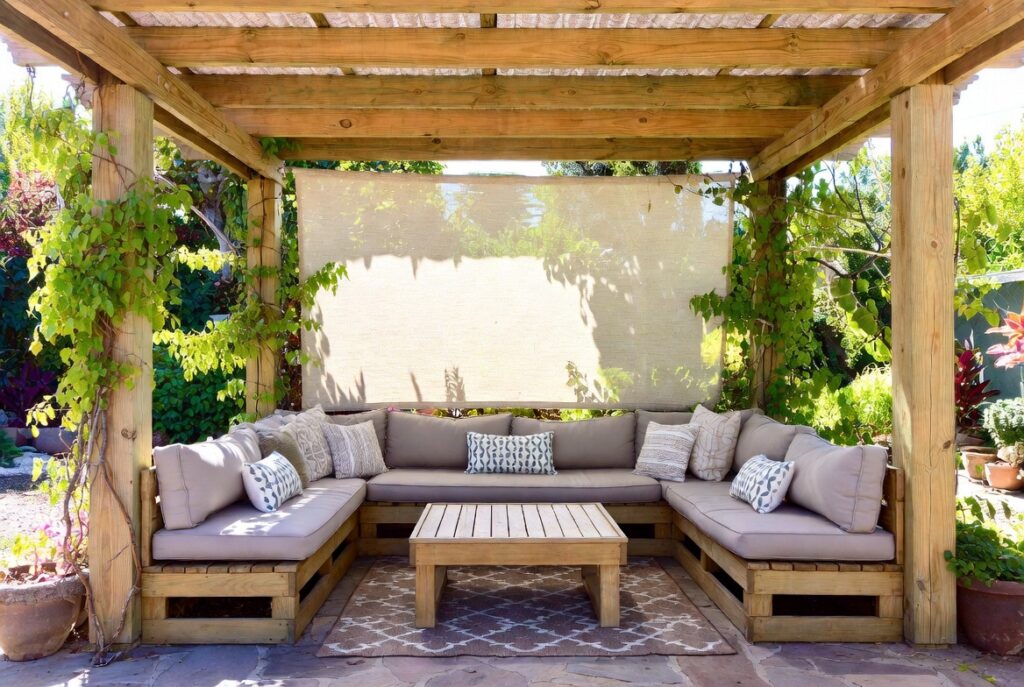
7. Design a Pergola Lounge Space
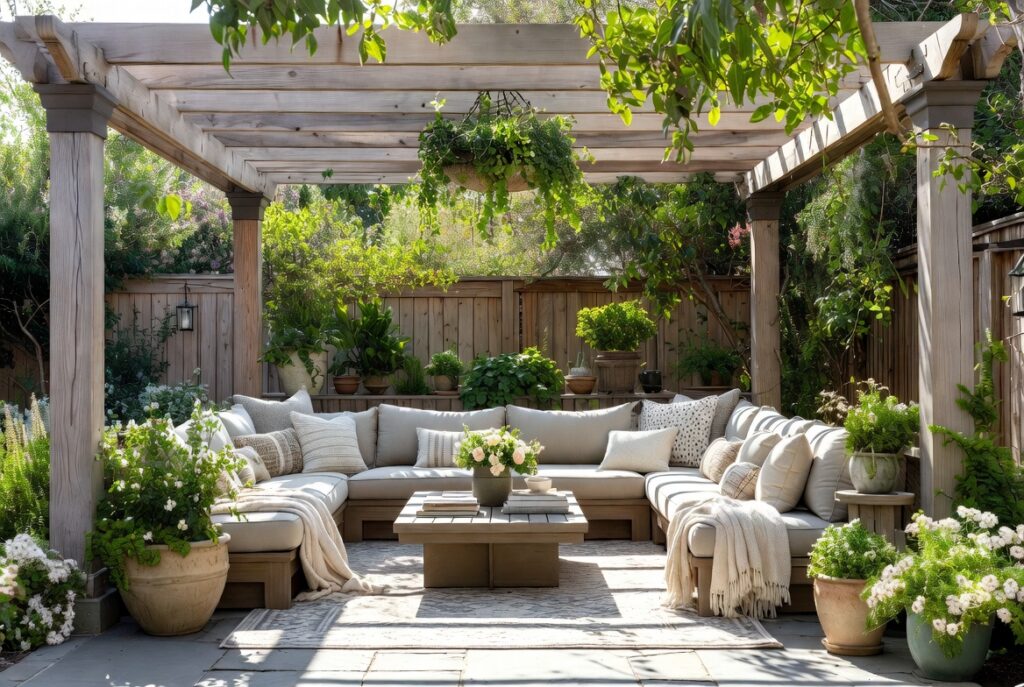
Best for: Homeowners who want a dedicated outdoor relaxation zone separate from the dining area
A pergola designed as an outdoor lounge — furnished with a deep sofa, armchairs, a low coffee table, and soft outdoor cushions — creates the most comfortable and most used outdoor living space possible. The overhead structure provides partial shade and a sense of enclosure that an open patio cannot offer, making the space genuinely inviting rather than merely available.
Choose weather-resistant furniture — rattan, teak, powder-coated aluminum, or polyrattan all withstand outdoor conditions well. Add outdoor cushions in UV-resistant fabric and a durable outdoor rug to define the zone and add the softness that makes it feel like a proper room.
Smart tip: Include a side table within reach of every seating position — a space without surfaces for drinks and books quickly becomes inconvenient. Built-in or fixed side tables are preferable to freestanding ones, which tend to migrate out of position and clutter the space.
Mistake to avoid: Furnishing the pergola lounge with indoor furniture. Even covered outdoor spaces experience moisture, UV exposure, and temperature variation that will destroy indoor furniture within one to two seasons. Always use furniture rated for outdoor use.
8. Use a Metal Pergola for Modern Style
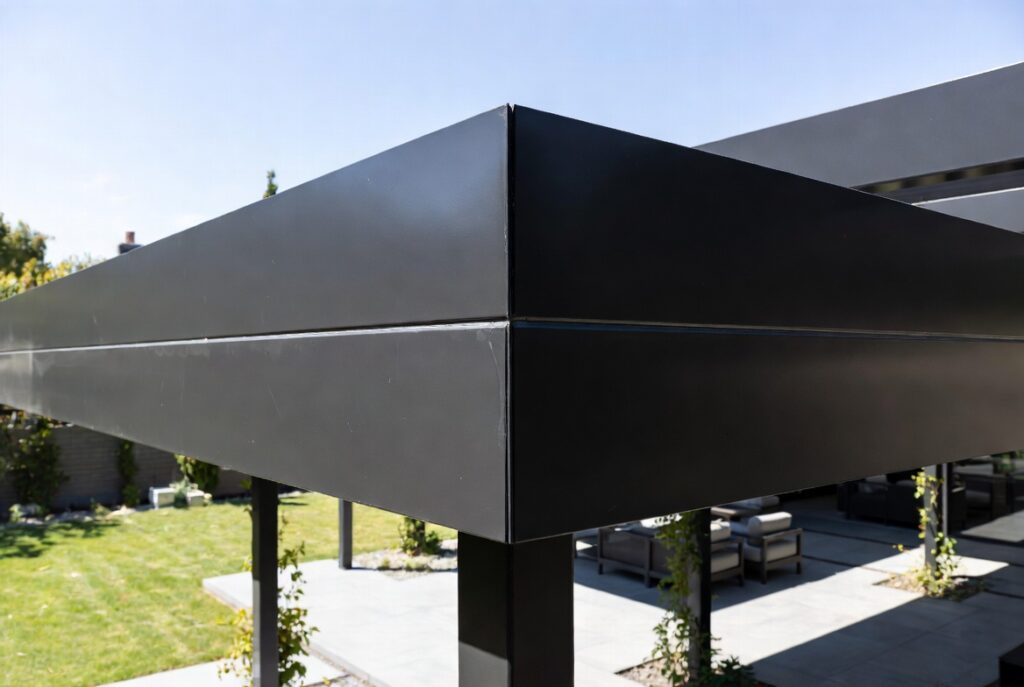
Best for: Contemporary homes, minimalist gardens, and outdoor spaces where a clean architectural line is the priority
A metal pergola — in powder-coated steel or aluminum — creates a sharper, more architectural aesthetic than timber and suits contemporary home styles particularly well. Metal pergolas have slim profiles that appear lighter and less imposing than equivalent timber structures, and their clean lines complement modern garden design without the traditional associations of wood.
Powder-coated finishes in black, dark grey, or anthracite are the most popular choices for contemporary metal pergolas — they suit modern architecture, weather well, and provide a neutral backdrop for planting and lighting.
Smart tip: Combine a black metal pergola frame with warm natural materials beneath it — timber decking, natural stone paving, and linen or canvas cushions. The contrast between the sharp metal framework and the warm natural materials creates the most visually sophisticated outdoor space possible.
Mistake to avoid: Choosing a cheap galvanized steel pergola kit without a quality powder coat finish. Unpainted or poorly coated steel will rust quickly in outdoor conditions, creating orange staining on paving and degrading rapidly. Always specify a quality powder coat or hot-dip galvanized finish for outdoor metal structures.
9. Build a Cedar or Redwood Pergola
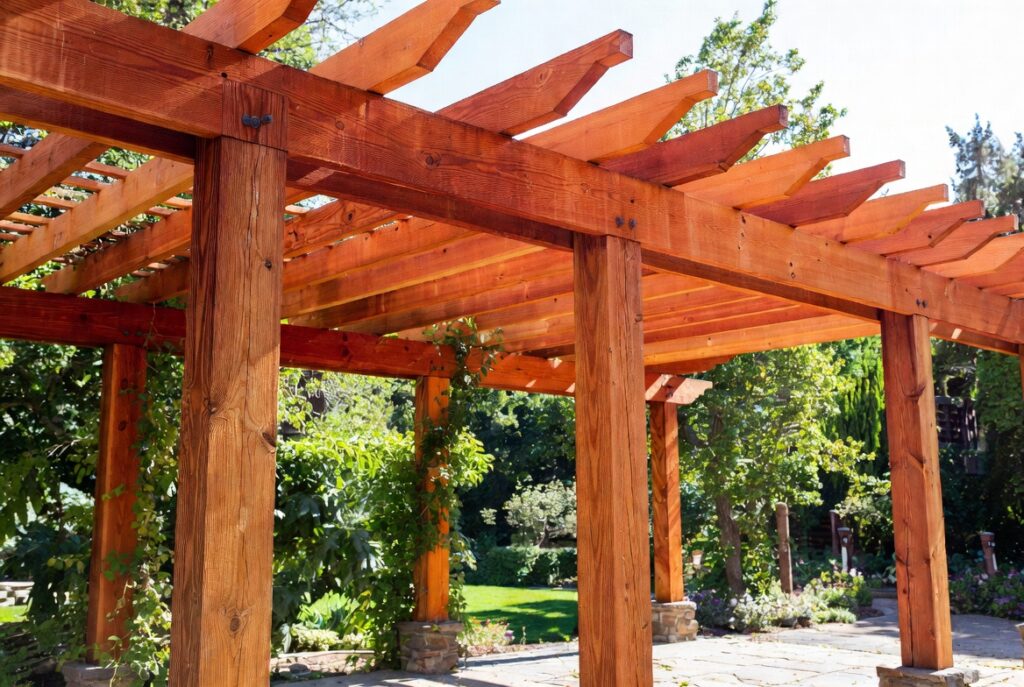
Best for: Traditional, cottage, or natural-style gardens where the warmth and character of natural timber is essential
Cedar and redwood are the finest natural timber choices for pergola construction — both are naturally rot-resistant, dimensionally stable, and beautiful in their own right without paint or stain. Cedar weathers to a distinguished silver-grey over time; redwood maintains a warm reddish tone. Both last decades with minimal maintenance and develop the kind of character that synthetic materials cannot replicate.
The natural oils in cedar and redwood repel insects and resist decay without chemical treatment — making them genuinely low-maintenance choices for garden structures.
Smart tip: Apply a penetrating oil or wood sealer to cedar or redwood pergolas every two to three years to slow the weathering process and maintain the timber’s natural warmth. If you prefer the silver weathered look, simply leave the timber untreated and it will develop its grey patina naturally within one to two years.
Mistake to avoid: Using pressure-treated pine as a substitute for cedar or redwood to save money. Pressure-treated pine is structurally adequate but significantly less attractive, more prone to warping and checking, and lacks the natural decay resistance of cedar and redwood. The cost saving is rarely worth the aesthetic compromise for a visible garden feature.
10. Cover the Pergola Roof with Wisteria
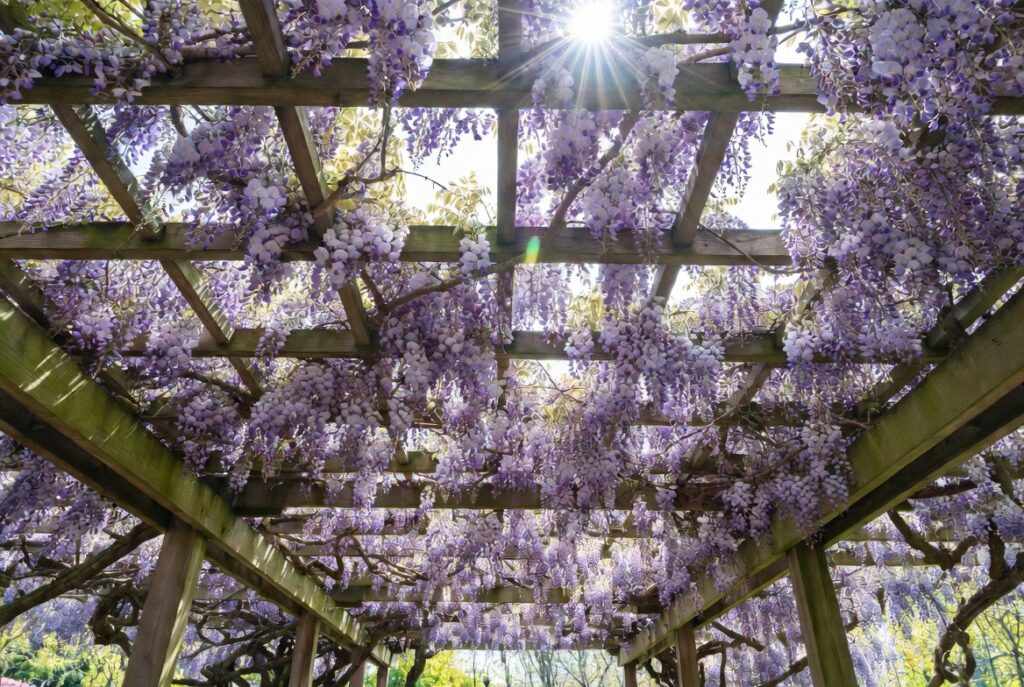
Best for: Large, sturdy pergolas where the spectacular impact of wisteria in full bloom is worth the structural requirements and maintenance commitment
A wisteria-covered pergola in full bloom is one of the most breathtaking sights available in any garden — cascading racemes of blue-purple or white flowers hanging from a densely leafed overhead canopy create an experience that no other plant can match. The fragrance beneath a flowering wisteria pergola is extraordinary.
Wisteria requires a pergola built to a higher structural specification than most — the weight of a mature wisteria in full leaf is considerable, and the stems exert significant lateral force on the posts as they grow. Use 100mm x 100mm minimum posts, substantial beams, and metal post anchors rather than posts set in soil.
Smart tip: Choose Wisteria floribunda (Japanese wisteria) or Wisteria sinensis (Chinese wisteria) based on your climate and desired bloom time. Japanese wisteria blooms slightly later and has longer flower racemes; Chinese wisteria blooms slightly earlier and is more vigorous. Both require the same sturdy structure.
Mistake to avoid: Planting wisteria without committing to the pruning regime it requires. Wisteria that is not pruned twice yearly — once in summer after flowering and once in winter — becomes an unmanageable tangle of stems that produces few flowers and can damage the structure it grows on.
11. Add a Ceiling Fan to Stay Cool
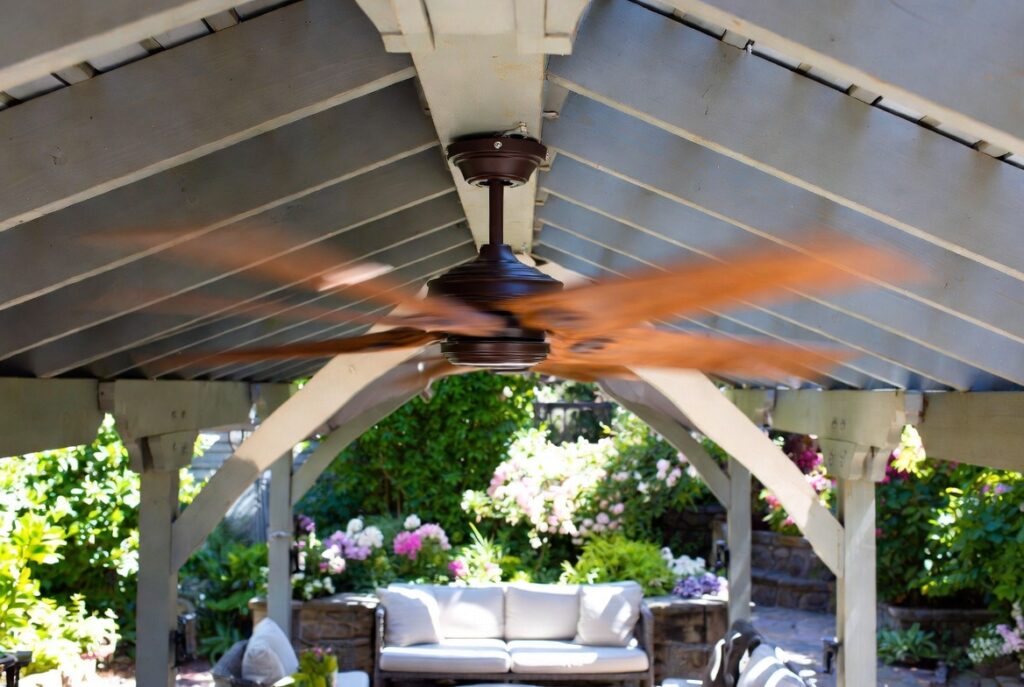
Best for: Pergolas in hot climates or any covered outdoor space used during summer afternoons
An outdoor-rated ceiling fan mounted to the pergola roof beam creates a genuinely more comfortable outdoor space in warm weather — moving air reduces perceived temperature significantly, keeps insects at bay, and allows the space to be used comfortably through the warmest parts of summer afternoons.
Outdoor ceiling fans must be rated specifically for outdoor or damp locations — standard indoor fans will fail and are a safety hazard when exposed to outdoor conditions. Look for fans with IP ratings indicating weather resistance.
Smart tip: Choose a fan with a reversible motor — in winter, running the fan in reverse (clockwise) at low speed pushes warm air that has risen to the ceiling level back down, making the covered space warmer in cold weather and extending the season the pergola can be comfortably used.
Mistake to avoid: Mounting a ceiling fan without adequate clearance beneath the blades. The minimum safe clearance between fan blades and the floor is 210cm — less than this creates a safety risk for tall people. Check your pergola beam height before purchasing a fan.
12. Install a Louvered Roof Pergola
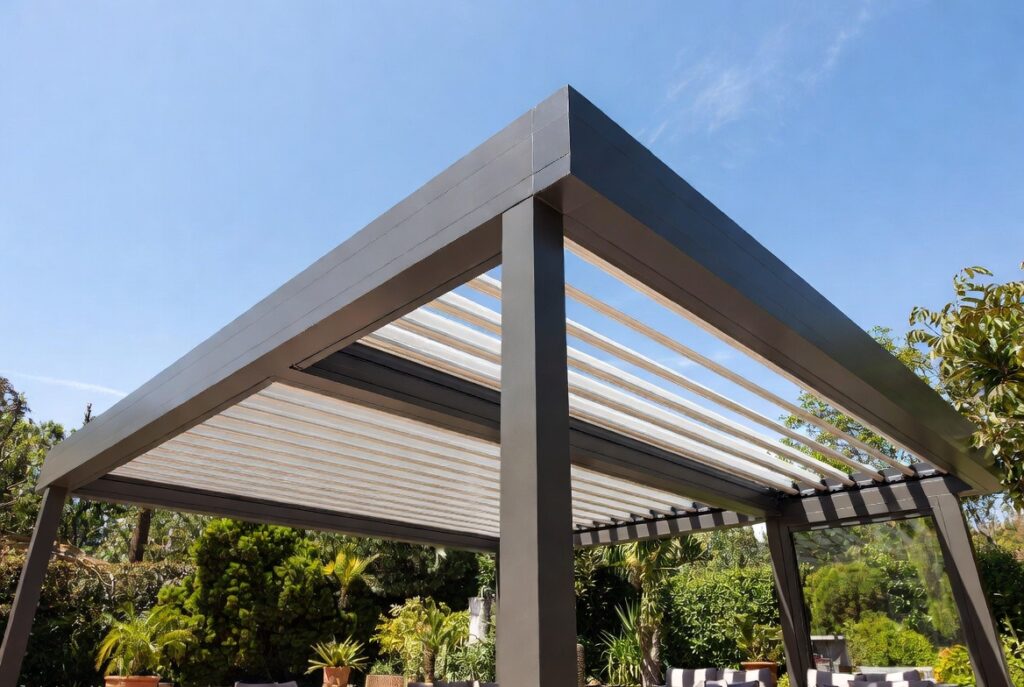
Best for: Homeowners who want complete control over shade, light, and rain protection in their outdoor space
A louvered roof pergola — with adjustable aluminum slats that can be opened fully for sun, angled for partial shade, or closed completely to shed rain — is the most functional and most versatile pergola type available. It effectively creates a fully weatherproof outdoor room that can be used in rain as well as sun, extending the usable season dramatically.
Louvered roof systems are more expensive than open-beam pergolas but provide significantly more flexibility — the space beneath can be used in conditions that would make an open pergola unusable. Many systems also integrate guttering to channel rainwater away from the sitting area.
Smart tip: Choose a louvered roof system with integrated LED lighting in the louvres — this provides even, atmospheric illumination across the entire ceiling area and eliminates the need for separate string lights or pendant fittings. The effect of lit louvres after dark is extraordinarily beautiful.
Mistake to avoid: Choosing a cheap louvered system with manually adjusted blades. Motorized louvered roofs can be adjusted from a phone app or wall switch in seconds — manual systems require physical adjustment of each louver individually, which is inconvenient and rarely done. Invest in a motorized system or stick with a simpler open-beam design.
13. Use a Pergola as a Garden Entry Gate
Best for: Gardens with a clear separation between zones — a lawn area and a vegetable garden, or a patio and a wider garden
A pergola positioned as an entry gate between two garden zones creates a moment of transition that makes the garden feel larger, more considered, and more interesting. Walking through a pergola gate covered in climbing roses or jasmine creates a sensory experience — shade, fragrance, and visual framing — that makes arriving in the next garden zone feel like a genuine discovery.
The entry pergola doesn’t need to be large — 1.2 to 1.5 meters wide and 2.2 to 2.4 meters tall is sufficient for a comfortable passage. The key is that climbing plants make it feel enclosed and garden-like rather than like a plain archway.
Smart tip: Position the entry pergola so that it frames a view of something attractive on the other side — a flowering border, a water feature, or a particularly beautiful specimen plant. The framing effect of the pergola makes the destination appear more significant and creates the anticipation that makes a garden journey enjoyable.
Mistake to avoid: Making the entry pergola too narrow. A pergola gate less than 1 meter wide feels constraining rather than inviting — people instinctively slow and duck through narrow spaces. Keep the minimum width at 1.2 meters for a comfortable, welcoming passage.
14. Build a Pergola Over a Hot Tub
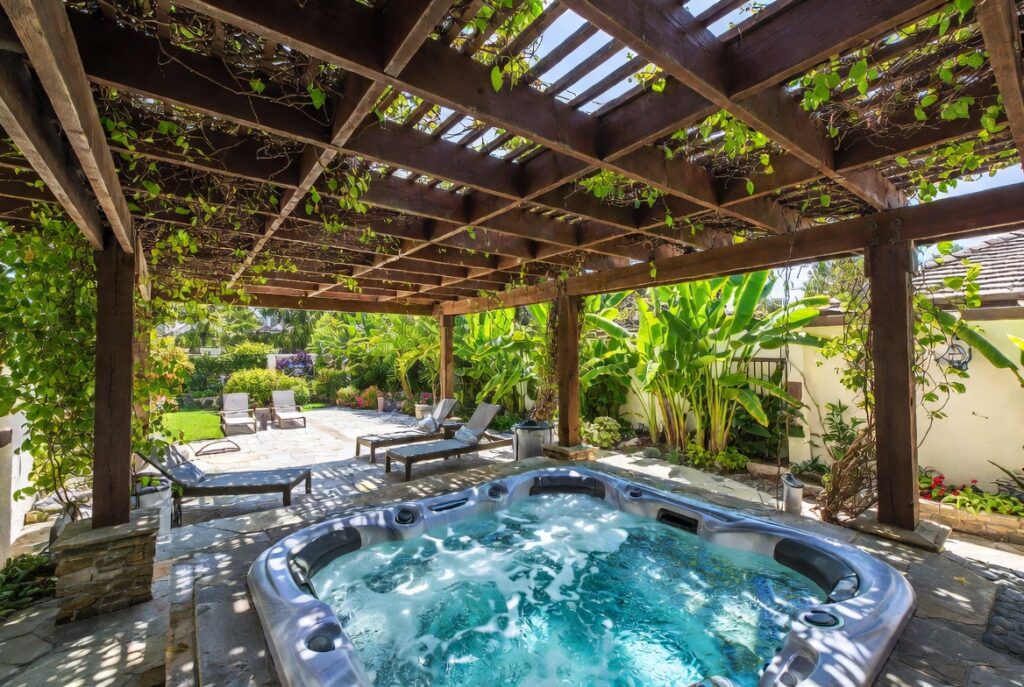
Best for: Hot tubs positioned in open yards where privacy, shade, and shelter would improve the experience
A pergola over a hot tub solves multiple problems simultaneously — it provides privacy from overlooking neighbors, partial protection from sun and light rain, a framework for string lights that create evening ambiance, and a structure to hang towels and outdoor accessories. The result is a hot tub area that feels like a genuine retreat rather than an appliance sitting in the open garden.
Build the pergola with adequate clearance above the hot tub cover — at least 30cm above the fully open cover height — and position the posts outside the hot tub perimeter so they don’t interfere with access.
Smart tip: Add screening panels or climbing plants to the sides of the hot tub pergola that face the most exposure to neighbors or the street. The roof provides overhead privacy; side screening completes the sense of enclosure that makes a hot tub space feel genuinely private.
Mistake to avoid: Using materials near a hot tub that will be damaged by moisture and steam. Untreated or poorly treated timber will deteriorate rapidly in the humid environment around a hot tub. Use cedar, redwood, or properly treated structural timber, and apply annual sealing to maintain the timber’s condition.
15. Create a Pergola Kitchen Outdoor Space
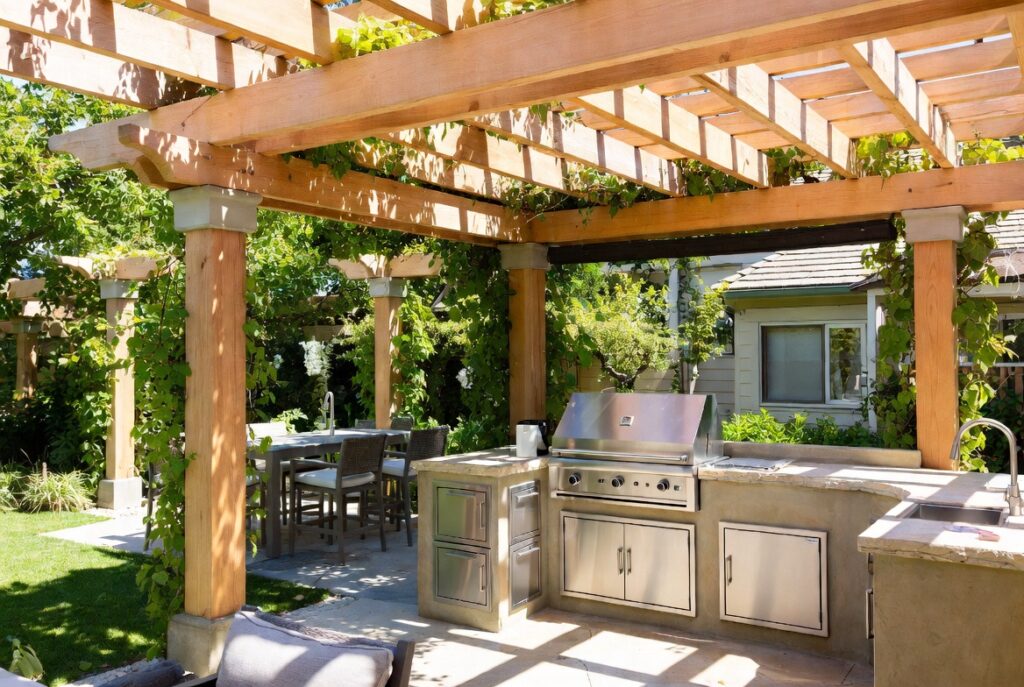
Best for: Serious outdoor entertainers who want a functional cooking and dining space that’s truly outdoors
A pergola over an outdoor kitchen — fitted with a built-in grill, countertop, under-counter storage, and a sink — creates the ultimate outdoor entertaining space. The overhead structure provides shade for the cook, a framework for task lighting over the cooking area, and a defined zone that makes the outdoor kitchen feel like a proper room rather than equipment in the open air.
The pergola for an outdoor kitchen needs to be sized generously — allow at least 1.5 meters of depth behind the kitchen counter for comfortable cooking clearance, and position the structure so prevailing winds carry grill smoke away from the seating area.
Smart tip: Install a stainless steel or outdoor-rated range hood above the grill position, venting through the pergola roof. This prevents smoke accumulation beneath the pergola canopy, which is particularly important if the roof has any degree of coverage. An outdoor range hood is a relatively minor cost that makes the cooking experience significantly more comfortable.
Mistake to avoid: Installing an outdoor kitchen under a fully covered pergola without adequate ventilation. Gas grills and charcoal grills produce carbon monoxide — an enclosed or semi-enclosed space with a grill and no ventilation is dangerous. Ensure any pergola used for outdoor cooking has open sides and, if covered, proper ventilation clearance.
16. Paint or Stain Your Pergola a Bold Color
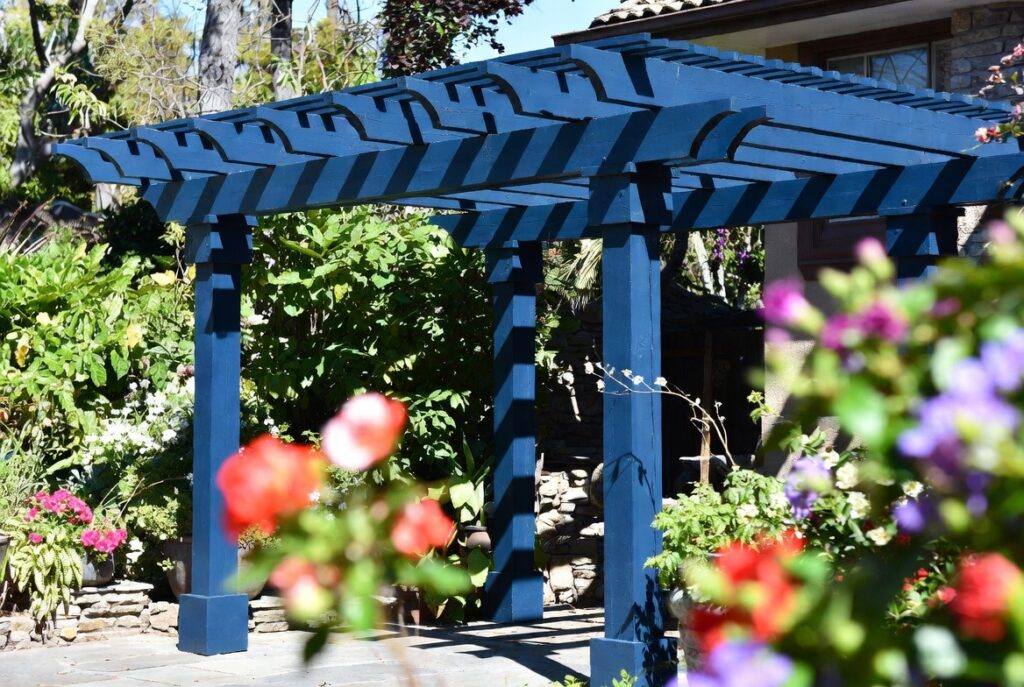
Best for: Gardens where the pergola is a key visual feature and a neutral finish feels too understated
A boldly colored pergola — painted deep navy, forest green, charcoal black, or terracotta — creates a dramatically different effect from a natural timber or standard white finish. The color transforms the pergola from a garden structure into a genuine design statement, and the right color choice can tie the outdoor space to the house’s exterior palette in a way that makes the whole property feel more considered.
Deep colors — particularly black, charcoal, and deep navy — have the additional effect of making plants appear more vivid against them, making a dark pergola an excellent backdrop for climbing plants and hanging baskets.
Smart tip: Match the pergola color to the window frames, front door, or other painted elements of the house exterior. This color repetition creates a visual connection between the house and the garden structure that makes the pergola feel designed as part of the property rather than added as an afterthought.
Mistake to avoid: Using interior paint on an outdoor structure. Interior paint will peel, blister, and fail within one season outdoors. Use exterior-grade paint or stain specifically formulated for outdoor timber — apply a primer coat first on any bare or previously unpainted timber.
17. Add Built-In Bench Seating
Best for: Pergolas where flexible seating is needed and free floor space is a priority
Built-in bench seating along one or two sides of a pergola provides permanent seating without taking up the floor space that freestanding furniture requires — benches built against the pergola posts leave the center of the space completely clear for a table, a rug, or simply open movement. They also provide additional storage if designed with lift-up lids or under-seat drawers.
Build benches at standard seat height — 43 to 45 centimeters from the ground — and a minimum of 45 centimeters of seat depth for comfortable sitting. Add cushions in outdoor-rated fabric to make them genuinely comfortable for extended use.
Smart tip: Design the bench height to double as a surface for outdoor entertaining — a bench at 45cm can serve as a drinks table, a staging area for food service, or additional counter space during parties. This dual function is particularly useful in smaller pergola spaces where dedicated surfaces are limited.
Mistake to avoid: Building benches too close to the pergola posts, leaving insufficient leg room between the bench and any table placed in front of it. Allow at least 40 to 45 centimeters between the bench edge and any table for comfortable seated use.
18. Hang Outdoor Planters from the Beams
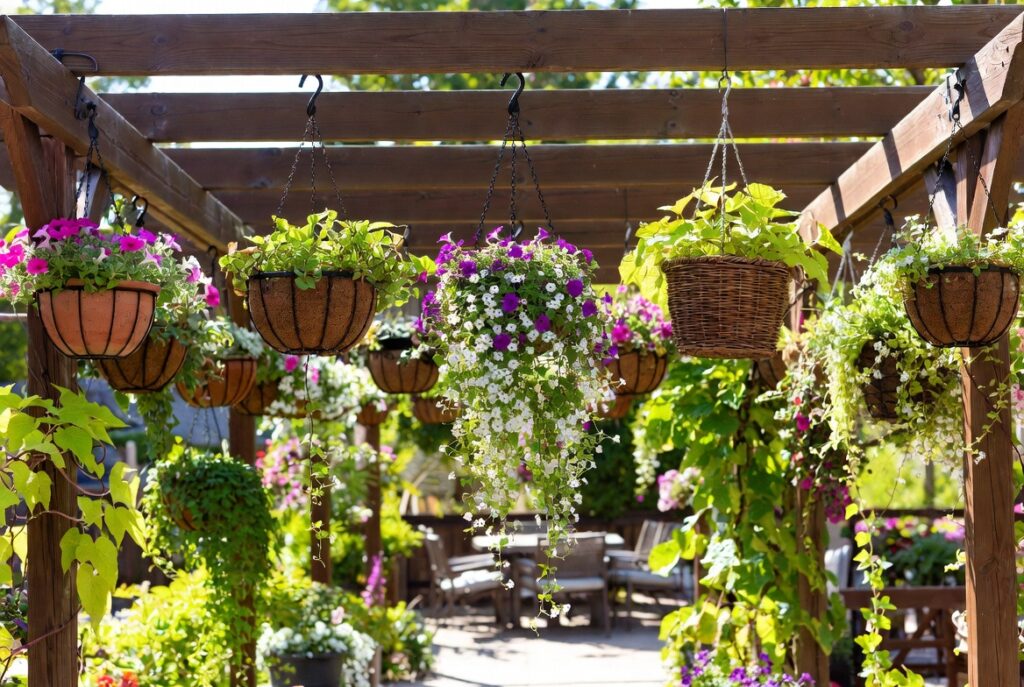
Best for: Any pergola where more planting is desired without using floor space
Hanging planters suspended from pergola beams bring plants to eye level and above, creating a lush, garden-like atmosphere beneath the structure and using the overhead space that would otherwise be purely architectural. Trailing plants — bacopa, calibrachoa, trailing petunia, or trailing succulents — spill down from the planters and soften the structural beams beautifully.
Use planters specifically designed for hanging — with adequate drainage, secure fixing points, and a weight appropriate to the beam they’ll hang from. Assess the beam’s load-bearing capacity before hanging multiple heavy planters.
Smart tip: Group planters in odd numbers — three or five hanging at slightly different heights creates a more naturalistic, considered arrangement than evenly spaced individual planters. Vary the trailing plants between containers while keeping the color palette consistent.
Mistake to avoid: Hanging planters directly over seating or dining areas without drip trays. Watering overhead planters creates drips that fall onto furniture and guests below — always use planters with integrated drip trays or water during times when the seating area isn’t in use.
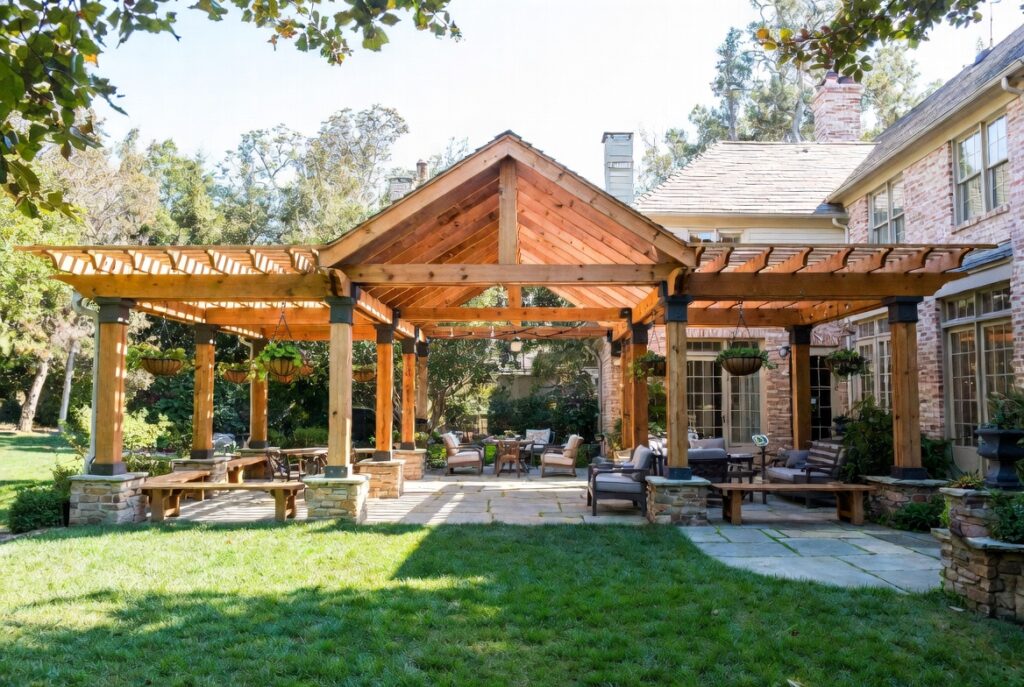
19. Use a Pergola to Define Zones in a Large Yard
Best for: Large backyards that feel undefined or overwhelming without clear spatial organization
In a large garden, a pergola creates a defined outdoor room within the larger space — giving the yard a sense of organization and making specific areas feel purposeful rather than simply large. The pergola zone becomes a destination within the garden rather than just part of the open space.
A well-positioned pergola in a large yard also creates interesting views — the framed view through the pergola to the wider garden, the sense of the garden unfolding beyond the covered space, and the contrast between the intimate covered zone and the open lawn beyond all add spatial interest that a plain open yard cannot provide.
Smart tip: Position the pergola so that its posts frame a particularly attractive view within the garden — a specimen tree, a flower border, or a water feature. The pergola then acts as both an outdoor room and a picture frame, with the garden beyond becoming a living artwork viewed from the seating beneath.
Mistake to avoid: Positioning the pergola so close to the house that it simply feels like an extension of the terrace rather than a destination within the garden. A pergola that creates genuine physical separation from the house — requiring a short walk across a lawn or along a path to reach — creates a more effective sense of escape and destination.
20. How to Choose the Right Pergola for Your Backyard
Best for: Anyone planning a pergola for the first time — the right starting decisions prevent the most expensive mistakes
Choosing the right pergola begins with three questions: what is the primary use (dining, lounging, cooking, or a combination), what is the architectural style of the house it will complement, and what is the realistic budget including installation and landscaping around the base.
Size is the most common mistake — people consistently build pergolas smaller than they need. A pergola that feels adequate in a showroom or on paper feels cramped once furnished. For a dining pergola, calculate the table size plus 90cm on all sides for comfortable chair movement plus access; for a lounge pergola, calculate the furniture footprint plus circulation space plus at least 60cm on all sides.
Material choice depends on your priorities: cedar and redwood for natural beauty and longevity, pressure-treated pine for budget construction, aluminum for low-maintenance and modern style, and steel for maximum structural options. Each has genuine advantages — choose based on your specific context rather than defaulting to the cheapest option.
Smart tip: Visit pergola showrooms and completed installations before deciding — photographs rarely convey the actual scale, material quality, and three-dimensional presence of a pergola accurately. Seeing a 3m x 4m pergola in a real garden gives you a far more accurate sense of whether it’s the right size for your space than any plan drawing.
Mistake to avoid: Treating the pergola as the final step in the outdoor design rather than the first. The pergola defines the zone — the paving beneath it, the planting around it, the lighting within it, and the furniture that fills it all need to be designed in relationship to the pergola structure. Plan all of these elements together from the beginning rather than adding them piecemeal after the pergola is built.
Before You Start
- Check planning permissions. Attached pergolas and structures above a certain size may require permits in your area. Confirm requirements with your local authority before building.
- Assess your site. Consider sun direction, prevailing winds, and views from inside the house — the pergola position affects all of these.
- Set a realistic total budget. Include the structure, foundations, paving, furniture, lighting, and plants — not just the pergola kit price.
- Think about the view from inside. The pergola will be visible from the house every day — position and design it to look good from the main internal living spaces as well as from within the garden.
Conclusion
A pergola is one of the most versatile and most rewarding outdoor projects available to any homeowner. It creates genuine architecture in the garden, extends the living space of the house into the outdoors, and provides the structure around which a truly beautiful and functional outdoor room can be built. The key is to size it generously, build it to last, and furnish it with the same care you would bring to an interior room — because that is exactly what a well-designed pergola becomes.
outdoor living space • backyard ideas • backyard landscaping ideas • outdoor patio ideas • garden ideas • outdoor living room ideas • backyard pergola ideas