Useful home bar ideas begin with where drinks are prepared, where people gather and how everything returns after serving. A small cabinet beside the dining area can be more useful than a large counter that blocks the room. Choose the setup for the drinks your household actually serves, including alcohol-free options, then give the counter, storage and cleanup route a clear role.
These 25 ideas compare room layouts and cabinet arrangements rather than another list of bar-cart accessories. Start with a dry station if a working surface and storage meet the need; a wet bar adds a sink and running water and requires a properly planned installation. Use the worksheet below to compare the entire routine before choosing permanent cabinetry or appliances.
Contents
- 1. Start with a short run of dry-bar cabinetry
- 2. Use an existing alcove as a complete composition
- 3. Hide the working station behind appropriate cabinet doors
- 4. Place a serving cabinet beside the dining table’s return route
- 5. Turn a corner into two different storage faces
- 6. Use a peninsula only when the occupied stools fit
- 7. Keep a full back bar separate from the guest side
- 8. Choose one freestanding cabinet as the room’s feature
- 9. Let a shallow wall station serve a compact room
- 10. Leave out fixed bar seating when the room already has chairs
- 11. Use the full-height end beneath a stair thoughtfully
- 12. Make a living-room bar read as ordinary furniture
- 13. Design an alcohol-free station around real serving choices
- 14. Add a sink only when the cleanup benefit justifies the project
- 15. Choose refrigeration by installation type before enclosing it
- 16. Make the serving surface distinct from the display
- 17. Use glass-front doors for a small, considered collection
- 18. Use open shelving only for the working display set
- 19. Give small tools a drawer beneath the preparation zone
- 20. Choose the counter finish with its care routine in mind
- 21. Make the back wall the main decorative commitment
- 22. Use a mirror for the view it reflects
- 23. Plan light for the counter without turning the shelf into a stage
- 24. Build the basement bar around the room’s real conditions
- 25. Give the station a clear return and reset route
Choose the scale of the project before the decorative finish
List the ordinary serving group, the storage reserve and the nearest washing area. Decide whether the room needs a furniture cabinet, a fitted dry station or a full installation with services. Measure the actual approach and include doors, occupied seating and appliance movement. Storage, plumbing and electrical requirements depend on the exact room and equipment; the concepts below are visual comparisons rather than construction instructions.
Match the bar type to the actual need
- You need a place to prepare a few drinks: Compare a suitable cabinet or short dry counter before adding services.
- You want the station to disappear between gatherings: Compare the fully open and closed door footprints, not only the cabinet front.
- You need local rinsing or refrigeration: Choose the exact tasks and equipment before designing the opening or services.
- The room is small: Keep the serving setup limited and use existing nearby seats when they work.
1. Start with a short run of dry-bar cabinetry

A dry bar can be as simple as storage and a working surface without a sink. Use a short cabinet run when the room needs a settled serving position but does not need plumbing. Put the cabinet beside the gathering area rather than at the far end of a busy route. Check the top with the glasses, tray and vessels used together so its useful area does not disappear behind a decorative display.
Compare the cabinet interior with the actual drinks reserve and serving pieces before choosing the door arrangement.
2. Use an existing alcove as a complete composition

An alcove gives the drinks station a natural boundary. Compare the whole recess, including skirting, wall irregularities and the door approach, before selecting furniture or fitted cabinetry. A simple counter with a few useful shelves can be enough. Keep the upper display light if the opening is narrow, and make sure the person preparing a drink can turn toward the room without stepping into another activity.
Use the existing recess as the starting point; making a new opening is a separate building project.
3. Hide the working station behind appropriate cabinet doors

Closing a drinks station can help a multipurpose room return to its everyday role. Choose doors and hardware designed for the actual cabinet, then consider where the open panels go during serving. A door that conceals everything when closed may block a neighboring drawer or the route when open. Include handles and projecting hardware in the comparison, and separate any appliance ventilation requirements from the decorative door design.
Draw both the closed and fully open arrangement before deciding that a concealed bar saves space.
4. Place a serving cabinet beside the dining table’s return route

A dining-room bar works well when it supports the route between the table, kitchen and cleanup area. Compare that movement with chairs pulled out and someone standing at the cabinet. The shortest distance is not always the most comfortable position if people queue across the main entrance. Keep everyday tableware separate enough that preparing a drink does not require moving a stack of dinner plates.
Walk the return trip with an empty tray and note where a door or occupied chair changes the route.
5. Turn a corner into two different storage faces

A corner can combine a useful counter with a shallower display or storage return. Treat the two sides as different depths rather than forcing a large corner cabinet into a small room. Check which objects would be hidden deep in the junction and whether a simpler blind corner is preferable to awkward hardware. Let the clear surface follow the preparation movement instead of decorating both sides equally.
Assign the deepest area only to belongings that can still be reached comfortably.
6. Use a peninsula only when the occupied stools fit
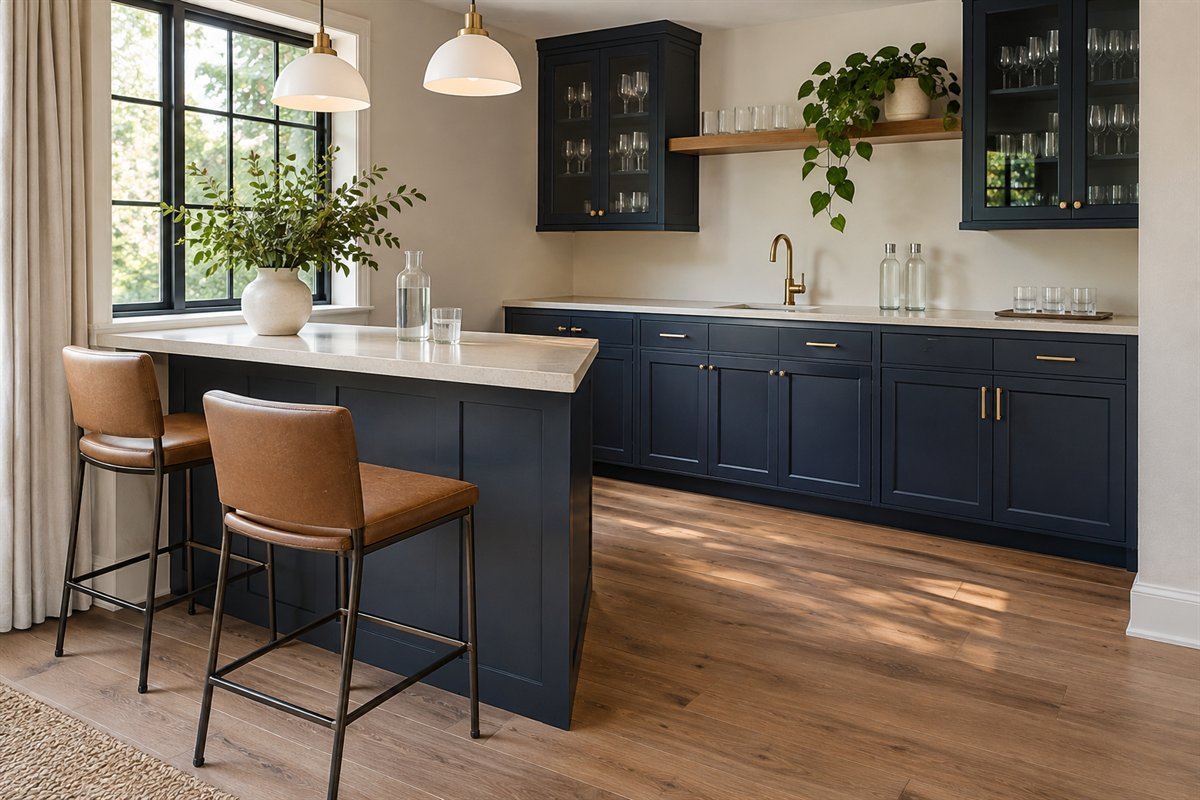
A peninsula can give guests a place to face the person serving. Compare the counter and stools as a complete occupied group: the seat, knees, back and approach all use space. Choose the stool for the actual counter and household rather than treating any tall seat as interchangeable. In a tight room, a shorter standing surface or nearby dining chairs may work better than an extra permanent seating row.
Mock up the occupied stools before fixing the counter’s final position.
7. Keep a full back bar separate from the guest side

A front counter and a separate back bar can organize a larger entertaining room. The back run holds the working supplies; the guest side provides a clean place to set down a drink. Check how the host reaches between the two and how cabinet doors affect the aisle. A room that looks generous while empty can feel crowded once stools, an open appliance door and people are included.
Compare the complete serving sequence rather than choosing the aisle from one photograph.
8. Choose one freestanding cabinet as the room’s feature

A distinctive cabinet can provide the visual character without a new built-in wall. Look at the usable interior, the open-door footprint and the height of the working surface before deciding from the exterior alone. A beautiful display cabinet may not be designed for mixing drinks on an internal shelf. Choose furniture intended for the tasks you plan to perform and protect its finish according to its own care guidance.
Ask which surfaces are working surfaces and which are display shelves before buying.
9. Let a shallow wall station serve a compact room

A shallow unit can suit a room that has wall length but little spare depth. The tradeoff is a narrower working top, so choose a limited serving setup rather than squeezing in a full collection. Compare the widest vessel, tray handles and the movement needed to pour. If the surface is too shallow for the actual task, use it for storage and serve on a more appropriate nearby table.
Make a paper outline of the usable top and arrange your real serving pieces on it.
10. Leave out fixed bar seating when the room already has chairs

A home bar does not need its own row of stools. In a dining room or shared sitting space, existing chairs can provide a more comfortable place to linger. Keep a reachable landing surface near those seats and let the bar remain a place to prepare and collect drinks. Removing a second seating group can free the route and reduce the amount of furniture competing for attention.
Identify where guests naturally sit before adding another seat type.
11. Use the full-height end beneath a stair thoughtfully

An under-stair recess may provide storage, but headroom and the approach determine where a working counter can go. Keep the standing task in an area that actually accommodates the user and the required route. The lower end can hold appropriately accessible storage instead of becoming a place where someone must bend while handling glass. Have the actual enclosure and any permanent alterations assessed before treating the empty volume as available cabinetry.
Separate a storage-only zone from the place where someone will stand and serve.
12. Make a living-room bar read as ordinary furniture

In a living room, relate the bar cabinet to the other furniture rather than making it look like a separate commercial installation. Repeat a timber tone or a simple metal detail and keep its everyday top useful. Closed storage can reduce the amount of packaging on display. Choose the contents around the household and use suitable access controls where required; a cabinet door alone does not establish secure storage.
View the cabinet from the sofa as well as from the entrance before deciding how much to display.
13. Design an alcohol-free station around real serving choices

A drinks station can be complete without alcohol. Plan it around sparkling water, the household’s preferred packaged drinks and the vessels used to serve them. Keep chilled or perishable ingredients under their required storage conditions rather than leaving them out as permanent decor. The same cabinet, surface and cleanup decisions still matter. A restrained working selection usually communicates the purpose more clearly than a shelf of unused accessories.
Write the ordinary serving menu before choosing the storage and display.
14. Add a sink only when the cleanup benefit justifies the project

A wet bar adds a sink and running water to the station. It can make rinsing and cleanup more convenient, but it also turns a furniture arrangement into a plumbing and installation project. Decide which tasks the sink will perform and whether the existing kitchen already serves them comfortably. Plan the actual water, drainage, electrical and building requirements with suitable professionals rather than choosing a sink only to complete the look.
Compare a simple dry setup with the full wet-bar project before committing to permanent work.
15. Choose refrigeration by installation type before enclosing it

Select the exact refrigerator before finalizing its opening. Built-in and freestanding products are not interchangeable: Sub-Zero’s cited guidance, for example, identifies particular freestanding-only models alongside its built-in ranges. Read the selected unit’s installation requirements for ventilation, door opening, services and access. A front grille in an illustration cannot prove that a cabinet opening suits a real appliance. Keep the approved equipment requirements in the cabinet brief.
Record the full model number and installation guide before a cabinet maker sizes the opening.
16. Make the serving surface distinct from the display

Give the station a clear working surface before arranging the display. A shelf or glass-front upper cabinet can hold the visual group while the counter stays available for pouring and setting down a tray. Check the vertical space above that counter with the tallest piece lifted and tilted. A tightly framed display can look finished but make the ordinary hand movements awkward.
Choose the display after trying the preparation task with the actual vessels.
17. Use glass-front doors for a small, considered collection

Glass-front doors can give the bar a sense of depth while defining the boundary of a glass collection. Clear and textured glass create different levels of visibility, so compare them with the amount of detail you want in the room. Arrange the contents for independent access rather than filling every shelf. Check the cabinet’s intended loads and installation, and keep delicate pieces in positions suited to the household.
Compare the closed view and the practical removal of the largest glass.
18. Use open shelving only for the working display set

Open shelves work best when the small display is easy to reach and return. Reserve them for the set you regularly use or enjoy seeing, with bulk supplies behind closed doors. Compare the shelf depth with the bases of the actual glasses and avoid packing a second hidden row behind the first. Suitable supports, loading and fixing depend on the shelf and wall; the visual arrangement does not replace those checks.
Lay out one shelf’s contents on a table before deciding how many shelves the station needs.
19. Give small tools a drawer beneath the preparation zone

A drawer directly below the working area can keep small accessories from spreading across the counter. Choose the tools for the drinks actually served and give each an easy-to-see position. Keep any sharp items in their intended protected storage, and separate them from delicate glassware. A partly empty drawer is useful if it makes the small working set easy to find; it does not need decorative fillers.
Remove duplicate accessories before adding a divider system.
20. Choose the counter finish with its care routine in mind

The counter will meet water, drips and repeated wiping, so read the care guidance for the exact finish. Caesarstone’s cited quartz and mineral surface guide, for example, calls for prompt spill care, appropriate cleaning and protection from hot cookware; that is guidance for those surfaces, not every material that looks like stone. A wood, laminate or other top can have different requirements. Keep the relevant care instructions with the cabinet record.
Compare a real sample’s care requirements with the way you will use the station.
21. Make the back wall the main decorative commitment

A tile, wallpaper or painted back wall can establish the bar area without using counter space. Choose one main decorative treatment and compare it with the cabinetry and the rest of the room. The most intricate pattern may be less effective behind a busy glass collection than a quieter surface. Material suitability depends on the actual exposure, cleaning and installation; decorative wallpaper and splash-resistant finishes are different choices.
View the sample behind your real glasses before judging it on an empty wall.
22. Use a mirror for the view it reflects

A mirror can connect the station with the room, but inspect the reflection from the host’s position and the nearest seats. It may repeat a pleasant window view or double an already busy shelf. Choose the size and installation for the actual wall, and keep the working area independent of a heavy leaning object. A smaller calm reflection can be more useful than a full mirrored wall that magnifies clutter.
Use a temporary reflective sample or existing mirror to check the view before selecting the final piece.
23. Plan light for the counter without turning the shelf into a stage

Check the counter under the room lighting used during a gathering. If it is difficult to see the pouring and serving area, plan a suitable task-lighting solution with accessible controls. Decorative shelf lighting can add atmosphere but should not be the only light on a working surface. Keep lighting and any electrical work appropriate to the location and equipment, especially where a sink or refrigeration is included.
Compare the station with the main room lights dimmed to their normal evening setting.
24. Build the basement bar around the room’s real conditions

A basement can give entertaining its own room, but do not begin with the decorative cabinetry if dampness, services or access remain unresolved. Plan the bar alongside the room’s normal routes and the activities around it. A compact dry station may be enough beside a game table or sitting area. The illustrations compare layouts; they cannot establish that an existing basement is suitable for finishing or that its environmental and building requirements are satisfied.
Resolve the actual room conditions before choosing decorative finishes or permanent equipment.
25. Give the station a clear return and reset route

Plan how used glasses reach the washing area and where cleaned, dried pieces return. Keep that route separate from the space where new drinks are prepared where possible. A tray can collect a small manageable group for the return trip, but it should not become permanent dirty-dish storage. Give the reset a simple end state: clear counter, correctly stored supplies and the working set back in its assigned place.
After a gathering, note which items had no obvious return position and simplify that part of the setup.
Map the four movements before choosing the layout
Draw four arrows on a rough room plan: collect the stored supplies, prepare the drink, hand it to the guest, and return used pieces to the washing area. Mark the position of the dining chairs, main entrance, cabinet doors and any appliance door in the open position. If every arrow crosses the same narrow gap, compare a different cabinet position or a smaller serving setup.
Try the routine with the real tray, tallest vessel and widest glass. A plain paper rectangle can represent the counter while you compare positions. Note which hand holds the drink and which hand needs to open a door or reach the glass. A cupboard may have enough internal capacity yet require awkward movements during the task. Keep the tools, working glasses and reserve stock in different roles rather than putting everything in the easiest front position.
Next, repeat the layout with guests sitting in the intended seats. Check whether someone can collect a drink while another person leaves the table, and whether the host can reach the washing route without squeezing behind an occupied stool. No universal sketch replaces your real room, equipment instructions or local requirements. The purpose is to reveal conflicts before they become permanent cabinetry.
A hypothetical counter-space budget
Suppose a proposed dry station has a 72-inch-long usable top. In a simple planning example, a 12-inch display area, a 24-inch preparation zone and an 18-inch serving tray use 54 inches along its length, leaving 18 inches to assess for separation or another actual task. These numbers are an arithmetic example, not recommended dimensions or construction standards. Depth, handles, rim clearance and hand movements still have to fit.
If the real tray is too deep or the preparation requires a wider area, change the layout rather than assuming the remaining length solves the problem. A smaller display may be preferable to a larger cabinet. Record the actual dimensions and keep the working counter separate from decorative shelf capacity. For equipment, use the complete model-specific installation requirements rather than borrowing a generic clearance from a different appliance.
Copy this home bar planning card
Room and main gathering position: ____. Drinks ordinarily served: ____. Working glasses and vessels: ____. Reserve supplies kept elsewhere: ____. Counter length and depth available: ____. Cabinet doors fully open: ____. Occupied seats and through-route: ____. Washing and clean-return route: ____.
For a fitted project, add the exact appliance models, installation guides, service access, ventilation requirements and the person responsible for confirming the room and installation. For a furniture station, add usable shelf dimensions, supported loads, surface care and any required fixing or access control. End the card with one clear reset description so the station works after the first gathering as well as in its initial photograph.
What is the difference between a dry bar and a wet bar?
A dry bar provides storage and a working surface without a sink. A wet bar includes a sink and running water. Choose the added installation only when it solves a useful preparation or cleanup need.
Does a home bar need stools?
No. Nearby dining or living-room seating can serve the gathering. Check whether additional stools improve the routine or simply occupy the route in a small room.
Can I put a freestanding drinks refrigerator inside a cabinet?
Only if the exact manufacturer’s installation guidance permits that arrangement. Freestanding and built-in designs can have different requirements. Select the model and its guide before designing the enclosure.
Can the station be alcohol-free?
Yes. Plan the cabinet around the drinks and vessels your household uses, with any chilled or perishable ingredients stored appropriately. The layout and cleanup decisions remain the same.
A practical next step
Choose the smallest arrangement that supports the actual serving routine. Make the counter useful, the storage reachable and the return route straightforward, then add the cabinet style, back-wall detail and lighting that suit the room.
Style a smaller mobile bar cart instead of a fitted station. Plan storage around the drinking glasses you actually use. Coordinate the drinks reserve with other dining room storage.
Images are original AI-generated design concepts, not photographs of tested rooms or verified installations. Cabinet, appliance, plumbing and electrical decisions must be checked for the actual room and products. The numerical counter example is hypothetical.
Sources and care references
- HOMSEE: dry-bar and wet-bar terminology; retailer reference
- Sub-Zero: built-in and freestanding model distinctions
- Caesarstone: care guidance for its quartz and mineral surfaces
Optional digital guide for this topic
If you prefer a structured workbook, explore this related paid guide.