Useful clothes valet ideas give a small clothing group a deliberate position between the wardrobe and getting dressed. A suitable stand can hold tomorrow's outfit or another garment that has a clear place in your routine. Its value comes from reducing a recurring pile without creating a second crowded wardrobe in the bedroom.
These 22 options compare furniture forms, useful details and positions in ordinary adult dressing areas. Choose the garments according to their own care needs and follow the exact stand's assembly, loading and restraint instructions. A valet is not a drying appliance, a seat or evidence that a garment no longer needs cleaning.
Contents
- 1. Begin with one prepared outfit
- 2. Choose a shaped shoulder support for a structured jacket
- 3. Give the trouser fold its own accessible rail
- 4. Compare two levels when two garments need separation
- 5. Keep a shirt visible within a small coordinated group
- 6. Use the valet for the casual outfit you actually wear
- 7. Give a return garment a separate defined position
- 8. Choose a folding valet when storage away is a real need
- 9. Use a small integrated tray for the outfit's accessories
- 10. Choose an integrated drawer for a quieter appearance
- 11. Keep one shoe pair on an intended base shelf
- 12. Leave the lower frame open when shoe storage is unnecessary
- 13. Compare a simple metal outline in a visually busy room
- 14. Relate a timber valet to the wardrobe's undertone
- 15. Let a pale finish recede against a light wall
- 16. Use a darker stand as one deliberate furniture accent
- 17. Place the stand along the wardrobe's return route
- 18. Check the bedroom door before using the space beside it
- 19. Keep the dresser's working space independent
- 20. Give two users separate modest clothing groups
- 21. Leave a guest valet ready for incoming clothes
- 22. Finish with a clear clothing return rule
Compare the loaded outline with the route around it
Measure the complete stand and include the widest hanger, extended rail, tray and feet. Then compare the actual clothes that will hang there: a sleeve, jacket or trouser fold can project beyond the bare structure. Mark the loaded outline with an appropriate temporary floor template and open nearby doors and drawers. Keep the garment hems, room controls and normal walking route clear. A narrow base does not mean the whole clothing group will occupy the same narrow footprint.
Choose an arrangement that fits your situation
- Tomorrow's outfit becomes a chair pile: Try one defined outfit on intended separate supports
- Small accessories disappear from the dressing area: Compare a modest designed tray or accessible drawer
- The room changes use between visits: Compare a documented folding model and its empty storage position
- The stand fits but sleeves obstruct the route: Measure the loaded outline and choose another suitable position
- The valet keeps accumulating clothing: Clarify the return routine before adding more storage
1. Begin with one prepared outfit

A valet can simplify the morning when it holds one deliberately chosen outfit rather than a week of possibilities. Put the main garment on its intended support and keep the accompanying item visible. Make the stand's capacity a boundary. If unrelated clothing keeps accumulating, change the return routine before adding more rails to the same corner.
2. Choose a shaped shoulder support for a structured jacket

Compare the jacket's shoulder width and its garment-care guidance with the intended hanger. A broad curved support may suit a different garment from a narrow rail or hook. Proman's cited Knight design illustrates a shaped wooden shoulder hanger. Check the actual contact surfaces and complete furniture instructions rather than assuming every hanger-shaped top supports every coat in the same way.
3. Give the trouser fold its own accessible rail
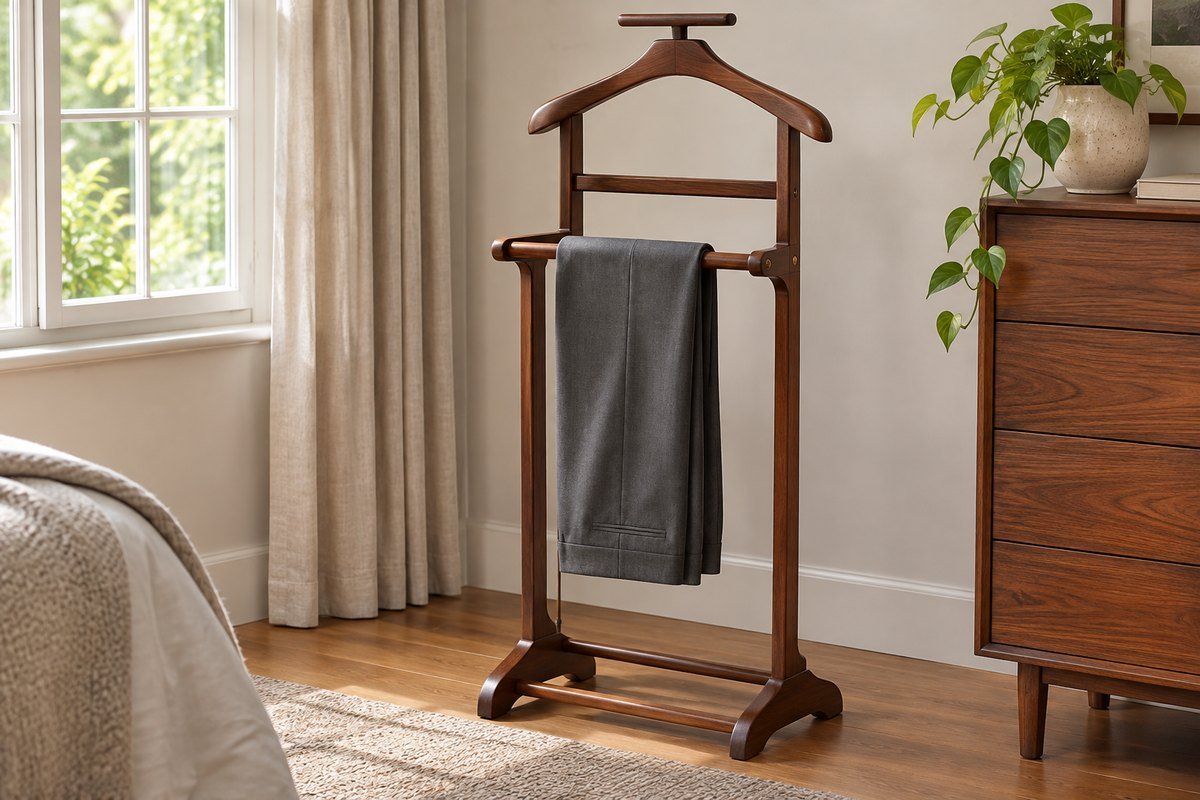
A separate rail can keep trousers visible without trapping them beneath a jacket. Check the rail's usable width, surface and position against the intended garment. Make sure the folded legs remain clear of the base and floor. Avoid treating a decorative cross-brace as a hanging bar unless it is intended for that use.
4. Compare two levels when two garments need separation

A designed two-bar arrangement can separate pieces that would obscure each other on one rail. Check how each item is removed with the other still in place. Zara Home's cited stand includes two horizontal trouser bars and a central hanger. More bars are useful only when the complete loaded arrangement still allows ordinary access.
5. Keep a shirt visible within a small coordinated group

A shirt and jacket can share a prepared-outfit area while remaining easy to identify. Choose the intended supports for each piece instead of squeezing layers onto a feature not designed to hold them. Check that collars and sleeves fall naturally. Keep the rest of the outfit elsewhere when adding it would turn a simple stand into an inaccessible bundle.
6. Use the valet for the casual outfit you actually wear

A stand need not be styled as formal suit storage to be useful. A suitable shirt and everyday trousers can have a clear position for the next dressing task. Choose supports that suit those garments and keep the quantity modest. The routine should follow your clothing rather than copying an elaborate display that has little connection with an ordinary morning.
7. Give a return garment a separate defined position

If the household retains a garment for another wear, make that decision from its condition and care requirements. One distinct support can separate it from an outfit prepared from clean storage. Keep items needing cleaning in the appropriate laundry routine. The stand supplies a location; it does not refresh fabric or determine whether an item is suitable to wear again.
8. Choose a folding valet when storage away is a real need

A purpose-designed folding stand can suit a guest room that changes use. Compare both its open footprint and its documented folded dimensions, then give the empty unit an appropriate stored position. The cited John Lewis folding model is a construction example currently marked unlikely to return to stock, not a promise of availability. Use the instructions for the actual folding unit selected.
9. Use a small integrated tray for the outfit's accessories

A designed tray can keep a watch or another small item with the clothing it accompanies. Keep the contents shallow and easy to see. Compare the tray's location with jacket sleeves and the way the garment is lifted off. A useful accessory position should not require reaching through several layers or adding a heavy decorative bowl to the stand.
10. Choose an integrated drawer for a quieter appearance

A modest drawer can conceal small accessories while the garments remain visible. Check its full opening movement with the stand loaded as intended. Zara Home's cited acacia design includes a lower shelf and drawer; that feature still needs useful access. Keep valuables and other items requiring secure storage appropriately stored rather than assuming a furniture drawer provides security.
11. Keep one shoe pair on an intended base shelf

A base designed for shoes can complete a prepared outfit without putting the pair in the walking route. Compare the shelf with the actual shoe length and the loaded stand's instructions. Keep the pair fully within the intended storage area. The cited Knight design includes a shoe-rack base, but a decorative crossbar on another stand should not be assumed to serve the same purpose.
12. Leave the lower frame open when shoe storage is unnecessary

An open lower area can keep the furniture visually simple and the surrounding floor easier to inspect. Retain every required brace and structural part. Choose this design when shoes already have a suitable home elsewhere instead of filling the empty area with another basket. A clear lower outline can be the feature that makes a small stand useful in the room.
13. Compare a simple metal outline in a visually busy room

A restrained metal stand can sit beside patterned bedding without introducing another broad textured surface. Look at its complete base, joints and intended hanging points. Choose a finish that relates to one existing room detail, then let the clothing remain the main changing element. A slim visual outline does not establish stability, weight capacity or resistance to tipping.
14. Relate a timber valet to the wardrobe's undertone

A wooden stand can connect the dressing area with existing furniture without matching an entire bedroom set. Compare a real finish sample with the wardrobe and floor. Keep the grain and outline simple when nearby furniture is already detailed. The material choice should come after the loaded footprint and garment supports have proved suitable.
15. Let a pale finish recede against a light wall

A pale valet can keep the furniture outline quiet when the clothing supplies enough color. Compare the finish with the actual wall in ordinary room light rather than expecting two whites to match from their names. Keep the feet visible enough to recognize the footprint. A subtle color relationship should support the dressing area without concealing where the object occupies floor space.
16. Use a darker stand as one deliberate furniture accent

A dark frame can relate to an existing mirror or dresser handle while the rest of the room stays light. Keep the silhouette legible against the clothing and background. Compare the loaded stand from the doorway before adding another dark storage object beside it. One clear accent may be enough to connect the dressing area visually.
17. Place the stand along the wardrobe's return route
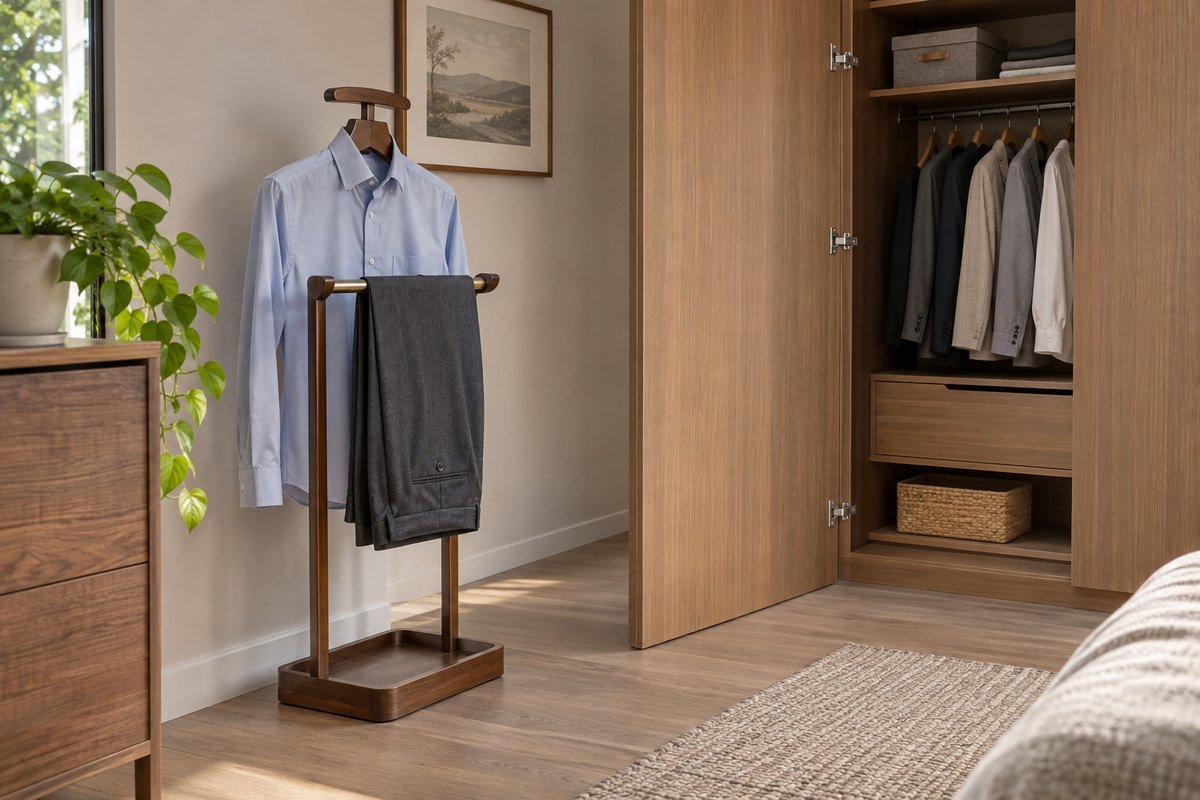
A valet near the wardrobe can make it easy to choose an outfit and return unused pieces. Keep the stand outside the full door and drawer movement, including clothing overhang. Try the sequence with the furniture in its ordinary state. If the wardrobe must stay partly closed to accommodate the valet, choose a smaller suitable stand or another location.
18. Check the bedroom door before using the space beside it

The wall near a door may look empty when the door is closed but be part of its full opening path. Mark the loaded stand's outline and open the door normally. Include sleeves and projecting rails. Choose another position if the arrangement depends on stopping the door early or catching garments behind it.
19. Keep the dresser's working space independent

A stand beside a dresser can support the same dressing task when both remain accessible. Open the drawers and compare the position from which clothes are removed. Include a person-sized working area in the plan rather than only the two closed furniture rectangles. Move the stand if it repeatedly blocks the drawer or becomes a place to balance unrelated storage.
20. Give two users separate modest clothing groups
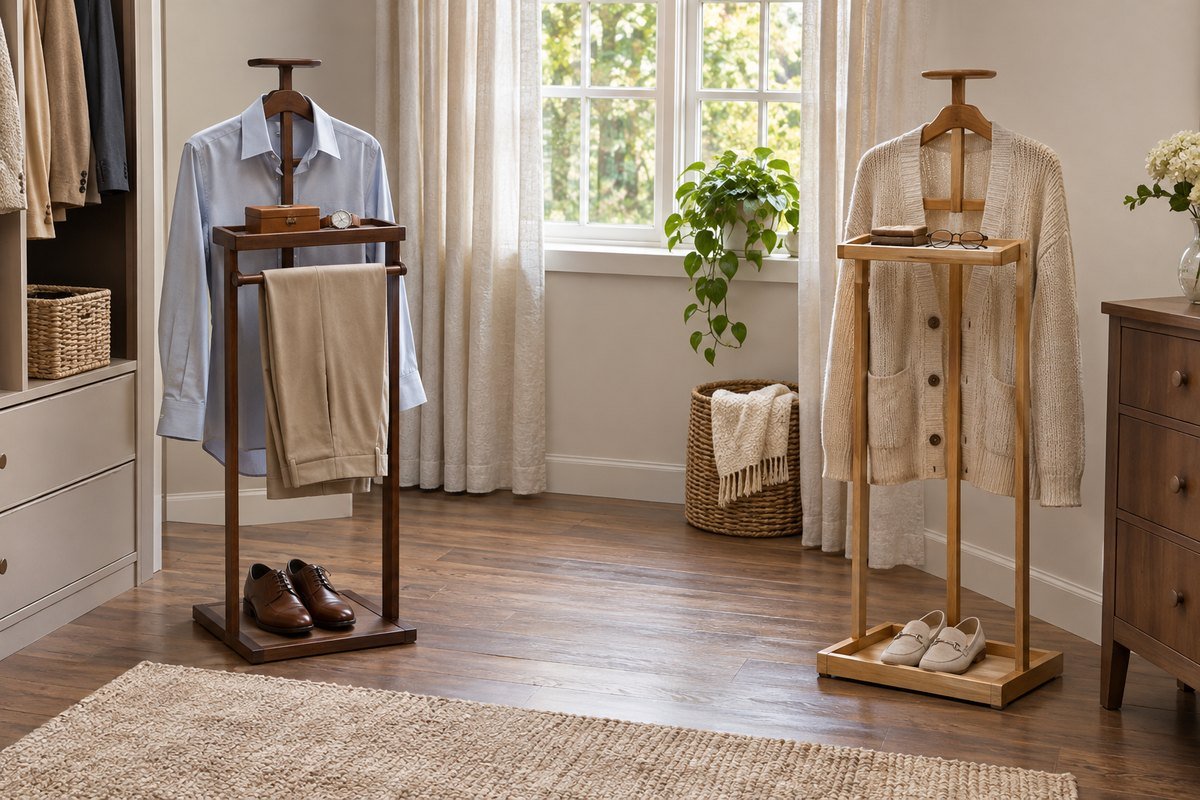
Two compact valets can clarify a shared dressing area when there is enough room for both loaded outlines. Choose each arrangement from its user's actual garments and routine. Connect the pair with one finish if helpful, while retaining separate retrieval space. A matching pair is optional when one person needs no stand or the room cannot accommodate the combined footprint.
21. Leave a guest valet ready for incoming clothes

An empty or nearly empty stand can give a visitor a useful temporary clothing position. Keep it assembled as intended and leave access to its hanging supports and any tray. Avoid filling it with decorative textiles that the guest must move first. A simple piece is especially useful when it provides a distinct service without taking away the room's clear route.
22. Finish with a clear clothing return rule

Choose what the stand is for and when the group leaves it: a prepared outfit is worn, an unused piece returns to suitable storage, and an item needing cleaning enters the appropriate laundry routine. Review the actual stand and finish as directed by its maker. When the collection grows beyond that purpose, clear the overflow before adding another storage feature.
Make a loaded-outline and return-route card
Draw the bare base and then a second outline showing the actual garments, extended bars and open drawer. Record the tallest and lowest hanging points and the space needed to lift each piece off. For a hypothetical 50-centimeter-wide stand, a garment that projects 5 centimeters beyond each side would create a 60-centimeter loaded width. That arithmetic does not prescribe a universal clearance or describe every jacket. Test the real clothing and leave the room's required routes and furniture access usable.
Compare the exact product information with this card. Zara Home's cited acacia model lists a 120-by-50-by-23-centimeter overall form, a central hanger, two trouser bars and a lower drawer. These are details of that model, not a universal valet size. Proman's Knight page describes useful features but lists inconsistent overall measurements in different parts of the same data sheet, so confirm its current dimensions directly before using them in a room plan. Keep product instructions, garment requirements and the return rule together rather than choosing from an attractive bare-stand photograph.
A practical next step
Choose a clothes valet around a small defined clothing group, its actual supports and the loaded room footprint. Then decide which finish and optional details improve that routine. A clear return rule keeps a useful dressing aid from becoming another permanent pile.
For the surrounding room, bedroom wardrobe ideas for the main clothing storage. Bedroom laundry hampers with a separate collection routine.
The images are original AI-generated design concepts, not photographs of tested products or verified installations.
Sources and care references
- Zara Home: acacia valet 7569/077/700 features and overall dimensions
- Proman Products: Knight valet features; confirm inconsistent dimension entries before purchase
- John Lewis: folding valet construction reference; page currently marks future stock unlikely
Optional digital guide for this topic
If you prefer a structured workbook, explore this related paid guide.