The best food storage container organization ideas solve two everyday problems: finding the right base and finding its lid. Begin with the clean, empty containers your household actually uses. Then choose a layout that keeps a usable pair easy to retrieve and just as easy to return after washing.
These 25 arrangements cover deep drawers, shallow drawers and cabinet shelves. Choose a few that fit your collection rather than building a compartment for every possible size. This guide concerns storing empty containers; follow the food and container instructions separately when filling, chilling or reheating them.
Contents
- 1. Make one matched-set starting group
- 2. Nest bases in short groups by footprint
- 3. Stand flat lids in a divided rack
- 4. Lay lids in one shallow drawer layer
- 5. Use adjustable pegs in a deep drawer
- 6. Keep a few complete sets closed
- 7. Use a designed lid-to-base connection where available
- 8. Give large containers their own wide bay
- 9. Collect tiny condiment pots in a removable bin
- 10. Keep a lunch kit as a working group
- 11. Separate bulky lids from flat ones
- 12. Store heavy glass at a comfortable lifting level
- 13. Give lightweight plastic bases a contained section
- 14. Use a pull-forward group in a deep cabinet
- 15. Keep round containers in their own section
- 16. Make one carry-out box for a small kitchen
- 17. Give spare seals a model-specific compartment
- 18. Separate the drying area from finished storage
- 19. Put everyday sizes nearest the opening
- 20. Move occasional entertaining containers to a reserve shelf
- 21. Keep measurement markings easy to inspect
- 22. Leave space for fingers around each group
- 23. Check the drawer with every lid and clip in place
- 24. Set aside unpaired pieces for one clear decision
- 25. Keep a return slot for the containers currently in use
Match the collection before organizing the cabinet
Lay out the dry bases and lids, check which pieces belong together and inspect their condition. Rubbermaid's glass-container instructions call for bases and lids to dry completely before storage and for damaged glass to be taken out of use. Read the directions for your own products. Similar-looking lids are not proof of compatibility, and an organizer cannot make a damaged container usable. Measure the cabinet opening and usable drawer height with the tallest proposed stack in place.
Choose an arrangement that fits your situation
- Several flat lids are hard to distinguish: Compare a divided upright rack with a single shallow layer
- The cabinet is deep: Try one manageable pull-forward working group
- Only a few complete boxes are used daily: Compare dry closed sets with nesting
- Large party containers crowd the drawer: Keep an identifiable reserve on another suitable shelf
- Pieces fit until everything is washed: Plan for the complete collection and leave return spaces
1. Make one matched-set starting group

Begin with the containers used during an ordinary week. Match each lid to its base before deciding where either part belongs. Put the working group together on one clear shelf or drawer section. A small complete collection is easier to plan around than a mixed pile that still includes unpaired pieces.
2. Nest bases in short groups by footprint

Group containers that genuinely nest without forcing their rims together. Keep each group short enough to lift the size used most often. A narrow stack of small lunch boxes can sit beside a separate larger stack. Avoid using every available inch of height if the bottom container becomes awkward to remove.
3. Stand flat lids in a divided rack

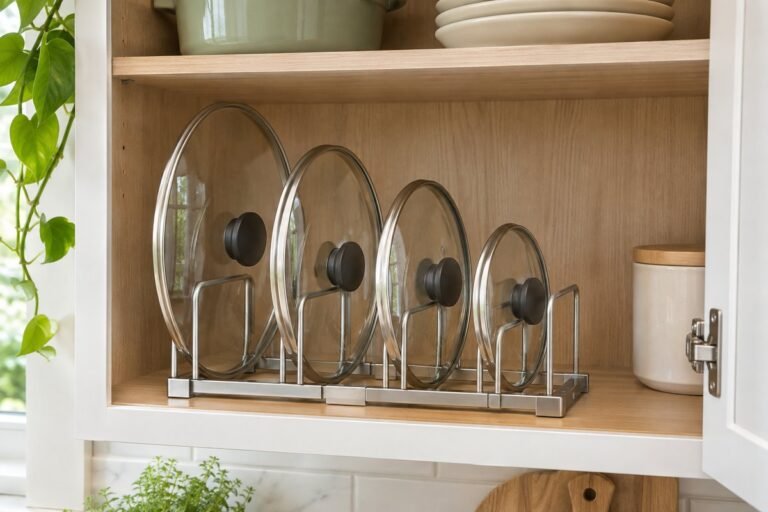
A vertical rack can make the outline of each lid visible. Set the dividers for the actual thickness of the lids, including clips and raised edges. Leave enough space to grasp one without pulling several along with it. Keep unusually domed lids elsewhere when they make the whole row lean.
4. Lay lids in one shallow drawer layer

For a small collection of broad, flat lids, a single visible layer may be simpler than a rack. Use shallow dividers to stop them sliding under neighboring tools. Keep the lids facing the same way so their sizes are easy to compare. This works best when the collection fits without overlapping several layers.
5. Use adjustable pegs in a deep drawer

Repositionable pegs can separate short container stacks and upright lids without committing to fixed compartment sizes. IKEA's cited UPPDATERA system is one product example; compare its actual dimensions with your drawer. Keep the pegs outside the grasping route, and leave room for the tallest lid to clear the cabinet when the drawer closes.
6. Keep a few complete sets closed

If there are only a few frequently used boxes, storing each with its own lid can remove the matching step entirely. Use this arrangement only after the pieces are completely dry and where the product instructions permit it. Compare the occupied space with nesting before deciding; convenience may justify a little extra room for the daily group.
7. Use a designed lid-to-base connection where available

Some systems are made to connect lids to the underside of bases or to other lids. Rubbermaid's Easy Find Lids instructions describe that feature for its own range. Check the exact system rather than trying to snap unrelated products together. Keep the joined group low enough that the connection does not obstruct retrieval.
8. Give large containers their own wide bay

A large salad box can dominate a drawer of smaller pieces. Reserve one wider position that accepts its full footprint, with the lid beside it or paired as appropriate. Let the everyday small containers keep a separate area. This avoids rebuilding the entire collection whenever the largest base comes out.
9. Collect tiny condiment pots in a removable bin

Small pots and their lids are easy to lose beneath larger boxes. Gather them in one shallow removable bin and keep the quantity suited to actual lunches or snacks. Use a second small compartment for their lids if necessary. The whole group should come forward without pouring loose parts into the drawer.
10. Keep a lunch kit as a working group

Store the main lunch container, its small inserts and the relevant lids in adjacent positions. Leave unrelated food boxes out of this group. Someone packing a lunch can then retrieve a complete combination without visiting several shelves. Review the arrangement when the household changes which lunch kit it uses.
11. Separate bulky lids from flat ones

A domed lid or large locking clip needs more depth than a plain flat lid. Give these shapes a wider compartment rather than forcing them into the narrow row. Keep their matching bases nearby. A layout based on the physical shape will usually be easier to return than one based only on capacity markings.
12. Store heavy glass at a comfortable lifting level

Choose a location where the whole base can be supported with your hands as it comes out. Keep stacks modest and avoid placing a heavy reserve above the regular grasping position. A low shelf or sturdy drawer may work better than a high cupboard. Follow the cabinet and organizer loading limits for the actual collection.
13. Give lightweight plastic bases a contained section

Light containers can slide into neighboring objects when the drawer moves. A small open bin or fitted divider can keep them together without requiring a lid on the organizer itself. Nest only compatible shapes and leave the top edge easy to grasp. Keep the section separate from the heavier glass group.
14. Use a pull-forward group in a deep cabinet

A removable bin can bring the rear collection toward the opening. Test its loaded weight and complete removal route before adopting it. Keep the contents low enough that a lid does not catch on the shelf above. Choose a smaller working group if reaching the back requires lifting an awkward full crate.
15. Keep round containers in their own section

Round bases and lids often waste space when interspersed with rectangular groups. Arrange them together, then compare the remaining cabinet area with the rectangular collection. Use a divider only where pieces actually drift. You may need two differently shaped zones rather than a uniform set of square organizer bins.
16. Make one carry-out box for a small kitchen

When there is no dedicated drawer, a modest open box can hold the complete working collection on a shelf. Separate bases from lids inside it and keep the handles accessible. Take the box to the preparation counter when needed, then return it empty of food and with the clean pieces in their assigned positions.
17. Give spare seals a model-specific compartment

If a product includes removable seals or spare parts, keep the clean, dry parts together with their model information. A small labeled compartment is more useful than a loose mixed bag of nearly identical rings. Follow the manufacturer instructions for removal and refitting. Do not treat a similar diameter as evidence that a seal is the correct replacement.
18. Separate the drying area from finished storage

A cabinet should receive pieces that have finished drying, not become the place where damp stacks are hidden. Leave an appropriate drying position near the washing area and return the completed sets later. This keeps the main storage arrangement available for immediate use without making the reader dismantle a wet nested pile.
19. Put everyday sizes nearest the opening

Place the size used for regular leftovers or packed lunches at the front. Move the less-used size behind or beside it where it remains identifiable. This is especially helpful when a cabinet is too deep for every piece to occupy the front edge. Change the order when the household's routine changes.
20. Move occasional entertaining containers to a reserve shelf

Keep oversized party boxes or seasonal pieces outside the daily drawer when they are rarely used. Store them clean and dry with their matching lids in a known location. Leave the most reachable area for the collection needed throughout the week. An occasional shelf should reduce the daily workload rather than hide forgotten duplicates.
21. Keep measurement markings easy to inspect

When choosing a container depends on capacity or care information, orient the pieces so the relevant markings are accessible. Avoid covering them with decorative stickers. Make a simple matching note if a lid family is difficult to distinguish, but retain the product's own information. The storage label should help identify a piece without replacing its instructions.
22. Leave space for fingers around each group

A stack may fit perfectly on paper while leaving no place to hold the bottom piece. Allow room at the sides or front for a comfortable grip. Test the arrangement with the complete container rather than measuring the base alone. Remove one redundant stack when the only retrieval method is to tip the neighbors.
23. Check the drawer with every lid and clip in place

Measure and test the tallest final arrangement, including any raised clips, lid handles and organizer edges. Close the drawer gently during the trial. A container that clears with its lid removed may catch when returned as a complete set. Lower the stack or change its position before relying on the layout.
24. Set aside unpaired pieces for one clear decision

Use a temporary review position for a lid or base whose partner is missing. Check the drying rack and other storage areas before deciding whether it still belongs in the collection. Keep that position small and time-limited. Follow local disposal or reuse guidance for unwanted pieces rather than assuming every material goes into the same recycling stream.
25. Keep a return slot for the containers currently in use

Leave the arrangement readable when a few boxes are holding food elsewhere. A small empty space shows where the clean pieces return, instead of inviting unrelated items into the gap. If the drawer becomes crowded only after everything is washed, plan it with the full collection rather than its temporarily reduced contents.
Make a matching-set inventory in five columns
Record the container family, useful sizes, matching lid shape, complete quantity and storage position. For example, a household might record three medium lunch boxes with square clip lids in the front drawer and one large round box with its lid on the reserve shelf. This is a planning example, not a suggested minimum collection. Add a separate note for a missing partner instead of counting that piece as a usable set. Test the layout through one wash-and-return cycle before buying more dividers. If the same lid repeatedly goes into the wrong section, change the grouping or make its identifier clearer.
A practical next step
Start by matching what you already own. Give the everyday complete sets the easiest positions, separate lids according to their shape and test the return after washing. Keep the system simple enough that the next person can put a clean container away without reorganizing the drawer.
For the surrounding room, plan the surrounding kitchen drawers by task. give pantry storage a clear working layout.
The images are original AI-generated design concepts, not photographs of tested products or verified installations.
Sources and care references
- Rubbermaid: glass food-container care and storage instructions
- Rubbermaid: Easy Find Lids system instructions
- IKEA UPPDATERA: an adjustable drawer-peg organizer example
Optional digital guide for this topic
If you prefer a structured workbook, explore this related paid guide.