Mailbox landscaping ideas work best when planting stays secondary to a visible, accessible mailbox. A small lawn-side bed, a few suitable low plants and a clear collection route can create a cared-for entry without filling every inch around the post. Start with the existing approved delivery position and the actual space available.
These 23 concepts focus on planting and maintenance around an existing mailbox. They do not replace postal installation guidance, roadside requirements or a site assessment. Use the plant shapes as design inspiration, then confirm the exact selections for your region, exposure and mature space.
Contents
- 1. Curve a small bed toward the lawn
- 2. Use an asymmetrical wedge for an awkward corner
- 3. Keep a narrow strip simple and linear
- 4. Make a small island readable from the house
- 5. Repeat one plant from the main garden
- 6. Limit flower colors for a calmer small bed
- 7. Use foliage contrast where bloom is brief
- 8. Give short ornamental grasses room to stay separate
- 9. Build a locally appropriate native plant pocket
- 10. Use a quiet shade composition under existing cover
- 11. Treat a hot exposed position as its own site
- 12. Keep delicate planting beyond the snow-storage area
- 13. Add a restrained spring bulb layer
- 14. Reserve one reachable pocket for seasonal annuals
- 15. Retain a little seasonal structure farther into the yard
- 16. Use a groundcover only where its spread can be managed
- 17. Choose a modest mowing boundary
- 18. Keep a practical route for collecting the mail
- 19. Place a movable accent farther into the yard
- 20. Coordinate shared planting without joining the mailboxes
- 21. Follow a gentle existing grade with low planting
- 22. Echo a nearby driveway border without closing the view
- 23. Begin with a small trial section
Start mailbox landscaping ideas with the space that must remain clear
USPS says the carrier must have a clear path to the mailbox and recommends keeping that route clear during regular maintenance. Draw the door operation, identification, delivery approach and your collection route before placing plants. Check permission for roadside work, and contact the relevant 811 center before digging in the United States, following its response and waiting instructions.
Choose the planting approach from the real constraint
- A tiny lawn-side patch: Use a limited low planting and a clear access gap.
- An exposed sunny position: Select identified plants for the actual soil and water access.
- Seasonal snow or salt exposure: Observe the storage and splash area before planting.
- A shared mailbox area: Agree on permission and care before coordinating a bed.
- Limited maintenance time: Begin with a small trial rather than a large island.
1. Curve a small bed toward the lawn

A crescent gives the planting a defined outline without wrapping the delivery approach in flowers. Draw its curve on the lawn side of the existing mailbox, then check the mature outline of the plants. Keep the opening, identification and the approved approach clear. The shape can stay small enough to weed from the grass rather than becoming an oversized island.
Try this: Trace the proposed curve from both the house and the collection route.
2. Use an asymmetrical wedge for an awkward corner
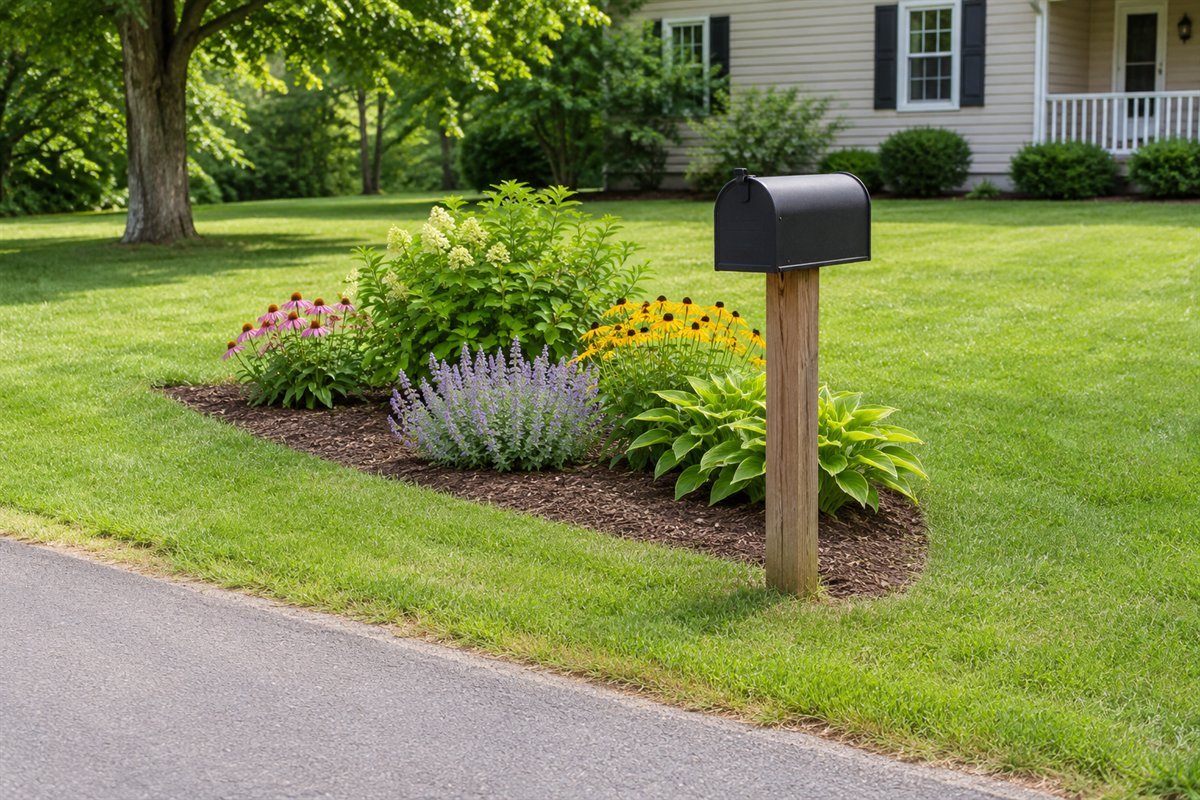
An uneven patch does not need a perfectly circular bed. A wedge can fit a lawn corner while leaving the working side open. Put the visual weight toward the yard and taper the planting where access is tight. Avoid filling a leftover corner until you have confirmed ownership, roadside restrictions and the space needed for normal maintenance.
Try this: Mark the narrow tip first and remove it if it cannot hold an appropriate plant.
3. Keep a narrow strip simple and linear

A narrow space benefits from a limited plant selection and a clear line. Choose plants whose mature width suits the strip instead of relying on repeated trimming to force a large shrub into it. Let the border run back into the yard so it reads as part of the garden. The planting should not extend into the delivery or pedestrian route.
Try this: Compare mature plant width with the narrowest usable part of the strip.
4. Make a small island readable from the house

A small island can be useful when the mailbox stands away from other beds. Keep its size related to the viewing distance and the amount of care you can provide. An open side near the box can connect the island to the collection route. Avoid making a continuous ring that leaves no comfortable way to reach the mail or inspect the post.
Try this: Sketch the access gap before drawing the rest of the oval.
5. Repeat one plant from the main garden

A repeated plant or foliage color can connect the mailbox area to the house. Choose a selection that also suits the roadside exposure; the front border may have different soil, moisture or shade. Repeat the visual idea rather than moving a plant simply because it already appears elsewhere. This gives the small bed a relationship with the larger landscape.
Try this: Identify one suitable repeat before buying a mixed collection.
6. Limit flower colors for a calmer small bed

Two or three flower colors are often easier to organize in a small patch than many unrelated accents. Look at the mailbox finish, nearby house materials and the larger garden when choosing the palette. Keep enough foliage and open space for the arrangement to remain readable between blooms. Color does not replace the need for suitable mature dimensions.
Try this: Compare the proposed colors in the real daylight at the site.
7. Use foliage contrast where bloom is brief
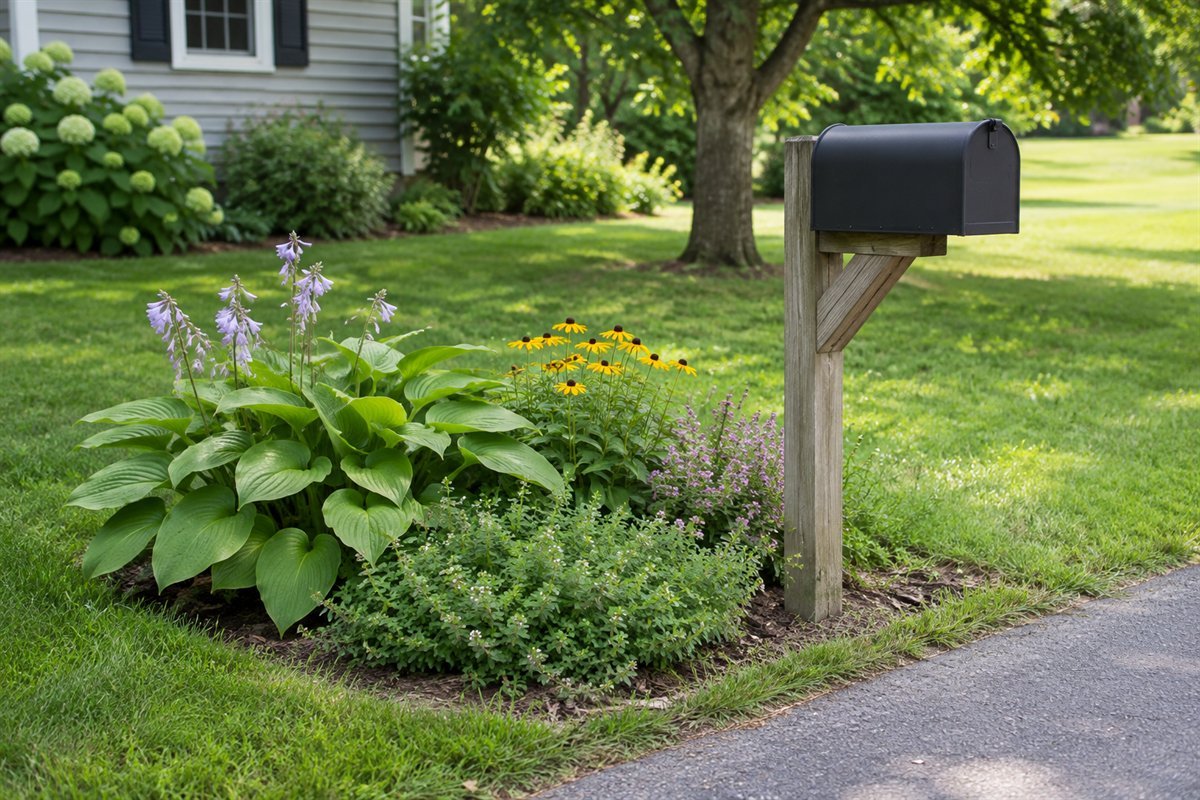
Foliage can hold the composition together when flowers are absent. Contrast a few leaf sizes or tones while keeping the overall planting low enough for the actual setting. Check that the selected plants share compatible conditions. An image can suggest a texture combination, but the exact identities and local suitability need to be confirmed before purchase.
Try this: View the plant list without its flowers and see whether the design still makes sense.
8. Give short ornamental grasses room to stay separate

A few small grass clumps can add a different outline without creating a tall roadside screen. Verify mature height, spread, regional suitability and whether a selection spreads aggressively. Keep arching foliage away from the door and access route. Avoid treating a plant sold as compact as proof that it will fit every narrow mailbox bed.
Try this: Include the full arch of the leaves in the spacing sketch.
9. Build a locally appropriate native plant pocket
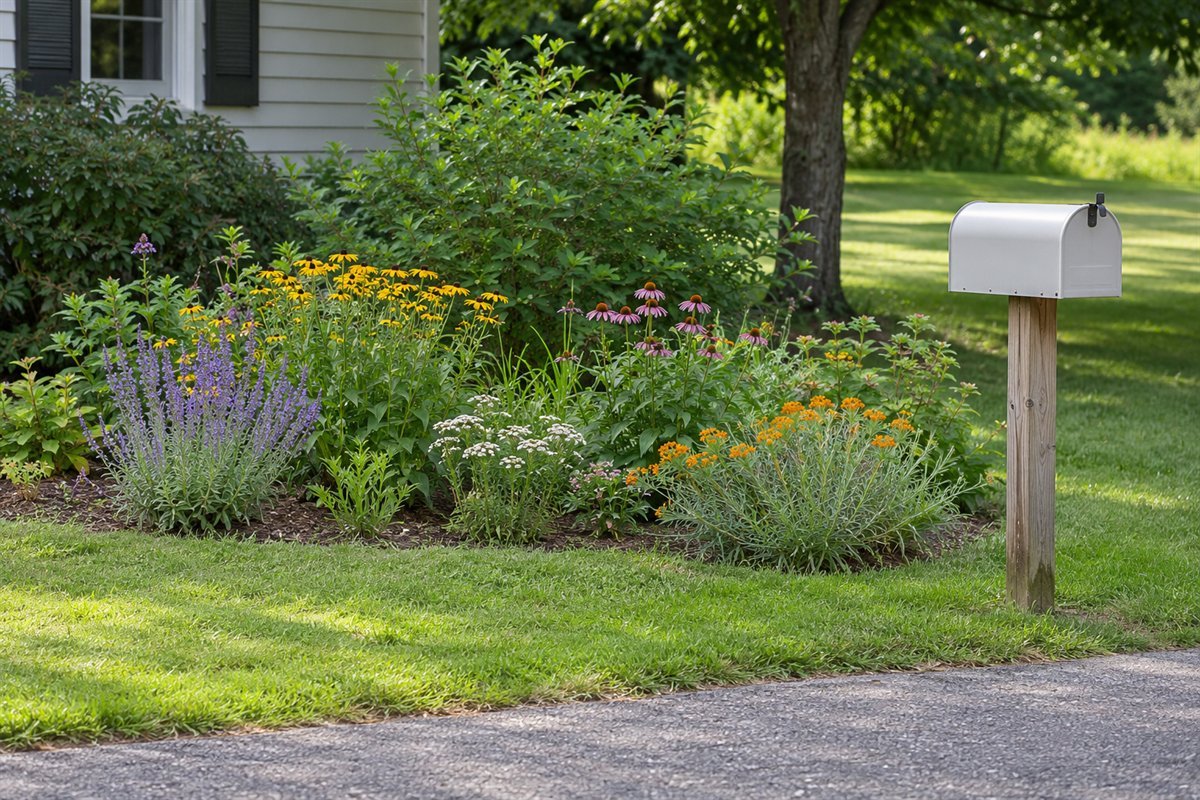
A small native planting can connect the entry to the regional landscape when the plants fit the actual site. Ask a local extension or reputable regional nursery for identified, appropriately sized choices. Native to a broad country is not the same as suitable for this exposure. Keep the delivery area clear and place the more active flowering group toward the yard.
Try this: Record the region, exact plant name and expected mature size together.
10. Use a quiet shade composition under existing cover

A shaded mailbox area needs plants selected for the real light rather than a sunny flower-bed recipe. Observe how the canopy changes through the year. Keep the layout modest near existing roots and obtain suitable advice before disturbing them. A few compatible foliage plants may be more manageable than trying to maintain a bright summer display in unsuitable shade.
Try this: Observe the position at several times of day before selecting plants.
11. Treat a hot exposed position as its own site

An exposed roadside patch can behave differently from a protected border. Check the soil, reflected heat, rainfall and practical watering access before selecting plants. Plants described as drought tolerant still need appropriate establishment and care. Choose a small, suitable palette rather than promising a maintenance-free bed from a photograph of gravel and sun-loving foliage.
Try this: Write down how water will reach the new plants during establishment.
12. Keep delicate planting beyond the snow-storage area

Where snow is cleared or de-icing products are used, identify the storage and splash area before planting. Iowa State notes that soluble salts can harm plants and that sensitivity varies. Do not choose a plant from a general tolerance list without considering the actual exposure. Moving the ornamental patch farther into usable yard space may be more practical than repeatedly replacing damaged plants.
Try this: Photograph the winter snow-storage pattern before planning a permanent bed.
13. Add a restrained spring bulb layer

Bulbs can provide a brief early display without determining the whole bed. Select locally appropriate plants and plan for the foliage that remains after flowering. Keep the normal care route open during that period. Use the seasonal layer within a simple permanent outline so the area does not look abandoned when the flowers finish.
Try this: Include the after-flowering view on the seasonal sketch.
14. Reserve one reachable pocket for seasonal annuals

One annual pocket lets you change a small area without disturbing the entire planting. Place it where routine watering and replacement are realistic. Compare the effort with the size of the permanent bed before expanding the seasonal section. Keep annual growth within the planned outline, especially where it could lean into the mailbox opening later in the season.
Try this: Start with the number of plants you can comfortably maintain during a busy week.
15. Retain a little seasonal structure farther into the yard

A few short seed heads or durable foliage shapes can keep the bed legible beyond peak bloom. Leave them only where their height, spread and condition suit the location. Remove material that leans into service or walking space. The aim is a cared-for seasonal outline rather than preserving every stem regardless of the practical consequences.
Try this: Review the bed after wind or snow changes the plant shapes.
16. Use a groundcover only where its spread can be managed

A groundcover can make a small bed visually continuous, but spreading growth still needs inspection. Confirm the exact plant and local guidance, including invasiveness concerns. Keep the edge accessible and prevent stems from concealing the post base or crossing the route. If the usable strip is very small, a few separate plants may be easier to manage.
Try this: Decide how the boundary will be maintained before choosing the groundcover.
17. Choose a modest mowing boundary

A clear boundary can make the small bed easier to mow around. Choose an appropriate detail for the actual site and equipment, keeping raised obstacles out of roadside and walking space. A design picture does not establish the suitability of an edging installation. Keep the line simple enough to maintain without repeatedly pushing equipment against the mailbox support.
Try this: Walk the mower route around the empty proposed outline.
18. Keep a practical route for collecting the mail

Plan the collection route from the house before filling the surrounding ground. The route should remain useful when foliage is wet or plants have reached mature size. Consider local surface and accessibility needs rather than assuming that decorative stepping stones solve every situation. Keep the route clear through ordinary seasonal maintenance and snow handling where relevant.
Try this: Carry the usual mail-sized items along the proposed route before planting.
19. Place a movable accent farther into the yard

A movable container can add color where permanent planting is unsuitable, provided its position is allowed and does not create an obstruction. Put it farther into the yard, not in the delivery approach or a traffic sightline. Assess the filled weight, stability, drainage and routine watering. A container is an alternative design element, not an exemption from access requirements.
Try this: Test the intended location with an empty vessel before filling it.
20. Coordinate shared planting without joining the mailboxes

Where neighboring mailboxes stand near one another, a coordinated low planting can look calmer than several competing tiny beds. Agree on ownership and care responsibilities before changing shared-looking space. Confirm local postal and roadside requirements rather than moving or joining the boxes for symmetry. Keep each box accessible and the identification visible throughout the growing season.
Try this: Write down who waters, trims and handles seasonal cleanup.
21. Follow a gentle existing grade with low planting

A gentle slope can be reflected in the planting outline without turning the area into a retaining-wall project. Assess the existing soil and water movement before proceeding. Do not mound soil against the support or redirect runoff toward the road, path or neighboring land. A significant slope or drainage problem needs appropriate site advice beyond a decorative planting concept.
Try this: Observe the area during rainfall before choosing the bed edge.
22. Echo a nearby driveway border without closing the view

If a driveway border is nearby, repeat a restrained color or plant group while keeping the entrance view open. A continuous tall hedge is not necessary to connect the two areas visually. Assess the real sightlines and local roadside requirements. Mature growth, rather than nursery size, should determine whether a plant belongs near the junction.
Try this: Check the view from the actual driveway approach before adding height.
23. Begin with a small trial section

A trial patch reveals how much watering, trimming and access the position really requires. Keep the outline simple and record plant identities and seasonal observations. Expand only if the planting remains suitable and does not interfere with mail service or ordinary yard care. Leaving part of the area as maintained grass is a reasonable finished choice, not a design failure.
Try this: Compare the trial after one demanding season before buying more plants.
A mailbox planting plan to complete before buying
First, sketch the existing mailbox and all the space used to reach, open and maintain it. Mark the carrier approach separately from your own walking route. Add the house-number view and the sightlines near a driveway. Keep the working mailbox position fixed unless an appropriate change has been approved. For installation measurements, use the linked mailbox placement guide and current USPS instructions rather than a garden photograph.
Next, establish what ground you may change. A lawn that appears private can adjoin a right-of-way, utilities or shared space. Confirm the applicable permission and local restrictions. In the United States, request utility locating through the appropriate 811 center before digging and follow the required response process. A shallow flower bed is still a digging project.
Record the plant conditions at the exact position: seasonal light, soil, moisture, reflected heat, snow storage and possible de-icing splash. Iowa State explains that salt sensitivity varies among plants. A broad tolerance label is not a complete planting recommendation, and this guide does not prescribe a soil amendment or a universal treatment for salt damage.
For every proposed plant, list its exact identity, expected mature dimensions and care needs. Sketch that mature outline rather than the size of the nursery pot. Keep the design low and open where the actual access and view demand it. Put plants with awkward reaching, trimming or seasonal replacement needs somewhere easier to care for.
Finally, assign a realistic maintenance routine. Check that foliage, fallen stems, containers and seasonal snow remain out of the required routes. Inspect the mailbox hardware and identification as well as the planting. A small bed that remains clear and cared for is more useful than an elaborate display that depends on constant correction.
Can flowers surround the entire mailbox post?
Only where the actual approved access, collection route and maintenance needs remain clear. A deliberate open gap may be more practical than a complete ring of plants.
Is there one ideal plant for every mailbox garden?
No. Use identified plants suited to the local climate, exposure, soil and mature space. Snow handling, salt exposure and watering access can change the choice.
Does a landscaping photo prove postal compliance?
No. Confirm the actual mailbox position and access with current USPS and local guidance. The images here illustrate planting compositions, not approved installations.
A practical next step
Choose mailbox landscaping ideas from the usable lawn-side space and the care you can provide. Keep the mail service, identification and collection route clear, trial a small suitable planting and expand only when it works through ordinary seasonal use.
USPS mailbox height and placement checks before changing the box. Garden edging ideas for choosing a manageable planting boundary.
Images are original AI-generated planting concepts. They do not establish postal approval, utility clearance, exact plant identity or suitability for a particular roadside.
Sources and care references
- USPS: mailbox access and regular maintenance
- Iowa State Extension: salt exposure and differing plant sensitivity
- Common Ground Alliance 811: the process before digging
Optional digital guide for this topic
If you prefer a structured workbook, explore this related paid guide.